
The best way to understand Amazon is through numbers. In 2018 Amazon generated an estimated $258.22 billion in US retail e-commerce sales, marking а 30% increase compared to 2017.
To put Amazon’s size in perspective – the online shopping juggernaut captures 49.1% of the online retail market and 5% of the whole (online and offline) US retail market. The Amazon marketplace alone accounts for $175 billion, and 50% of the total sales on Amazon’s US marketplace come from third-party sellers. So, yes, the cake is big enough and it's increasingly getting bigger every year.
But, what about the size of your slice?
Well, you’ll have to share the $87.5 billion with more than 6 million third-party sellers in total. This number might be discouraging at first glance but, luckily for you, it isn't reflective of the actual competition you're going to face. The count of active sellers – that is sellers with a product listing, not just people with registered Amazon seller accounts – is roughly 2.15 million. Only a quarter of them (~570,000 sellers) have at least one review a month on their listing. Realistically, it is only those sellers that you need to concern yourself with.
How much do these active sellers (with at least one listing review a month) make? A quarter (or 140,000) of them have a revenue of more than $100,000 a year, and 20,000 have a revenue bigger than $1 million a year. According to another source, 12% of all active sellers have an annual business revenue between $250,000 and $500,000, 9% between $500,000 and $1 million, and 8% between 1 and $2 million.
However, it's profit margins that pay the bills and not revenue. About 75% of Amazon sellers are using Amazon FBA – which is the main reason why this is an Amazon FBA guide – and their profit margins average somewhere between 20-30%. For one-fifth of FBA-dominant sellers, this number goes as high as 32-50%.
By now you've probably grasped the sheer magnitude of the Amazon marketplace. There is definitely enough money in it for everyone that is willing to work for it so, with that in mind, let's explore the Amazon FBA model in detail, with all of its pros and cons.
How to Setup an Amazon Seller Account
One of the most important things you’ll need to do when you decide to begin selling on Amazon, is to choose your professional seller account. Unlike opening your own eCommerce store, selling through Amazon allows you to choose from different kinds of seller options. The first option is the Individual Seller account, and the second is the professional seller Amazon account.
As you might expect, the professional option for your Amazon business comes with access to more functionality. Like similar buy box strategies, an Amazon seller account charges a unit fee for each item sold. On the other hand, a professional seller account charges a monthly subscription fee. If you’re looking to sell items across a range of product categories and you’re not sure exactly how much you’re going to sell in any month, then a professional account makes more sense.
You can sell products from as many product pages as you like with the Amazon business account, and the price of your package doesn’t go up.
Having an Amazon account from the “professional” package is a lot like having your own eCommerce system, with your own UPC and shipping options. The business selling plan also comes with access to things like Amazon prime, and reporting features to track your Amazon selling.
To establish either plan, you’ll need to go to the Amazon Central environment for Sellers
Setting Up Your Amazon Selling Plan
The good news is that setting up an individual or professional seller account doesn’t take much time or effort. You’ll be done within about 10 minutes. However, it’s important to be prepared and have your EIN at hand, or your social security number.
Amazon will ask you various questions about things like shipping service, and the kind of Amazon charges you’re going to be issuing. You’ll also need to provide answers to questions about your tax situation, to ensure that everything will be set up legally for your new online business.
After you’ve answered all of the questions, and you’ve completed the survey provided by Amazon, then you’ll have finished setting up your account, and you’ll be able to begin selling products. Remember, while you’re setting up, it’s worth checking out Amazon’s fulfillment options to make sure that you have the right shipping service in place.
Order Fulfilment with Amazon
Amazon gives you the option to either use their FBA products, or handle the act of shipping products with your professional account on your own. Although both options can work well depending on the kind of business that you run, it’s worth noting that the FBA program is likely to get you better product reviews and happier customers overall.
The biggest benefit of fulfilling your orders on your own is that new sellers can benefit from low postage prices using the approved carriers available from Amazon. When a customer gets a new item from you, you’ll be able to deliver whatever they ordered by printing a postage label from your Amazon account. You can also choose to use your preferred postage label and carrier.
The self-fulfillment option used to be the only way to start selling on Amazon in the past. However, now that Amazon offers an alternative fulfillment choice, it’s a much more compelling alternative to having your own website. For instance, With Amazon Fulfillment, all you really need to do to start running a great business is to highlight your product features in a product description, choose a product title, add some pictures and start attracting customers.
This takes a lot of the hassle out of running typical online retail stores. Benefits include:
- The ability to choose next-day Amazon Prime shipping
- The option to scale your business by outsourcing everything from warehousing to packing and shipping.
- Access to the 24/7 award winning customer service delivered by Amazon
- Easy business automation so you can work on your business.
Remember, to add FBA services into your seller account, you’ll need to register first.
The Amazon FBA Process Explained
Image credits: Matt Chalwell
Amazon FBA literally means Amazon Fulfilled-by-Amazon. From the perspective of an Amazon FBA third-party seller, this e-commerce business model is simple: first, you send your products in an Amazon warehouse a.k.a fulfillment center, then your products get sorted and inventoried by Amazon workers – only to be picked from their place on the shelves when a customer makes an order, packed into a box and shipped to the customer’s doorstep. The whole process is automated and taken care of by Amazon; all you have to do is ship the product to them, create a listing, keep the product in stock and take care of the marketing and promotion side of things.
At this point you must be thinking “just ship the product to Amazon and let them take over from there” sounds too good to be true; if it were that easy, everyone would be doing it. And you’re right! Here’s the catch: in order to reap the benefits that the Amazon FBA service has in store for you as a third-party seller, you first need to find or create a product that sells. This is the hardest part about Amazon FBA. This is where your entrepreneurial spirit and resilience really need to shine through and set you apart from your competition.
But let’s not get ahead of ourselves. Before we get into all of that, we first need to analyze (a) why you should sell your product on Amazon in the first place, and (b) what are the good and bad sides of building an Amazon FBA business. Yes, you read that right – a business. Amazon FBA is not a side hustle, it’s a business. If you want to make some real money anyway.
The pros
- Scalability – Even though this list is not sorted by importance, scalability is deliberately our number one pro because it may very well be Amazon’s biggest strength. There’s virtually no limit to how much you can grow your business on Amazon and, consequently, to how much money you can make. The market is ginormous. Leverage that to your own benefit.
- Convenience – The reason why all the online gurus trying to sell you overpriced FBA courses are able to push Amazon FBA as something you can do in your spare time is this – Amazon FBA is indeed very convenient.
Amazon takes care of the market, the storing, packing, shipping and even the customer support, which leaves you with lots of time to focus on sourcing and developing your products, and growing your business. You can also integrate FBA with your Shopify or personal web store and take advantage of the various prime delivery options available to prime Amazon members. - Low barrier to entry – If you have a US bank account, valid ID/passport and a few hundred dollars (more on that later) you can launch your Amazon.com FBA business as a non-resident US alien from almost anywhere in the world. The low barrier to entry also means more competition, which is one of the main reasons why selling on Amazon is a lot harder now than it used to be just two or three years ago. This is just one more reason to finish reading this whole guide and do further research on your own on every section we’ve outlined.
- Massive exposure – Again this is “just a perk” of the market dominance and the sheer size of Amazon. Because of how big it is, the site is quickly becoming one of the largest search engines on the Internet as progressively more people skip Google and go on Amazon first when they’re looking for something to buy. Even when you search Google for products you want to buy, guess who pops up first? That’s right, Amazon. They do all of the hard work getting shoppers to their site, while you get to sell your products to them. For a considerable fee, of course.
The Cons
- Dependency – Even if you manage to get to a seven-figure monthly revenue, don’t get it twisted – you’re just a guest on Amazon’s platform. Amazon is the great white shark and you’re the pilot fish. This is not Shopify; you don’t own your store, Amazon does. And if they decide to kick you out for whatever reason – you’re done. This is by far the biggest problem Amazon FBA sellers are facing. Even if you try to diversify and create your own Shopify/Bigcommerce store, realistically most of your income will still come from Amazon. It’s terrifying if you think about it in this manner but, it is what it is.
- Horrible seller support – Amazon is growing so fast it can barely keep up with itself. The Fulfillment by Amazon subreddit (great learning source, for the record) is filled with Amazon seller support horror stories. If the A10 algorithm messes up, or if you face any technical problems with your seller account for whatever reason, you’re at the mercy of the underpaid third-world-country customer support guy. Good luck.
- Unfair competition – Amazon FBA is a dirty business. Plain and simple. If you break any of Amazon’s TOS you’ll get instantly banned, and getting yourself out of that mess is… Well, read the bullet above. Even though playing by the rules is the safest option – playing safe is, ironically, still somewhat risky. Sellers willing to play dirty will hijack your listing, one-star your products and fake/buy their 5-star reviews, buy and break your product only to ask for a refund, sell a similar product at a dumping price until they kick you out of the competition and so on. There are also rumors (pretty much confirmed by now) of Chinese sellers colluding with Amazon employees and buying insider data, gaining a massive competitive advantage over everybody else.
- Cash flow intensive – Even though you don’t need much money to start an Amazon FBA business, scaling one successfully is very cash flow intensive. FBA sellers get their check from Amazon every 14 days and only after Amazon takes their cut for storage, fulfillment and other fees. If the product you launched gains some traction, you may very well need to make your next product purchase within the first two weeks because you need to account for the lead time, transport time, loading to Amazon warehouse time and so on. You need to think and plan your inventory at least 2-3 months ahead.
Comparing the Dropshipping vs the FBA E-commerce model
Image credits: Tony Craig
Ultimately, creating a successful FBA or Dropshipping business depends solely on the extent of your skills and dedication. Both models have their own strengths and weaknesses and choosing one model over the other will entirely be based on your own unique circumstances and preferences. Taking this into account, we think that it’s only fair that we showcase the main advantages and disadvantages of the Amazon FBA model compared to the Dropshipping model so that you can make an informed decision.
The three main advantages of Amazon FBA over Dropshipping are:
- Simpler product research,
- Easier marketing, and
- Bigger (easier) scaling potential.
Amazon FBA product research demands much less money, time, and effort than the research required in choosing the right Dropshipping product. On Amazon, you’re dealing with one giant market with all of the information and stats you could possibly need all huddled up in one place. The money required for Amazon product research boils down to the costs of your monthly/annual product research tool subscription plan. Dropshipping, on the other hand, is very different. The product research process is more complicated and stochastic, and you’ll have to master several different product research methods and tools and ultimately spend time testing different products before you strike gold. With tools like Jungle Scout or Helium10, you can pretty much know what to expect from your product even before you launch it on Amazon.
When it comes to the marketing side of things, again, Amazon is way simpler. Marketing on Amazon amounts to the money you spend on your PPC campaign; there’s nothing more to it really, just optimize your listing (or pay someone $50 to do it for you), optimize your PPC ACoS (advertising cost of sale), and you’re done. With Dropshipping you need to understand Facebook ads, Instagram marketing, Google ads/SEO/natural traffic, you have to write content for your site, create funnels… you get the point. The learning curve is much steeper.
The third advantage of Amazon FBA over Dropshipping is its bigger scaling potential. Sure, you can find a home run product and scale your Shopify store to 6 or 7 figures but the profit margins are just smaller and you’ll plateau sooner. With Amazon FBA, on the other hand, the scaling potential is almost limitless. The ROI is greater and if you keep reinvesting the compounding effect can snowball out of control really fast.
You’ve probably heard the saying “don’t put all of your eggs in one basket,” right? Well, this brings us to FBA’s biggest disadvantage over Dropshipping. With Amazon, not only are you putting all of your eggs in one basket but, to make things even worse, you’re putting them in someone else's basket.
Amazon has all the control and it’s not uncommon for them to take up to six months to fix hijacked listings, leaving you helpless and destroying your business in the process. Protecting yourself from competitors that are using blackhat tactics to screw you over, or even protecting yourself from Amazon’s mistakes is almost impossible as things currently stand.
What’s more, no one is born with the knowledge required to run an online business. It’s only natural that, sometimes, you will be the one making mistakes. You might unknowingly sell a restricted or a trademarked product or do something even more naive (e.g. forget that your billing credit card has expired) and when you’re dealing with Amazon – this alone can be a reason to get your seller account suspended permanently.
With Dropshipping, on the other hand, you’re in full control of your store. Sure, you need to follow some ground rules set by Shopify/BigCommerce or the payment processor you’re using but, besides that, you’re free to do pretty much anything you want.
Last but not least, the Amazon FBA business model is a bit more pricey to kickstart when compared to Dropshipping. With the Dropshipping model you don’t hold any inventory and therefore you don’t pay any storage fees; the only up-front costs are the Shopify theme plus the Shopify apps monthly payments and your marketing costs which depend entirely upon your needs and goals.
With Amazon FBA it’s different – the up-front risk is greater, but so is the scaling potential.
Let’s dig right in.
How much money do I need to start an Amazon FBA Private Label business?
It’s important to take the time to really think about all the costs of setting up your Amazon account, from running a successful social media presence, to dealing with referral fee costs, the price to ship products, and more.
Because this is the first time we introduce the private label (PL) concept, it’s only fair that we first explain what PL means. In short, private label products are those manufactured by one company for sale under another company’s brand. From an Amazon FBA perspective, running a PL business means that you’ll be closely working with manufacturing factories (most likely Chinese) in order to create a “unique” product with your brand logo stamped on it. There are other methods of making a profit on Amazon such as retail/online arbitrage or wholesale, but in this guide we mainly focus on the Amazon FBA private label model.
Without further ado, let’s break down the start-up costs of starting an Amazon FBA PL business and give you some basic strategic insight:
Mandatory costs:
- Amazon pro account – $40 a month (It’s recommended that you create a free Amazon seller account while you’re in product research/development phase and then upgrade to pro).
- Total cost of product – You can definitely start with less but ~$1500 should be enough for 100 to 1000 units of whatever you choose to sell. This includes developing, manufacturing, shipping and PPC (Pay Per Click).
Pro tip
When you’re launching a new product, always start with relatively small quantities in order to test the market.Optional but advised costs:
- Product research tools – Jungle Scout Chrome extension ($97 or $197 flat fee) + Jungle Scout web app ($40 a month — use 1 month until you find your product and then cancel subscription). There are other product research tools such as Helium 10 and Viral Launch, do your own research and pick one.
- Brand logo – You can find a freelance artist to design your brand logo for anywhere from $5 to $100.
- Pictures of your product – Pay a professional photographer to create high quality listing pictures of your product for ~$20-$100.
- Barcode – $5
- Product inspection – $100
- Incorporation – preferably an LLC – $50 to $500 depending on the state where you choose to incorporate.
Total cost ranges between a minimum of ~$1500 and advised total of ~$2000.
This is a relatively small amount of money to start a business. However, as previously stated, Amazon FBA is very cash flow demanding and we recommended that you start with 2.5x the money of the total cost of the product since you’ll need a big buffer in case your first product succeeds and sells out in the first month or so.
Going out of stock with your first product is a big no-no because when you’re out of stock your product ranking will drastically decrease or even disappear, and digging yourself out of that hole will cost you a ton of money in PPC. And even then, nothing is guaranteed. Always plan your inventory accordingly.
Starting an Amazon FBA private label
Now that you’re familiar with the Amazon FBA process, we can get to the most important part of the guide – and presumably the main reason why you’re here – starting your own FBA private label business.
The five zero-to-hero steps you need to go through can be broken down into two meta-sections:
a) Steps you need to take before your product reaches an Amazon fulfillment center:
- Product/Market research
- Sourcing a product
- Navigate seller central and list your product
b) Steps you take to successfully launch your product after it arrives at an Amazon fulfillment center:
- Shipping your product
- Launching and marketing your product – Getting your first sales and reviews
The way you scale an Amazon FBA private label business is simple: go through the same process and add more products. Rinse and repeat.
-
Product research
Product research is the first and the MOST important step in the process. It is the foundation of your operation and it can make or break your business. Searching for the ideal product to sell on Amazon may be a tedious process, but you have no choice – you must do it, and you must do it right.
Product research is a numbers game. Get over it. There’s simply no room for emotions and preferences. The market doesn’t care about your likes and dislikes. Sure, you should always aim to do business in a niche that interests and excites you, it will give you a competitive advantage as it makes your work more pleasurable, but also keep in mind that boring businesses make billionaires. You want to launch a product that isn’t too competitive but there’s a high demand on the market for it.
So how do you find a high demand – low competition product?
You analyze the market and understand what the numbers are saying. You can start your product research analysis manually, but scrolling through Amazon mindlessly and without any indicators will get you nowhere. This is why we recommend using a product research tools such as the ones offered by Jungle Scout, Helium 10, Viral Launch, Unicorn Smasher or others. All of these product research tools have different algorithms and ways to get to the numbers they’re showing, plus their accuracy is more or less the same. Of course, these product research tools have no way of knowing the real numbers only Amazon has, but if you utilize them properly, they'll get you much further than your own heuristic way of coming up with the information — and in a lot less time. The fact that most of (if not the entire) Amazon seller industry relies on them is a case in point.
The mental model
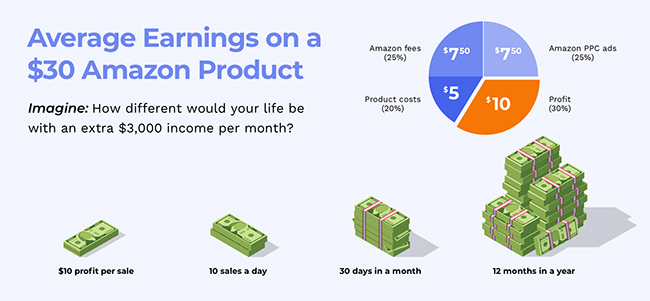
Let’s assume, for simplicity’s sake, that you want to make ~$1000 in profit a month selling your branded product on Amazon. This is your goal. Your placeholder. Once you got this, you begin the hunt for a profitable product by tailoring the research to your goals. Let’s break it down even further.
If you’re shooting for a sensible profit margin of 25%, it means that your desired product must have a minimum monthly revenue of $4000. This is your first filter – you’re looking for a product that generates at least $4000 of revenue per month for the top competitors in the niche.
Next, you want a product that is easy to manufacture (you can basically eyeball this and use common sense) and has low competition. What’s low competition? It’s relative but, in principle, you want to see a couple of sellers on the first page with less than 50-100 reviews, sellers with 3 to 4-star rating coupled with bad reviews, bad photos or unoptimized listings. You can compete with that.
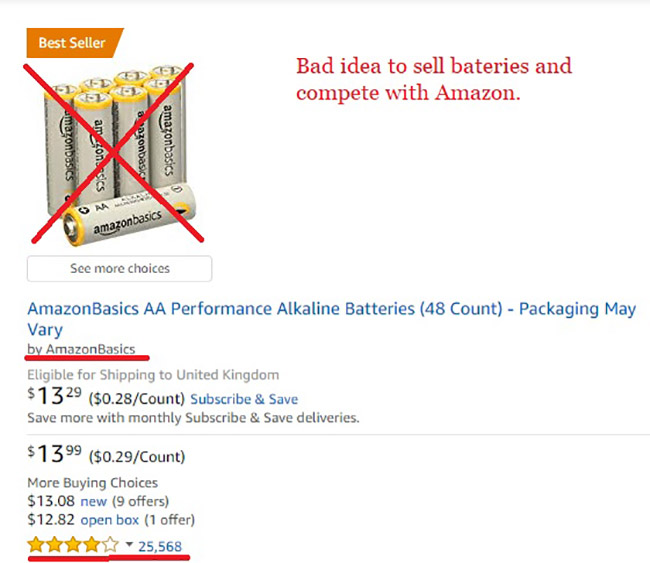
Avoid niches dominated by one seller with more than 1000 reviews and a 4+ rating, or niches where Amazon itself is selling their products. You can’t compete with that.
Okay, so you found a product that has a high demand (generates a minimum of $4000 a month by our arbitrary standards) and has a low (or bad) competition, what’s next? Next, you want to put that product in your product tracker and monitor its performance for about two weeks. If the numbers are looking good, the next thing you want to do is estimate your profits.
Pro tip:
Make sure you get this next part right. This is critical.Start by getting the exact measurements and weight of the product (with packaging) and then calculate the total shipping costs to get the product from your supplier to the Amazon fulfillment center. Once you got this, use the Amazon FBA calculator to calculate all of the FBA fees. Next, you need to add up all of your upfront costs (samples, graphic design, photography, inspection costs and any additional costs,) your fixed costs (the cost of the product and the total shipping costs) and Amazon FBA costs (estimated PPC/other marketing costs and FBA fees), and divide this number by the number of units you ordered to get your total cost of product.
To get your profit margin, simply subtract the total cost of product from the retail price of the product.
Total cost of product = (upfront costs + fixed costs + amazon fba and other marketing costs) / number of units ordered
Profit = Retail price – Total cost of product
If you’re personally satisfied with the expected profit margin — congratulations! You’ve found your niche!
Now you want to start thinking about your competitors. How can you diversify your product, how can you improve upon it and make it superior to your competitor’s products? Start going through the bad reviews on your competitor’s listing and analyze them. Find the pattern – there’s always a pattern – and see if you can figure out ways to mitigate the problems the customers are unhappy about without incurring additional production costs.
-
Sourcing your product
Now that you’ve narrowed your research to a single product, the next step is to source your product by finding a good supplier.
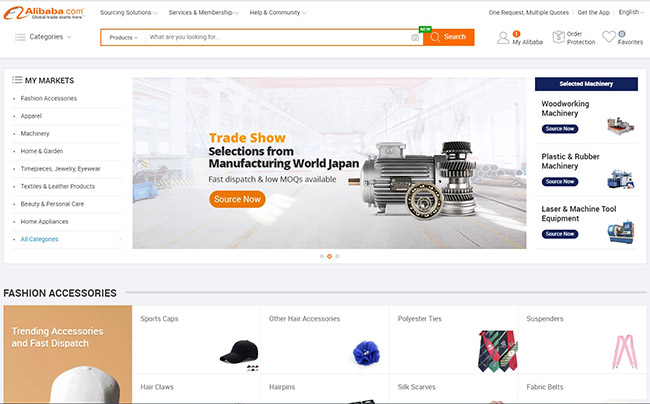
The most common place people go to search for suppliers is Alibaba.
Alibaba is a website that connects suppliers to individuals or businesses and, as it stands, your safest bet when searching for a reliable supplier because a lot of the sellers there are already set up to service Amazon FBA businesses.
You should also always check and compare your potential suppliers to suppliers on 1688.com or Global Sources. The former website is in Chinese language only, so you’ll need to use Google Translate and struggle a bit with your searches, but it’s worth it because 1688.com is catered more towards the Chinese buyers, which means you’ll see the real uninflated prices. When you find a few potential suppliers on Alibaba, make sure you cross-check their rates with the same or similar products on 1688.com. It’s very likely that the prices there are significantly lower (because the business-savvy suppliers on Alibaba are trying to milk foreigners out of their money), and you can leverage this information further down the road when you negotiate with your chosen supplier.

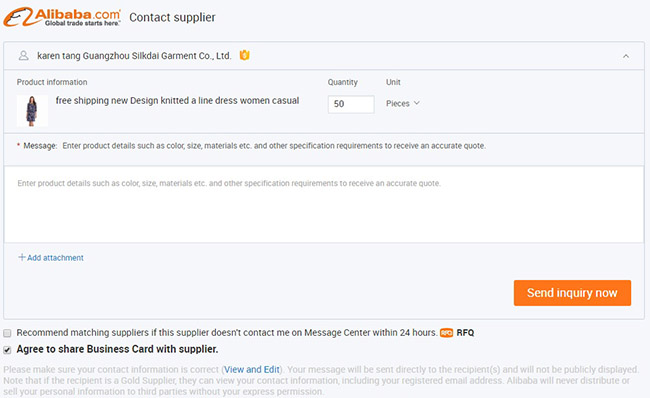
When you search for a supplier on Alibaba always tick the gold supplier box and ignore the suppliers with shady ratings. When you find a potential supplier that meets your standard, mark him as “favorite” and continue with your search until you have 10-15 potential suppliers in your favorite bar (top right corner next to the search bar.) From here, you can email them all at once.
How to email suppliers?
There are many email templates on the Internet giving you examples of how to establish the first contact with your potential suppliers. Skim through them and follow Bruce Lee’s famous advice: “Absorb what is useful. Reject what is useless. Add what is essentially your own.”
Even though the contents and style of the emails are largely arbitrary, there are a couple of core principles you should adhere to:
- Introduce yourself as a CEO of a business or as an employee from the purchasing department of an established company. This will make you look more professional and the supplier will take your more seriously.
- List your specifications as clearly and in as much detail as you can. Make sure you use very simple English to avoid any risk of misinterpretations.
- Ask them if they can meet your specifications and require them to provide you with the following details:
-
- Photo, specifications, and EXW (Ex Works) quotation
- Are they a manufacturer or a trading company?
- Lead time for samples and trial order?
- Can they add a logo to the product, and if so, ask them to send pictures of the product with a random logo on it for reference.
- What’s the best rate they can offer for the trial order?
- ALWAYS number your questions and make sure they answer every single one of them. If they skip some of your questions, call them on it and politely ask them to provide all the necessary answers.
- Ask as many questions as possible in your initial emails in order to avoid endless back-and-forths with all of the suppliers.
Sticking to these simple rules should be enough to cover all the bases and keep you out of trouble. Once you get some replies from the suppliers you contacted, you can start probing and evaluating their replies, pick your 1-3 favorites and try and negotiate the best terms you can.
Supplier evaluation
First impressions are very important in business. You’re judging your potential supplier from the first email interaction. Are they fluent in English? Did they give you a generic copy-paste response or did they care enough to answer you personally? Are you able to keep a prompt conversation or does it take them days to email you back? Communication is your first filter, and the suppliers that don’t pass the test should be immediately disqualified.
After you’ve established a satisfying level of communication with a few potential suppliers, it’s time to cross-check and evaluate the quality of their product. Normally you’ll have to pay somewhere between $50 and $100 dollars for your first product samples, and if you order samples from 2-3 suppliers this might add up to a considerable chunk of cash; there’s no way around this, consider it a cost of doing business.
Once you’ve received and inspected your samples, perhaps followed up with any additional questions, go ahead and tell your chosen supplier that you’ll be making your first order. If you’re ever going to negotiate on the price of the product and the payment method, this is when you do it. Just make sure you’ve done your research, and be professional and realistic with your expectations. If you’ve established enough trust with the supplier you can arrange to pay 30% or 50% upfront and the remaining 50-70% after the inspection and before shipping. As far as the payment process goes, insist that everything is done through Alibaba (read our Alibaba guide) and their trade assurance program – it minimizes risk by guaranteeing money back in the event of a supplier failing to meet the terms of the order contract.
After you’ve successfully sourced your first product it’s time to create a product listing and arrange the freight to an Amazon fulfillment center.
-
Create an optimized product listing
The actual step-by-step process of creating a new product listing in your Amazon Seller Central is fairly intuitive and there are thousands of guides (including the one in the Seller University) that teach you how to do it. Merely creating a product listing, however, isn’t what you’re here for. You’re here to learn how to rank your product on the first page in Amazon by optimizing your listing.
What does on-page optimization mean? It means that once your product is live, Amazon’s A10 algorithm will scour through your listing and analyze the content in order to determine what you’re selling. Then it will categorize your on-page content, mix it with other ranking signals and place (rank) your product in a certain position based on what the consumers are searching for.
Before we take a deep dive into the on-page product optimization, there’s one more thing you need to know: when it comes to ranking, sales are above everything else. Sales, velocity, reviews and price – in that order – are the key factors that will determine your fate on the market and the position you hold amongst your competitors. You can have the best on-page optimization possible, but if you’re not selling, you’re not going anywhere. Needless to say, if you’re selling like a madman, Amazon will rank you on the first page even if your on-page optimization is terrible. All that Amazon cares about is making money, and they do that by taking fees and a percentage of your sales. In other words, if you make money they make money — and the A10 algorithm is designed to ensure exactly that.
That being said, you can do your best but ultimately, you can’t control how much you sell. The market does that. All you can do is focus on the things you have control of, and this is where your listing optimization comes to fruition.
Amazon product listing can be broken down to these six simple steps:
- Product listing title – Do your keyword research properly and put the highest ranking keywords relevant to your product in your title. Don’t stuff it with 10 different keywords; it won't help you rank, it will just deter the customers that found your listing somehow. Stick to Amazon’s rules and keep the title under 200 characters. Use pipes (|) and dashes (-) to break up target keywords and improve the readability, and don’t forget to include your brand name.
- Bullet points – This is where you sell your products once you lure the customer to click on your listing. Writing high conversion bullet points that sell is all about finding that sweet balance between old-school copywriting and new-school SEO writing. Try to show off all of the benefits of your product and why it’s is better than what your competitors offer. Include as many primary & secondary keywords without ruining the copy, add social proof where possible. Think like a customer; what would you want to know about the product if you were the one buying it?
- Description – Unless you’re enrolled in Amazon’s Brand Registry and you can post Enhanced Brand Content, don’t get overly concerned about this section. Nobody reads these. You can use the description to tell the customer a little more about your brand, build rapport, et cetera.
- Back end search terms – Put as many keywords in this section as possible and prioritize long tail keywords that already contain other top keywords. The order doesn’t matter, this part is rather straightforward.
- Optimized Images – Images are possibly the most important part of your listing. Ranking put aside, the product image is the first thing your customers see and, after price, it’s the biggest deciding factor in conversions. So, don’t fool yourself and pretend that you’re an expert, just hire a professional photographer and send them a sample of your product.
- A/B testing – If you want to really squeeze the most out of the on-page listing optimization you want to run A/B testing. This basically means that you’ll be running two slightly different versions of your page where 50% of the customers see page A and 50% see page B. This method allows you to gather information and determine which version of your listing works better! Splitly is one of the services you can use for this.
At last, it’s totally fine if you don’t want or you don’t have the time to learn how to optimize your listing by yourself. You can always go on the Jungle Scout Market and find guys that have been doing this or years. The price for their listing optimization services ranges between $50-100$ which really isn’t that much when you consider the ranking implications of your listing.
Once you create your product listing and you get accustomed to navigating through Seller Central it’s time to arrange the shipping!
-
Shipping your product
Shipping can be a little intimidating for beginner Amazon FBA sellers. You can easily find yourself in a situation where you don’t understand the alien terms the supplier is throwing around, or you don’t understand the shipping process, the customs, the fees or the labeling of the inventory. At the end of the day, shipping can be really simple once you get the gist of it, and this whole chapter can probably be summed up in two or three sentences. However, we’re still going to go through all the terms and shipping methods one-by-one, so that you know exactly what you’re doing and you don’t look clueless in front of your supplier.
Generally speaking, you’re faced with two options from the very beginning: you can either arrange the shipping by yourself, or you can let your supplier do it for you. In most cases, it is best that you leave the shipping arrangements to your supplier because it’s very likely they’ve already established a business relationship with a carrier which makes the process a whole lot easier for you. You ask for the quote, pay them the money and wait for the product to arrive at the Amazon fulfillment center. A lot of the times this option will not only be the easiest, but also the least expensive one. The biggest problem with this approach, however, is that whenever you have any issues with customs or anything like that you’ll have to communicate with the carrier through your supplier, meaning you won’t have as much control over the operation.
If you’re a hands-on kind of person you can contact a carrier or freight forwarder and arrange the shipping by yourself. It’s a bit more work but it always pays off to have more freedom. You can contact as many carriers as you want and pick and choose the best offer, haggle the charges down and, most importantly, when your business kicks off and you start frequently ordering large shipments you’ll have an established relationship with your carrier and they’ll essentially become a trusted business associate.
If you choose to go this route, read the following breakdown of the most essential information required to get you started:
- Carrier vs freight forwarder – A carrier is any company or person that carries the product from one place to another for you. A freight forwarder can outsource the transport to a third-party company or it can do the work of a carrier. The difference is that a freight forwarder oversees the entire process; they take care of customs documents, the entry fee, ISF, the bond and everything that needs to be arranged in order to get your shipment from point A to point B. The most reputable and well-known freight forwarders are DHL, FedEx and UPS.
- Customs broker – Every time your goods go from one country to another you’re dealing with two different jurisdictions, meaning some documents and applications need to be filled out for your goods to pass the border. You can do this by yourself if you’re foolish, or you can have a professional do it for you. Freight forwarders often have an in-house customs broker, so you don’t have to worry about this.
- Ex-works – Ex works is a contractual term that basically means that you’ll be paying the supplier to build your product and prepare it for pickup at their location – leaving everything else to you. You need to find a freight forwarder, organize the transport and so on. The ex-works quota is the price of the product excluding the shipping costs.
- Ship vs plane – As a general rule, you want to ship your first shipment by air even though it's more expensive. Why? Because it’s much faster and you want to get your first product on the market as soon as possible in order to take the high ground. If your product kicks off, you’ll want to order your second or third shipment by sea (takes about a month or so, excluding lead time) in order to save some money and bump up your profit margins.
- FCL vs LCL – If you ship by sea, you’ll eventually stumble upon these two acronyms. They’re short for “full container load” and “less than container load” and mean exactly what you think they mean. As you might’ve guessed, FCL shipping is more affordable.
- FOB – Short for “free on board”, this term only applies to shipping by sea, and it means you’re paying your supplier to build the product, get it on board, and get it cleared through customs in their country. The rest is on you.
- DDU vs DDP – Short for “delivered duty unpaid” and “delivered duty paid” respectively. Again, it’s exactly what it sounds like. With DDU the product will be delivered but you’ll have to show up at customs to pay the duties. It’s an unnecessary hassle. With DDP you pay your supplier or your freight forwarder and they do absolutely everything for you. It’s pricier, but you get your product from China (presumably) to an Amazon fulfillment center without a single worry.
As production comes to an end, you'll need to create a shipment in the Seller Central. This gives you the physical address of the fulfillment center where you’ll ship your products. In your Seller Central account to Inventory > Manage Inventory and then click the drop-down menu of the product you are ordering (the one we thought you how to list in section 3) and choose Send/Replenish Inventory. You’ll be asked whether you want to create a new shipping plan or add to an existing one.
Because this is your first shipment choose “Create new shipment” and then in the “Ship from” field put your supplier's address if you’re using the supplier to ship your product, or your freight forwarder’s address if you’re using a freight forwarder. Once you go through all of the steps (select how many units you will be sending, skip the Amazon prep, verify the info, use small parcel delivery, print the shipping labels) Amazon will give you the address of the exact fulfillment center. Send this address to your supplier or freight forwarder and you’re done.
Pro tip:
Try to get your supplier to apply the FN SKU barcodes on the packages. They’re usually happy to do this for free whereas Amazon will charge you 20 cents per unit.Inspection
When your supplier notifies you that everything’s ready for shipping, it’s time to inspect the quality of your products. You can hire a third party inspection company online for somewhere between $100 and $300. It might seem like a lot for you right now but consider this to be another cost of doing business.
Inspections are always a good idea when working with Chinese suppliers (especially for the first time) because there are countless things that can go wrong; the supplier may have poor manufacturing quality control and sell you faulty products, or he may give you wrong weight and size measurements causing you unforeseen issues with Amazon. Everything needs to be right before the product gets on that plane – the logo, the packaging, the labels, the product itself, everything! You can’t afford to mess this up. Amazon customers have very high expectations and they won’t be hesitant to leave you a bad review and ruin your rating. This is among the worst things that can happen because reviews are king on Amazon. If you get any bad reviews during the first one or two weeks of your launch, your sales will plummet. And if your sales drop and you lose momentum, your product ranking will sink as a consequence and you might never recover.
Communication is key when you’re dealing with a third party inspection company. When you hire them, make sure you create a long enumerated list of requirements and really get your money’s worth. The list should include stuff like:
- Randomly test 1/3 of the products;
- Inspect the quality of the moving parts (if any);
- Drop the shipping box from 2 feet (this will piss off your supplier, but who cares?);
- Weigh and measure the product;
- Send me a video or pictures from the product — and so on, you get the point. Anything you can think of – ask them to do it, the more thoroughly they do the product inspection, the better.
Once you get the green light from the inspection company you can wire the rest of the money, and your product is ready to ship!
So, let’s get to it!
Launching and Marketing Your Product – Getting Your First Sales and Reviews
Image credits: Matt Riley
Sales velocity is king. You found a winning product, found your supplier, you arranged the shipping and created the listing — now all you need to do is launch your product in the right way.
What does that mean? It means that you need to get sales and positive reviews as soon as possible after the launch. This will get you “noticed” by the A10 algorithm and Amazon will rank your products higher, which will result in even more sales. The goal here is to get you on the first page of Amazon (for the targeted keyword) where most of the sales happen.
The lesson here is that you can’t really expect your product to sell organically when you first launch it, or heck, even before you get it on the first page. You need to go out of your way to place the product in front of the right customers. You need proper marketing. You need to spend money to earn money.
The first thing you’ll want to do is get your friends and family to buy the product. Be warned – this is against Amazon TOS and if you don’t do this correctly Amazon will detect and ban you straight away. This method of gaining traction early on is a bit controversial in the Amazon FBA world; some consider it a “blackhat” tactic but, are you hurting anyone really? You’re not. Plus your competition is already doing this, so it’s not like you have a choice.
The easiest way to get yourself banned doing this is to simply send a link of your product to your friends and family and tell them to purchase it. Direct buys on newly listed products are highly suspicious and will instantly raise red flags with Amazon. To circumvent this, you want to send a screenshot of your listing to your friends and family and tell them to search for the product on Amazon themselves; meaning, instead of searching for your brand's name directly, they should type the appropriate keywords in the search box and scroll through Amazon until they find your product. This will make it seem as if the buys were organic and you’ll stay in the clear.
Next thing you want to do is to set up giveaway promotions where you give 50-80% discounts for your product. Offering steep discounts means you’re likely going to lose money on these sales at the beginning, but it almost guarantees that you’re going to get a lot of sales because of the competitive prices and rank your product faster.
You need to understand that when you first start selling on Amazon your primary objective will be to rank your product, not make profits. The return on your investment will come when you place your product on the first page of the relevant keyword. The time it takes you to do this depends on many factors: your choice of product, quality of your listing, ad spend, price, competition and so on. It may take you two weeks or it may take you three months — but that doesn’t really matter if you go into this prepared and with the right mindset.
Amazon Sponsored Ads
Going into this, you need to understand that you need to butter both sides of the bread at the same time. You don’t wait for your friends an family to buy your products or hope that your giveaway campaign gets you enough sales to rank your product – you attack this thing at all fronts at the same time. You optimize your listing, do giveaways, and pay Amazon to show your listing above all the rest simultaneously.
Amazon Sponsored Ads, also known as PPC (pay per click) is an essential marketing tool for your FBA business. When you start selling on Amazon your product will be buried somewhere on page 20 of the search results which makes it really hard for your potential customers to find you. Sponsored ads, however, give you the opportunity to pay your way through to the top of the search results and, perhaps even more important, after running an automated PPC campaign Amazon lets you download a report that shows you all of the keywords (and their relevance) that led customers to your product listing. After you get this report you can take the best performing keywords and use them to create your own manual PPC campaign in order to optimize for better ACoS (advertising cost of sale.) Bringing down your advertising costs will significantly improve your profit margins later on.
Automated PPC Campaign
Open your Seller Central account, go to Advertising > Campaign Manager and then scroll down to create a campaign.
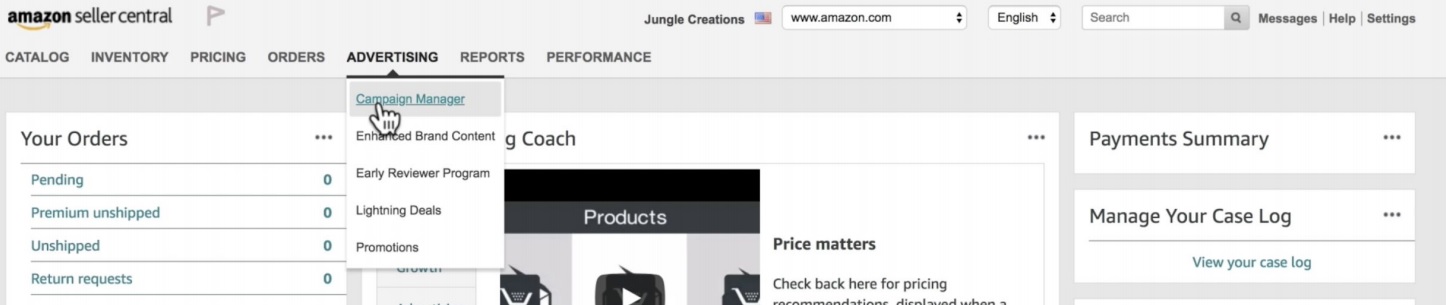

Next, you want to give your campaign a name, set a daily budget and choose “Automatic targeting”:
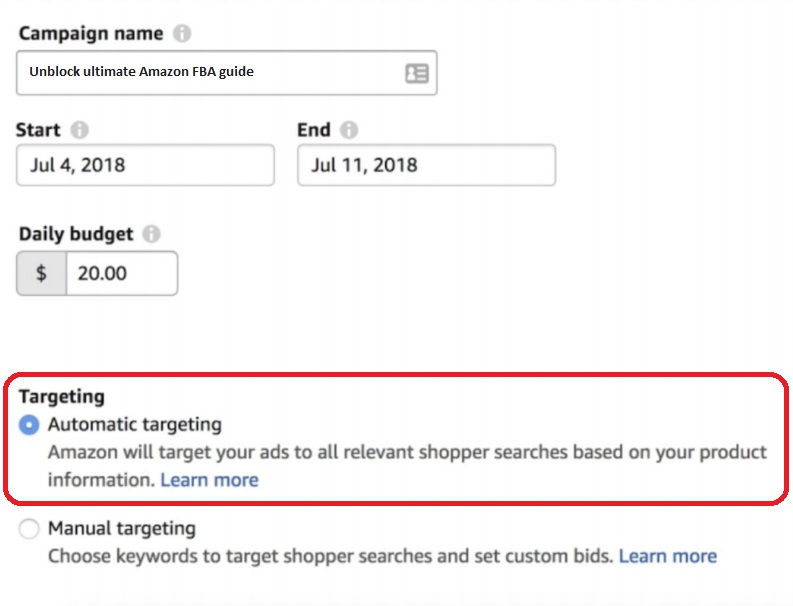
Next, you’ll be required to set your default bid. This is where you choose the maximum amount of money you’re willing to spend for one click on your ad.

When you’re launching a new product on the market you want to bid a bit more conservative and keep a close eye on the performance of your ad; if you’re not getting enough impressions or views after a few days of running the campaign it means that your bid was too low and you need to bid higher.
After you run the automated campaign for about a week you’ll have enough data to start a manual campaign. The process is simple: after you chose “manual targeting” click on “Enter keywords” > copy the first 50-100 best-performing keywords from the campaign report, and paste them in the empty field. Finally, click “add keywords” and you’re done!
Keep Optimizing PPC
Running an efficient PPC campaign is not a set-it-and-forget-it type of situation. Staying on top of the game means that you’ll need to keep tweaking your keywords, bids, listing, product photos, and bullet points in order to stay ahead of the curve and dominate your competition.
Managing PPC campaigns is an art form in its own right; countless videos, books, articles, and blog posts have been written on this subject alone and to try and cover all of this information in one guide is unfeasible. We can, however, give you just enough information to build you a solid foundation, a data directory and a research tour guide of sorts that you can later use as a starting point for your own learning endeavors.
If you’re not sure where to start and how to learn the basics of PPC optimization, try the RPSB method:
- Research – Run an automatic campaign with a broad match type with Amazon’s suggested search terms for about two weeks.
- Peel – After one or two weeks, you should have conversion data for your campaigns. Choose the highest converting search terms to put into a “winner’s circle.” The number of keywords is up to you and how much you want to lower your ACoS.
- Stick – Take the highest converting keywords, put them in your manual campaign with “exact match type” and slightly increase your bids.
- Block – Turn the lowest performing keywords into negative keywords. This will increase your conversion rate and your ad ranking and lower your costs simultaneously.
In order to do this, first you need to know your keywords:
- Broad Match – Search terms that are broadly related to your product. Less competitive and cheaper.
- Phrase Match – Search terms that appear in phrases that the customer searches for. More competitive, expensive, and specific than broad.
- Exact Match – Search terms that exactly match your product. Quite competitive and more expensive.
- Negative Keywords – These are the keywords that you don’t want to show up for. Use them to prevent excessive ad spend and increase conversion rate.
Know What you’re Optimizing For
““You can’t manage what you can’t measure” ”- Peter Drucker
Set your goals straight. What are you optimizing for really? Are you optimizing for low ACoS and bigger profits on an already established product on the market, or are you putting all of your efforts in ranking or brand recognition? If you’re doing the latter, having a higher ACoS (typically above 40%) isn’t necessarily a bad thing. If you’re intentionally raising your ACoS and you’re doing it with a specific goal in mind (ranking your product) then the first thing you need to do is calculate your break-even ACoS.
Break-even ACoS basically tells you at what ACoS you make zero profit and zero loss. Here’s how you calculate it:
Let’s assume you’re selling your product for $25 and your total cost of product is calculated at $12. This puts your pre-ad profits at $13. If we assume that you want to put all of your profits into PPC advertising, your break-even ACoS will look like this:
Break-even ACoS = Ad cost ($13) / Sale price ($25) = 52%
This means that at 52% ACoS you’re not making any money, but you're not losing any money either. Your break-even ACoS is possibly the single most important measurement for your Amazon FBA business. If you don’t know your break-even ACoS before you start your PPC campaign, you’re essentially a blind man in a dark room looking for a black cat which isn’t there. Don’t be that guy.
Rinse and Repeat
You’ve finally made it to the end. We’ve covered everything from finding a product all the way down to launching it! In order to scale your business, just rinse and repeat the same steps to launch more products. This will not only increase your profits but will also diversify your business; when one product isn't doing very well, you’ll have others to pick up the slack and keep your business profitable.
Obviously, there’s more to selling on Amazon than a lot of people think. You can’t just add a phone number to your account and enter some basic product information like you might when selling products on eBay. There are various Amazon fees to think about, as well as different strategies that you’ll need to consider if you want to become one of the company’s best sellers.
Selling on Amazon isn’t easy. There are many more advanced strategies on how to sell on Amazon but this guide is already long enough as it is and we didn’t want to overwhelm you with information. This “how to sell on Amazon” guide is not intended to give you everything you need to begin, but rather, to give you structure and a clear-cut overview of everything you need to know in order to start this journey by yourself.
Every section of this guide could be 100 pages long and we’d still hardly cover everything. Every seller has a unique philosophy and strategy on how to make a buck selling on Amazon and the only thing that matters is to find a way to make this work for you.
Amazon can give you the freedom to work from home and on your own terms, but it can also give you the chills that go along with the responsibility of running your own business.
Finally, one more advice before we end this: If you don’t have the disposable income, don’t buy any courses teaching you how to sell on Amazon FBA. We’re not saying that there aren’t great courses out there, all we’re saying is — if you have the time and you’re willing to put in the effort, you can learn how to sell on Amazon for free. Our guide is more than enough to get you started, and there are many more guides, articles, youtube videos, podcasts, e-books and free courses to get you to where you want and need to be.
Best of luck and happy selling!


Ciao, ho intenzione di inziare a vendere e ricercare prodotti da vendere su Amazon FBa.
Non ho competenze, è cercavo un libro, consigli o corso x capire cope inziare ed avere successo.
Grazie