
A Shopify launch checklist can be a useful resource for any business owner planning on running their own online store.
After all, there’s a lot of work involved in turning any ecommerce idea into a success. You need to ensure you’re delivering an amazing customer experience, from start to finish, manage the order and fulfilment process, and even invest in marketing.
Rather than jumping in at random and hoping for the best, you can use this convenient checklist to make sure you have everything you need to run a successful store already set up and ready to go.
The following tips will ensure you don’t miss any crucial steps, help you to streamline your workflow, and boost your chances of making quick sales.
The Complete Shopify Store Launch Checklist
- Step 1: Choose and Purchase your Plan
- Step 2: Set up a Custom Domain
- Step 3: Choose Your Sales Channels
- Step 4: Optimize the Checkout Experience
- Step 5: Update your Tax and Shipping Settings
- Step 6: Verify Email Notification Settings
- Step 7: Build Your Core Website Pages
- Step 8: Conduct a Content Audit
- Step 9: Optimize Your Site for Search
- Step 10: Optimize Your Images
- Step 11: Implement an Analytics Tool
- Step 12: Create a Pre-Launch Marketing Plan
- Step 13: Install Useful Apps
- Step 14: Improve your Contact Strategy
- Step 15: Test Everything before Launch
Shopify Launch Checklist – Video Version
Instead of reading, you can watch this video version of our article.
How to Launch Your Shopify Store?
Step 1: Choose and Purchase your Plan
If, like many new companies starting on Shopify, you decided to start building your site with a free trial, then you’ll need to make sure you have the right plan structure in place going forward.
There are various plan options available from Shopify, depending on your specific needs.
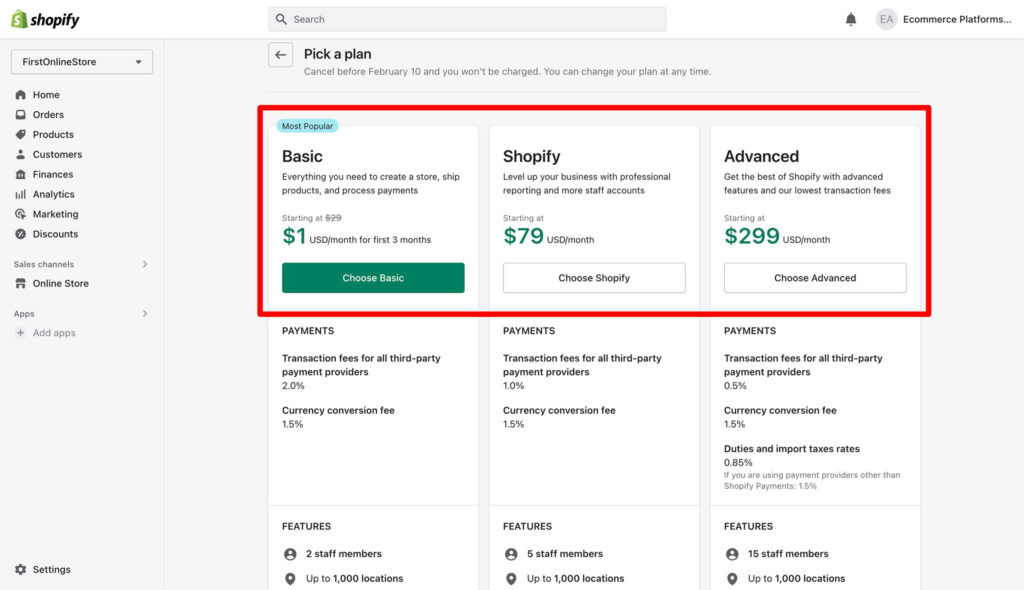
If you’re just getting started, it’s probably a good idea to go with the Basic Shopify or the Shopify plan, rather than immediately opting for an enterprise-level solution like Shopify Plus.
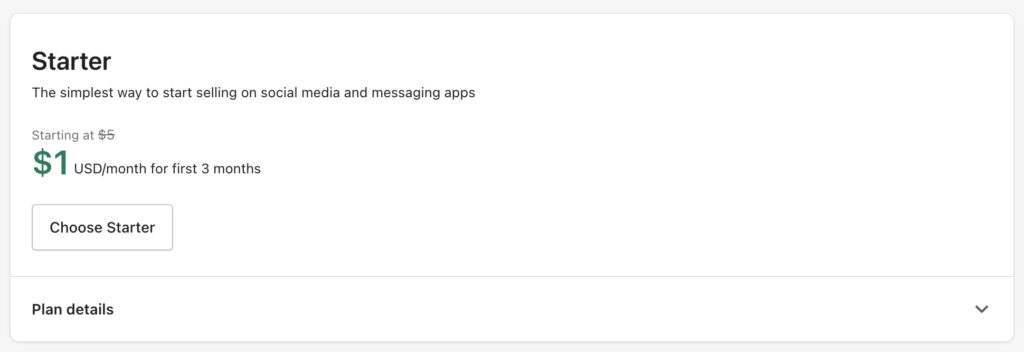
If you're only looking to sell on social media or using buy button, then the Starter Plan is also available.
Ensure you know exactly what features and functionality you’re going to get from each plan, and get your billing information set up.
This will help to reduce the risk of any hiccups when your site goes live, and customers start interacting with it.
Make sure you have your payments automated, and review your strategy regularly to see whether upgrading could earn you more potential customers.
Further reading 📚
Step 2: Set up a Custom Domain
A custom domain is crucial to your branding strategy. It shows your customers you’re invested in running a professional store, and helps you to develop a more effective presence online.
To begin, you’ll need to conduct a domain name search, to ensure the store name you want is available.
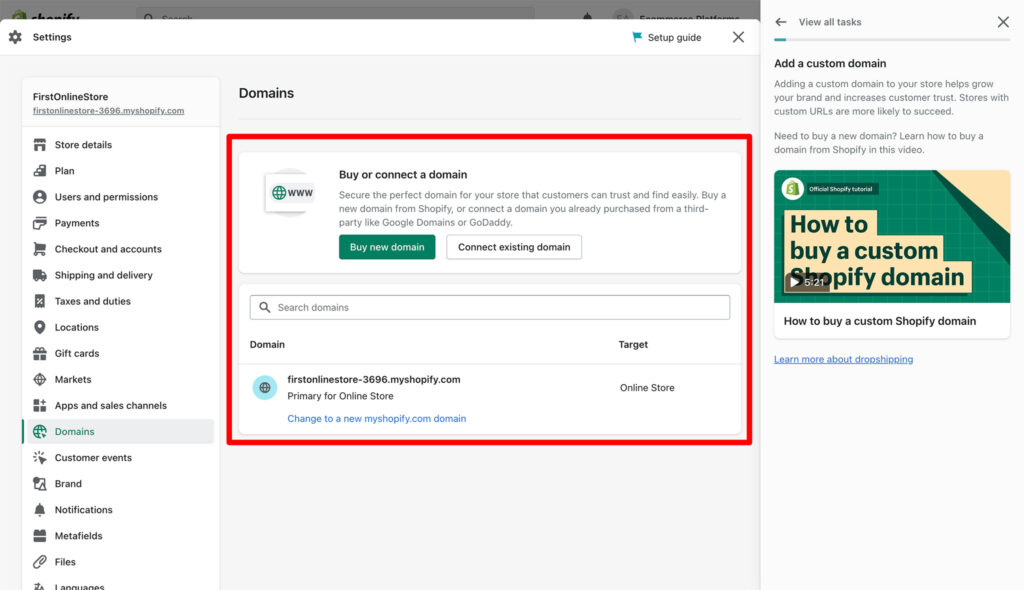
If a trademark hasn’t already been registered for your business name, and someone isn’t already using the domain you want to access, you can purchase that name directly through Shopify.
You’ll also be able to purchase domain names elsewhere and add them to your store if you prefer.
If your name of choice isn’t available, you can consider adding additional words and terms to your name instead. For instance, a clothing brand named Candy might use the URL WearCandy.com.
You can also opt for a different TLD (top-level) domain, such as Candy.org or Lessons.edu.
Further reading 📚
Step 3: Choose Your Sales Channels
The next step in running an effective Shopify store, is deciding exactly how you’re going to allow customers to purchase your products. While allowing customers to make purchases directly in your store is great, it’s always helpful to have additional options available.
A multi-channel sales strategy ensures you can introduce customers to your products, and generate sales from a range of different environments.
Fortunately, Shopify allows you to add a multitude of different sales channels, including:
- Buy buttons and checkout links
- eBay
- Amazon
- Facebook shop
- Messenger
- Google shopping
Adding all of these channels to your dashboard will allow you to manage customers, orders, and product options in one convenient place. The more sales channels you can implement, the more your brand recognition will increase too. Just make sure you maintain a consistent strategy across all of the platforms you pick, with a constant tone of voice and image.
Further reading 📚
Step 4: Optimize the Checkout Experience
While there are a number of factors which can influence whether people choose to complete a purchase with your store or not, the checkout is one of the most important. Remember, on average, the ecommerce cart abandonment rate is around 69.8%. This means anywhere up to 7 out of 10 of the people who visit your store could leave without purchasing anything.
You might not be able to guarantee a complete lack of cart abandonment in your store, but you can boost your chances of sales by removing friction from the checkout process. Make sure you:
- Display clear shipping rates on the checkout page
- Allow customers to edit their carts easily
- Offer familiar payment methods like PayPal or credit card payments
- Enable discount codes and gift cards in the cart
- Offer order status tracking options
- Make the contact page available in case of issues
- Send email notifications to confirm purchases
- Provide clear shipping policies for all sales
- Implement language and currency switchers for international sales
If you’re already using Shopify Payments, you can place test orders on your website using a live payment gateway to ensure everything is working properly.
Further reading 📚
Step 5: Update your Tax and Shipping Settings
Next, it’s important to think about your sales tax and shipping settings, based on the products you’re going to be selling.
When you’re setting up your checkout and payment options, use the tax and shipping sections of Shopify to ensure you have everything implemented correctly.
Remember, if you get this information wrong, you could risk not just legal issues, but also problems with your profit margins.
You may not be charging enough to cover all of your operational costs. This is particularly important if you’re going to be shipping products worldwide, where delivery costs and tax expenses can often vary.
If you’re uncertain about the tax requirements connected to your business, it’s worth talking to an accountant to get some extra direction.
Step 6: Verify Email Notification Settings
Email notifications are extremely important to a Shopify store owner. They ensure you can keep track of relevant information related to your store. You’ll need to have your email settings implemented correctly to connect with your customers, manage notifications, and even implement marketing.
Head into the Settings page on your Shopify site and click on “Notifications” to make edits to your email templates.
You can upload your logo, change the messaging, and adjust the colors of your emails. You’ll also need to ensure you have notifications set up for the right things.
If you need some extra help, using an email marketing app which works with Shopify can be extremely useful. Options include Seguno, Klaviyo, Shopify Email, and many others. You should be sending at least the following emails:

- Shipping notifications
- Order confirmation
- Abandoned cart notifications
- E-Receipts
- Welcome Series messages
Step 7: Build Your Core Website Pages
Now it’s time to start developing the crucial pages you need for your Shopify store. Crucially, it’s not enough to just have clear product pages.
Research shows many customers want to be able to access as much information about a company as possible before they make a purchase. While the exact pages included on your website may vary, most companies use the following:
- Homepage: your homepage is essentially the front page of your website, setting the tone for everything customers can expect from you. The homepage should establish the look and feel of your website, and provide insights into what you do, and who you are. Make sure navigation is clear so people can jump to other pages easily.
- Contact pages: A contact page ensures customers can reach out to you if they’re having any issues with your products or services, or have a question. Make sure you include multiple ways to get in touch. You can add a contact form, email address, retail address, and phone number, as well as live chat widgets with Shopify add-ons.
- About page: Here is where your tell your customers all about your company. Highlight the people responsible for running the store, and tell your narrative about the organization’s background. Make sure you provide as much useful information as you can about what makes your business special, and how you’re going to serve your customers.
- FAQ: An FAQ or Frequently Asked Questions page can be extremely useful to your shoppers. It allows them to quickly answer questions related to shipping, product prices, and delivery times. If you’re not sure exactly what to include on this page, it’s worth taking a closer look at some of the pages created by your competitors. You can even add a search box to your FAQ to help people find information faster.
- Store Policies: A store policies page can also be a fantastic source of information about your company. It can provide information on refund and return policies, shipping policies, and more. This page could even reduce the number of customer service queries you need to deal with.
Step 8: Conduct a Content Audit
It’s easy to make mistakes when you’re rushing to get your store up and running, this is why conducting a content audit is important.
After you’ve created all of the relevant pages your customers are going to need to navigate your store, take some time to go through everything and check for errors.
Look for broken links, grammatical problems, and spelling errors. You might find it’s better to work from the last paragraph and go back up to the top, as errors can be more likely to jump out at you this way.
Remember, when it comes to your copy, consistency is important too. You might find it helpful to use an editorial style guide to ensure everything sounds the same from one page to the next.
From a technical perspective, ensure there are no 404 pages or loading errors, particularly when your customers are accessing your store from a mobile device.
View your site across multiple browsers and devices to ensure there are no issues, and consider having a colleague or someone else check through your content too.
Step 9: Optimize Your Site for Search
While there are a number of things you can do to improve your chance of reaching your audience with your store and products, it’s always easier to achieve success if you already stand out on the search engines. The majority of product searches do start with Google, after all.
There are various SEO audit tools available to download and add to your store from the Shopify marketplace, and you can use online website graders too. Here are some quick tips to get you started if you want to rank with the search engines:
- Conduct keyword research: Make sure you know which keywords you want to rank for, and add them to your pages, store, and blog posts.
- Keyword optimization: Add chosen keywords to all of the right places, such as product descriptions, URLs, meta titles, H1s and file names.
- Design a sitemap: Create a sitemap to provide information about your website content and structure to Google, so it can crawl your store easily.
- Schema markup: Use schema markup best practices to help search engines better find your content, and serve insightful results on the right pages.
- Site speed: Make sure you’re serving pages quickly. Choose a good hosting company to improve your chances of success, compress your images, and consider using a content delivery network (CDN) to boost speed.
It may also be helpful to invest in content marketing as part of your search strategy. Writing blogs and news posts will help you to rank for keywords, and could earn you backlinks from other sites.
If you’re confused about search engine optimization, consider working with a specialist.
Step 10: Optimize Your Images
When shopping online, customers don’t have the opportunity to pick up and view products themselves. This means they need to be able to see as much information as possible about your items by looking at the pictures you share.
Slow-loading or poor quality images can damage your website and reduce user experience.
Fortunately, Shopify does handle the technical parts of keeping images loading quickly for you, so you should be able to save some time here. However, it’s also helpful to:
- Use descriptive file names: This will help you to rank on the search engines, particularly if you use keywords you want to rank for.
- Optimize alt attributes: Add alt attributes connected to your keywords.
- Compress your images: Keep your image file sizes as low as possible. However, it’s important to ensure you’re not damaging the image quality too.
- Use the correct files: Make sure you stick to the right file size; JPEG images and PNG images are often best for Shopify.
- Review thumbnails: make sure your thumbnails look clear and consistent throughout all of your website pages.
- Test: You can consider running A/B tests to determine which of your images are driving the most sales, conversions, or engagement throughout your site.
Step 11: Implement an Analytics Tool
The best way to consistently improve the performance of your website and generate more sales, is to collect as much data as you can. Analytical tools are fantastic for providing you with a behind-the-scenes insight into what’s working, and what isn’t.
Shopify offers its own set of useful reporting and analytics tools to help you keep track of conversions and other key factors.
However, you might find it helpful to add third-party tools into the mix too. Google Search Console and Google Analytics are great options. However, you can also look at add-ons and plugins like SE Ranking and Adobe Analytics.
The more information you can collect about your ecommerce store, the easier it will be to create campaigns which increase your conversion rate and revenue.
Make sure you don’t just track your top-performing products, but also where your customers are coming from, and which marketing strategies are working.
Step 12: Create a Pre-Launch Marketing Plan
Getting your products and brand in front of your target audience is something you’ll need to work at throughout the life of your store.
However, it can be helpful to have a “prelaunch” plan in place, so you can boost your chances of success straight away.
A pre-launch marketing strategy can boost your search engine rankings and generate hype for your store. You could plan a social media marketing campaign, where you generate interest for your products by sharing videos, pictures, and other content online.
It’s also helpful to have a content marketing plan in place, with blog posts, news reports, and other information that can help you to rank online.
If you have an email marketing tool integrated into your Shopify site, you can also plan what kind of nurturing emails you’re going to be sending to your target audience too.
As one of the best ecommerce platforms, Shopify gives companies a lot of ways to align their marketing and sales strategies.
Step 13: Install Useful Apps
One of the reasons Shopify has emerged as such an effective tool for online business owners, is that it makes it easy for you to add all the extra functionality you need in seconds.
There’s a comprehensive app marketplace available from the Shopify App Store. This allows you to extend the functionality of your site with everything from wish lists to marketing tools.
As tempting as it may be to add as many different apps to your site as possible, it’s worth remembering that doing so can slow down your site.
Start with the basic tools you know you absolutely need, such as tools for customer support, boosting conversions, and improving marketing.
You could, for instance, install an app which allows you to offer cross-selling and up-selling offers at the checkout to boost average order value.
Keep in mind, only some of the essential apps on the Shopify marketplace are available for free. There are various products which will also require an additional monthly subscription.
Step 14: Improve your Contact Strategy
As mentioned above, having a clear contact page is often an important part of offering your customers a reliable and consistent experience on your store.
However, a contact page isn’t the only place you should add information about how customers can get in touch with you.
Where possible, it’s helpful to have your contact details located on most of the pages of your website, often in the footer section.
One good way to improve the customer service strategy, is to implement a live chat function. You can add live chat apps to your store from the Shopify app marketplace. This will ensure customers can instantly reach out to you if they have any issues.
Just make sure, if you’re going to be setting up live chat, you also have people available to answer any messages sent to you by your audience.
Your contact information should also provide some useful insights into when employees might be available to answer questions.
Step 15: Test Everything before Launch
The final step in launching your Shopify store is actually setting it to go live. However, before you do that, it’s worth taking some time to go through and test everything one last time. Navigate through your store on multiple devices to ensure everything is working properly.
Ensure you’re comfortable with your Shopify theme, your shopping cart, and your contact options.
If you have other team members connected to your store, it’s worth asking them to take a look too, so you can ensure you’re going to be offering all of your customers a fantastic experience.
Implementing a feedback option with a plugin from Shopify may be helpful too, as it will allow customers to send you comments and information if they struggle with anything.
When you’re fully happy with everything, launch your store by setting it to go live. Remember to consistently promote your store, and double-check your analytics to ensure you’re pushing for additional sales and conversions whenever you can.
Make the Most of your Shopify Checklist
A Shopify store launch checklist can be a valuable tool for anyone thinking of launching their own ecommerce website.
While the platform is relatively straightforward for beginners to use, it’s easy for anyone creating a new Shopify store to get lost along the way.
Following the steps above will ensure you have everything you need in place to connect with, engage, and convert your audience.
As you collect more metrics from your store, you’ll be able to implement new strategies to increase your sales over time.


Comments 0 Responses