
In this article you'll learn how to start an online store – from absolute blank to an operational store with your products in it, ready to welcome your first customers.
Here's what's particularly useful about this guide:
- We go through the process step-by-step.
- We don't omit any challenging technical details that might be a roadblock for you.
- We cover not only the tools but also the methodologies and the decision-making process involved in building an online store.
- We go for a completely DIY approach – read: you don't need to hire anyone to help you out.
It’s time to learn everything you need to know about how to start an online store.
In this article:
Before we dive right in, let's answer some of the common questions around the topic of how to start an online store:
How to Start an Online Store: Step by Step Guide
- Step 1: Defining the type of your store 🏪
- Step 2: Narrowing down your niche ⛳
- Step 3: Doing market research 📊
- Step 4: Choosing an e-commerce platform 🛒
- Step 5: Naming your store & choosing a domain name 📛
- Step 6: Understanding web hosting 🕸️
- Step 7: Launching a blank online store 🛍️
- Step 8: Picking a store design and customizing it 🎨
- Step 9: Dialing in your store's core settings ⚙️
- Step 10: Adding your first products 🎁
- Step 11: Your before-launch checklist 🏁
Step 1: Defining the type of your store 🏪
Okay, so the first step in figuring out how to start an online store is one of the most basic. You need to decide what you’re going to be selling to your target customers.
What can you offer from your online business that’s going to make your site stand out in the search engine, and encourage clients to whip out their credit card?
I'm assuming you probably already know what you want to sell – at least roughly.
“Hey, I want to sell custom-sewn bed sheets.” Or, “Hey, I have this idea for an online boutique.” Or, “I have an idea for a cool new app.”
Whatever it might be in your case, that core idea will help you define the type of your store.
Remember, you can build an eCommerce business of virtually any size these days. You don’t need to start with a huge corporation. Tools like Ebay and Etsy, as well as endless shopping cart systems, make launching your online business a breeze.
This step is essential since it has an impact on the tools you'll use to build your store with, as well as your general strategy and approach.
Here are the questions you should try to answer 🤔
- Do I want to sell physical products and have them delivered to the customer?
- Do I want to sell digital products and let customers download them directly?
- Do I want to sell services?
- In relation to the inventory, do I want to…
- …handle it myself?
- …use third parties to handle it for me (such as Amazon FBA)?
- …send the product directly from the supplier to the customer (drop-shipping)?
- Do I want to display wholesale rates as well?
- Do I want to sell overseas?
Each spot where you have a “yes” requires your e-commerce store platform to be able to handle that specific want.
As you begin to develop your strategy for an online business, make sure that you know exactly what you’re going to want to do with your ecommerce site.
Therefore, start by creating a straightforward list to define your absolute core requirements. Something like this:
The more information you have to begin with about your business model and sales strategy, the easier it will be to find the online store builder and shopping cart that’s right for you.
Step 2: Narrowing down your niche ⛳
As you learn how to start an online store, you get exposed to a lot of jargon. Like, something you've probably been hearing a lot, “you need to build your perfect customer persona,” or “you need to define a niche.” Those can sound incredibly vague and are hard to act on.
“I just want to sell my stuff!” – says you.
We hear that, but here's the problem:
On the web, every store is one click away.
Here's what I mean: If you're operating locally, you indeed can be the “neighborhood sock store.” There are no other stores like it in a five-block radius, and people do need socks, right?
It doesn't work like that online. Online, people can go to a thousand other stores instead of yours. They are all one click away. And they will all ship to virtually any location. As long as your customer has a credit card or bank account attached to their PayPal service, they can find million of eCommerce business options to choose from
This means that you need to differentiate and be more laser-focused in terms of who you offer your products to.
While your marketing strategy and search engine optimization campaigns will be helpful for your online store, you’ll need to start by ensuring that you’re reaching out to the right customer base.
Misconception no.1 when defining your customer base
You shouldn't just “define” your customer base by pulling them out of thin air. You need to put in some actual research here.
Ultimately, your products and services aren’t going to appeal to everyone. No matter how much your high quality business plan tries to cater to everyone, some customers are going to love what you have to offer more than others.
We have a whole other guide on how to find your target demographic, so feel free to check that out for in-depth advice.
In the meantime, start with the following:
Identify the keywords people use when looking for your products online
Google is the likely first stop for many people when searching for anything to buy.
Because of this, virtually every eCommerce business starts off with some manner of search engine optimization. When you’re building your own online store on eBay, Etsy, Shopify, BigCommerce, or virtually any other website builder, you’ll need to keep search engine performance in mind.
Keywords are an essential component of search engine optimization, Google AdWords advertising (PPC), and virtually any other marketing strategy you can think of.
While a lot of people will simply put “socks” into Google, those customers are probably interested in any type of socks and will buy whatever's cheapest = Amazon. You can't compete with that, so let's dig a little deeper.
Many people get real specific about the kind of socks they want to buy:
- “warm socks”
- “trekking socks”
- “motorbike socks”
- “cheap motorbike socks”
You can take any of such keywords and put them through a tool called Google Keyword Planner (GKP). It will let you know how many people search for any given phrase each month. GKP will also suggest other keywords for you to look into.
Therefore, your first order of business here is to replace “socks” with your product names and try drilling down to find some phrases that are in tune with what you want to sell and that are also kind of popular online (1000 searches a month or more).
Here's a how-to on using GKP.
After you have a handful of those phrases lined up, you can define your niche in more precise terms. Maybe you want to target your hand-made bags to moms of toddlers? Or your clothing to dads in a hurry? Whatever that might be, it's officially a niche!
Knowing the niche for your ecommerce business will help you to speak the language of your target audience when you’re building your marketing strategy.
The more you understand your audience and what they want from your product descriptions and online marketplaces, the more you can convince them to use their credit card with your online shop.
Step 3: Doing market research 📊
There's basically only one goal of market research when you're learning how to start an online store. And that is to make sure that there indeed are people in your niche that are eager to buy.
After all, you don't want to wake up with a shiny new store, only to find out that there's no one willing to check out the merchandise.
Research is something that you’ll need to get used to when you’re building a successful online store. We’re living in a world where customers expect websites to be built specifically according to their preferences. If you want your online shop to thrive, and your eCommerce sales to grow, then you’ll need to understand the online marketplace.
There are a few ways to go about market research:
- (a) Research what your competition is doing and emulate them to an extent.
- (b) Examine where your prospective customers hang out online, how they decide what to buy, how they compare products.
- (c) See what the most common questions or challenges are in your niche.
From the top:
(a) Spy on your competition
First order of business, if there's no apparent competition in the niche, then there's no niche. Being the first one on the field works only in movies.
The best way to start is to go to Google. Do a couple of searches using some of the keywords you found during the earlier stages described above. You should find a handful of competitors that way, or at least people selling similar products. Apart from that, you might also already be able to name a couple of competitors just off the top of your head.
Now it's time to spy on what they're doing online.
I have two favorite tools for that purpose. You can do basic research with either of them for free, but if you want to get more in depth, you'll have to buy a subscription … which you can still cancel after a month when you're done with your research, of course.
The first one is SEMRush. They advertise themselves as a service for competitors research, which sounds perfect.
When you input a domain name of your competitor, you'll see all sorts of info about their website:
- their main keywords
- their best backlinks
- their top link texts / anchors
- general stats on their projected traffic, number of backlinks, and more
Example screen:
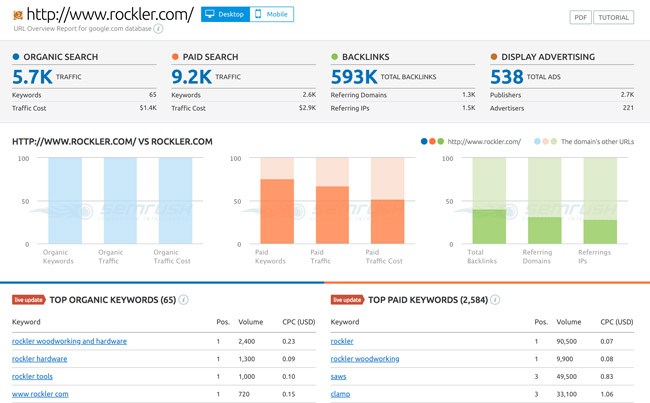
The goal here is to try figuring out what it is that the competitor does to promote their store. What sort of links they get? Can you get some of the same companies to link to you as well? Which keywords do they pursue? Should you go after them too? And so on.
The right thing to do here is to spend a while looking through all the info that SEMRush has on your competitors and get as many insights as you can.
The other tool is Buzzsumo. This one is great at revealing what the most popular pages on your competitor's website are, and possibly their most popular products as well.
Just type in a domain name and see what pops up.
Example:
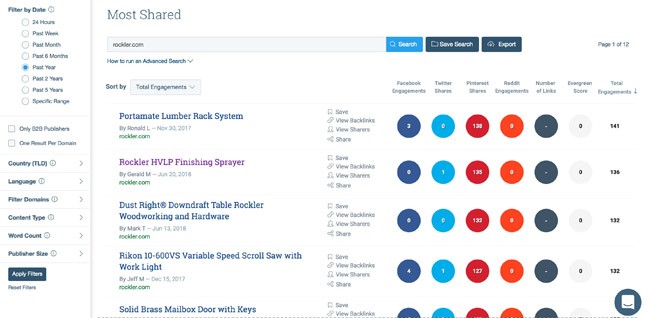
The questions to ask would be: What makes those the most popular? Can I offer something similar?
Next, go to the social profiles of your competitors and see what you can learn there:
- What sort of updates do they post? Just product promos or custom content as well?
- How often?
- Do they engage with their followers?
- Do they only cover what's going on in the niche or comment on the news as well?
This type of research can signal what sort of things you will have to be doing as well if you want to be relevant.
For instance, it takes more than just listing products for your eCommerce business online and implementing a reliable shopping cart to be successful online today. You’ll also need a marketing strategy that include things like search engine optimization, google adwords and PPC, and even content marketing.
Analysing your competitors carefully will show you how to write product pages, blogs, and other pieces of content that attract people to your online shop. You don’t even need to be an expert blogger to get started.
(b) Find out how your customers decide to buy online
This varies from niche to niche quite massively. There are a couple of ways to find out how people make up their mind when buying:
- if you're a member of the niche yourself, look at your own buying behavior,
- discover where your potential customers hang out online and how they compare products.
The main places you should go to do this kind of research are online communities in the niche, forums and Facebook groups.
We have an excellent guide on how to find relevant forums and Facebook groups in your niche here. Check it out for a walk-through.
The goal is to get into the brains of your potential customers and see what they talk about in relation to the products, how they compare different products before buying and what they really value in specific products. This is knowledge you can use later on when building your online store.
When you know what your customers look for from an eCommerce business in the search engine, you can build your marketing strategy around their needs. Remember, a good business plan will include a range of ways to connect to your target audience, including everything from search engine optimization, to PPC.
(c) Find out some of the FAQ in the niche
The final place you can visit to learn about your potential customers is Quora.
Quora is a questions and answers type of website. Anyone can go there, ask any question imaginable, and get multiple responses from the community. There are myriads of topics covered on Quora, so there's also likely a section for your niche.
Go to Quora, and use the search field to find relevant threads. Pay attention to:
- the most common questions in your niche
- the challenges that people seem to be struggling with the most
- product alternatives that people ask for
- questions on how to use a particular product
This sort of information can be a goldmine when deciding how to position your new store.
In summary, what you should have walking out of the market research phase:
- a good idea that there indeed is a group of people possibly interested in your products,
- insight as to where those people hang out online,
- knowledge on how they decide what to buy,
- the websites they go to for information and the reviews they read,
- the everyday struggles and challenges.
All of this valuable information will help you to design your online business based on what you know about your customer’s journey. If you know the process that your customer goes through to get from the point of learning about your business to using their credit cards, then you can start to boost conversions.
For instance, you might discover that your eCommerce site needs a robust PPC marketing plan to capture the attention of customers on a search engine. Once you’ve pulled your customers onto your product pages or online shop, you need an SSL certificate to show them that you’re a high-quality and credible company. You might even need to nurture your customers over time using a long-term email marketing strategy. Some online store builders like BigCommerce even come with integrations to email marketing tools built-in.
Once you finally convince your customers to go to your shopping cart plugin, you’ll need to ensure that you have the right payment gateways in place, and that you’re not scaring clients off with high shipping costs. All of these steps come together to form a strong customer journey.
Step 4: Choosing an e-commerce platform 🛒
Now that you have a basic idea of the customer journey that you need to cater for, you can begin to look for an online store builder and eCommerce platform. The first thing to remember here is that there’s no one-size-fits-all strategy for your eCommerce business.
If you want to start an online store, you'll be happy to know that there are more than a dozen viable e-commerce software solutions and platforms to choose from.
However!
This abundance isn't always a good thing.
After all … what if you choose the wrong one?
So here's what we're going to do:
I'm going to show you a rather sizable comparison table of the top online store platforms. You'll find all the details you need here. Then, below, I'll give you my shortlist of just the top two selections: the recommended and the budget solution.
“Which platform to use?” is the most common question we get here at ecommerce-platforms.com.
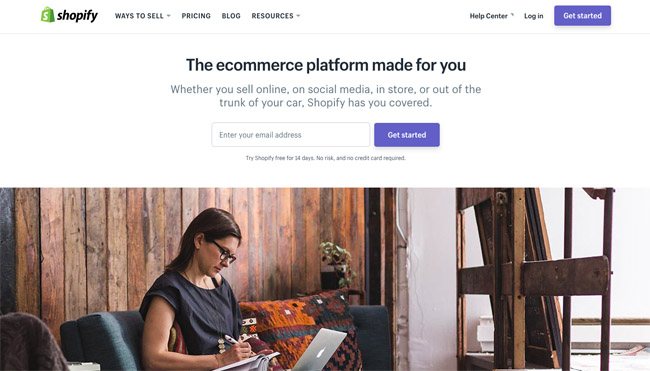
In 90% of the cases, the answer is Shopify. Shopify is the leader in the e-commerce space and offers you all the functionality an online store could need. It can handle both physical and digital products, drop-shipping, and even services.
Meaning, no matter what you want to sell, you can do that with Shopify. Add to that, launching your store with Shopify can be done in minutes (tested) and you don't need to go anywhere else for any of the other pieces of the puzzle (like the domain name). Shopify is also affordable, starting at $29 a month.
- Check out our Shopify review to learn more about the platform.
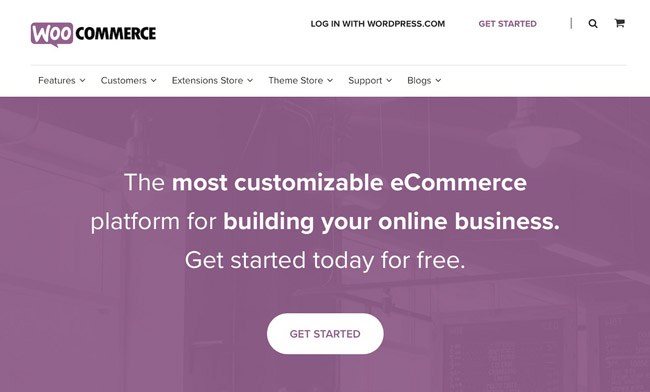
Now, what about the other 10%? Well, that's usually where the budget choice comes into play. That setup is WordPress together with WooCommerce:
- WordPress is an open source website engine.
- WooCommerce is an open source online store platform that runs on WordPress.
What's great about this setup is that it's incredibly customizable while also being more than affordable. To say it simply, both platforms are free. So the only things you need to pay for are the domain name and hosting (this could be around $60-$80 a year).
- Check out our WooCommerce review to learn more.
(Having tough time deciding between the two? Here's our head-to-head comparison: Shopify vs WooCommerce)
Remember, there’s more than just WooCommerce and Shopify to choose from for your eCommerce sales too. You can also build an online shop using website builders like BigCommerce. There’s also various tools out there that integrate naturally with online marketplace services like eBay and Etsy too. Choosing a website builder with lots of plugins and integrations can help you to ramp up your eCommerce sales.
Step 5: Naming your store & choosing a domain name 📛
Finding a name for your store is probably the most fun part of the entire process when building an online store.
Still, it's a critical step, and it shouldn't be taken lightly.
After all, a successful online store needs a great name. Choose the wrong title for your eCommerce site, and even the most marketing strategy or email marketing campaign won’t be able to convince people to buy from you.
First off, consider having your niche's main keyword in the store name. This can have some SEO benefits.
For example, if you want to sell designer socks, then including “Designer Socks” as part of the name will send a signal to Google that they should perhaps rank you for the phrase.
However, at the same time, a name like “Designer Socks Today” might sound a bit dull, despite it being highly keyword-optimized.
On the other end of the spectrum, we have brandable names. Those usually consist of words with no prior meaning that combine into a sweet sounding and memorable name. Think “Google” or “Amazon.”
The downside is that those brandable names don't bring any SEO benefits.
More or less, this plays something like this:
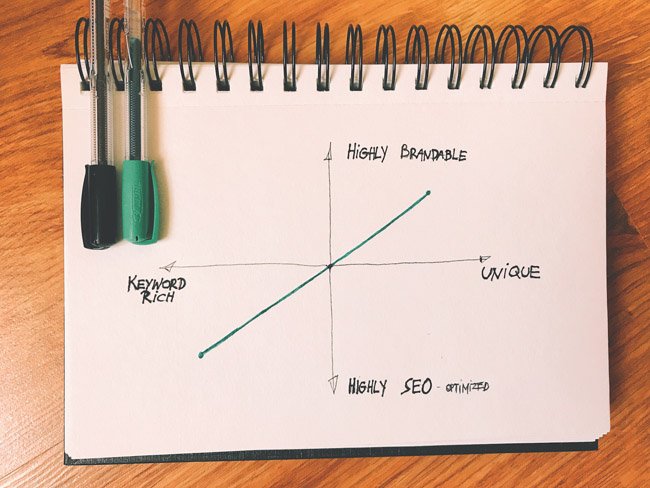
The perfect scenario would probably be to meet somewhere in the middle – get some SEO benefit from the name while also retaining much of its brandability.
I like to use two tools when brainstorming names:
(a) The business name generator by Shopify. It's a free tool.
All you do is provide a seed term, and then Shopify will suggest some cool names based on that. It also checks available .com domains that you can use with that name.
(b) LeanDomainSearch. This one is similar to Shopify's tool, but it displays everything on a single screen, which might be easier to scan through.
The usage is the same. Just enter your seed keyword, and the tool will do the rest. It checks for available .com domains as well.
If you see anything you like, note it down for later.
Step 6: Understanding web hosting 🕸️
Important! If you've decided to go with Shopify or any other all-in-one e-commerce store solution, then feel free to skip this step entirely. If you're going with WordPress + WooCommerce, this step is for you.
Web hosting (or web server) is where your online store is kept and from where your customers can access it.
Just like choosing a shopping cart or website builder, finding the right hosting is an important part of your business model.
The good news is that there are companies offering optimized hosting platforms without requiring you to understand what's going on under the hood.
There are, however, things you should pay attention to when picking your hosting platform (and don't worry, I'll give you some recommendations below):
- Dedicated IP addresses.
- SSL certificates – to make the shopping experience secure for your customers.
- PCI compliance – The Payment Card Industry Security Standards Council is a body responsible for overlooking the e-commerce space. You want a host that meets their compliance requirements.
- Good performance – if your site takes a lot of time to load = less sales.
- Perfect uptime – with your site down, no one can buy anything from you. 99.99% uptime is reasonable.
- Fast-acting support – should you have any troubles, you want to be able to contact someone for help.
- Automated backups – you always want to have recent backups of your store data (orders, products, etc.).

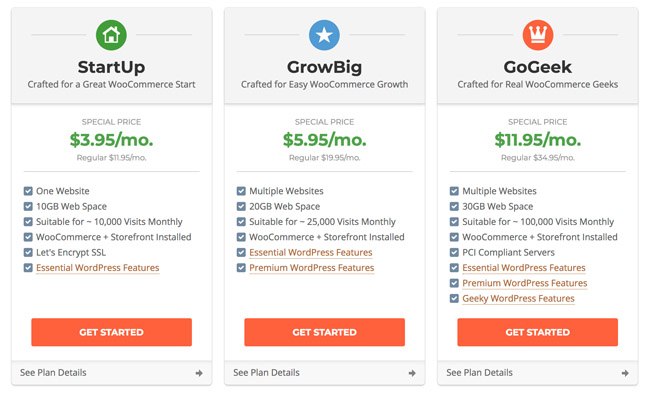
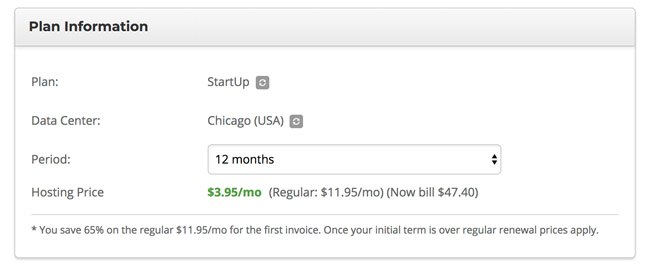
- SiteGround WooCommerce hosting. Easy to get started with and really affordable. When you're launching a new online store, it's only $3.95 a month + $15 annually for a domain name (total of $62.40 / year).
SiteGround has perfect support, offers excellent performance, free SSL integration, and every other perk that a new online store owner could need.
Other options:
- WPengine Hosting – from $23.33 / month.
- WooCommerce Hosting by Dreamhost – from $3.92 / month.
- Liquid Web WooCommerce Hosting – from $19 / month
- Bluehost WooCommerce Hosting – from $6.95 / month.
Check out our Ecommerce Hosting reviews to learn more about them.
We'll show you what to do with your hosting platform of choice in the next step.
Step 7: Launching a blank online store 🛍️
With the engine of your store selected, it's now time to get it running. Here's how to start an online store:
To begin with, you’ll just be working with the basics. You need to get the foundations right if you want people to use their credit card with your online business.
There are two alternative paths that we'll present here, based on your e-commerce platform of choice:
- Path (a) going with Shopify
- Path (b) going with WordPress and WooCommerce
Those are the two most popular paths that people take when building a new e-commerce store and also our recommended approaches.
Path (a): How to start an online store on Shopify
This is going to be quick! Shopify is dead set on making it as easy as possible to get started with the platform and go from nothing to a working store in mere minutes.
All you do is go to Shopify.com and click the main Get Started button that's in the top menu.

After that, it's Shopify that takes the initiative and takes you by the hand through the setup process.
It will:
- let you set a name for your store,
- ask about what you're selling so it can optimize the look of the store,
- let you pick a domain name,
- install everything for you,
- show you through the main Shopify interface after the install.
We have a separate resource on how to build a Shopify store in less than 15 minutes. It features screen-by-screen instructions and guidance on how to go through the installation. You should check it out.
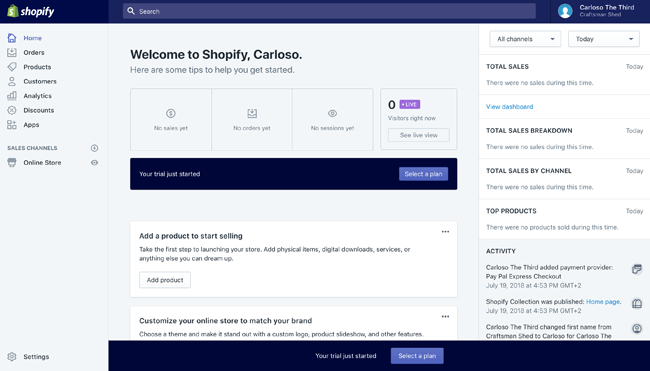
When you're done, your administration panel for the store will look something like this:
Path (b): How to start an online store on WordPress and WooCommerce
First, go to your hosting platform of choice. If you've listened to our recommendation, you're most likely with SiteGround WooCommerce hosting.
Start by clicking on Get Started next to the plan of your choice.
In the next steps, SiteGround is going to ask you all the usual stuff, like your name, email, country, payment information, and also confirm the plan you're selecting. Let's stop at that last thing:
The thing to pay attention to here is the server location. Pick the one that's the closest to your actual target audience. It's going to make everything run faster for them.
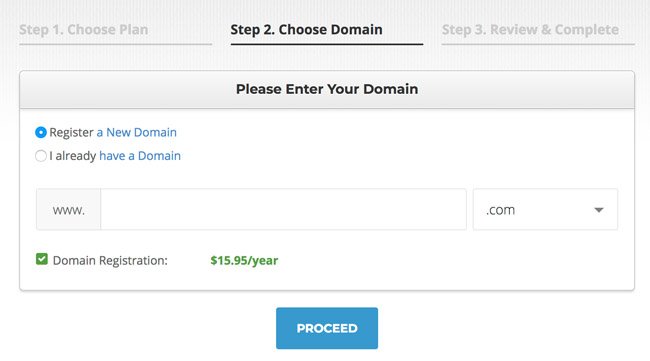
Next, SiteGround is going to let you register a domain for your new store. The cost of this is $16 a year. Enter the domain name you've chosen at earlier steps in this guide.
Lastly, SiteGround will propose to have both WordPress and WooCommerce pre-installed for you.
So after a couple of minutes of what's basically clicking around and filling out form fields, you end up with a working online store.
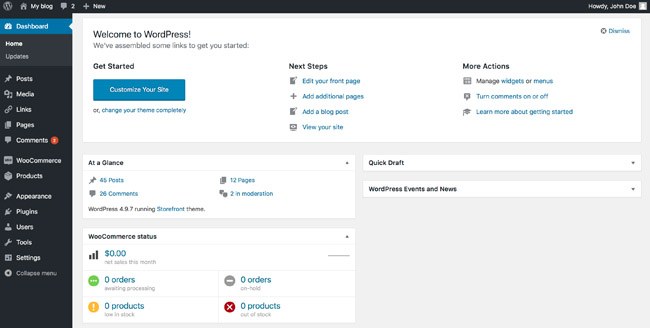
When you're done, this is what your administration panel for the site is going to look like:
Step 8: Picking a store design and customizing it 🎨
At this stage, you have a blank store – there's nothing in it, just the software all configured and ready to go.
The first thing we can do here is to customize the design.
The right design for your online shop will help to keep customers engaged with your product pages. When someone clicks through to your store from the search engines, they notice a number of things straight away. First, they’ll see your SSL certificate and whether your site is secure. Next, they’ll notice your store’s appearance – and how professional it looks.
Here's how to pick the right design:
Again, spy on your competition
This is, once again, a great moment to spy on your competition. Come back to the same competitors you researched during the market research phase, and look at their store designs:
These are just some of the questions worth asking. Jot down your conclusions – and especially if you're finding the same things with more than one competitor.
The reasoning here is that if something is standard practice in the niche, it's probably because it works.
With all that knowledge, come back to your e-commerce platform's design selection module, and look for themes/templates that seem to be the most in tune with your needs.
But!
Whatever you do, don't pick a design solely based on the fact that you like it visually. Trust your research and the niche. If you can see something in use over and over again in your niche by multiple competitors, then it might be a good idea to use it as well – even if you don't find it particularly appealing visually yourself.
Remember that you’re trying to convince your target audience to trust you enough to use their bank account or credit cards with you. You can only do that if you take their preferences into account.
Path (a): How to pick a design in Shopify
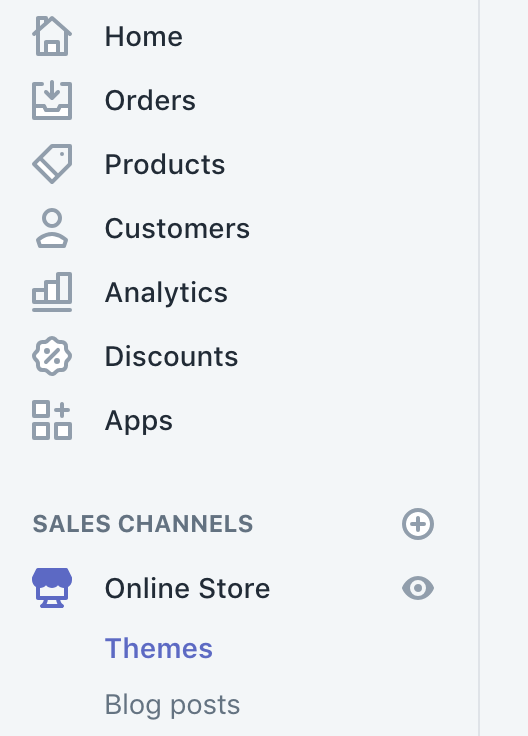
As you sign up, Shopify will assign a theme to your store by itself. To change it, from the main panel, go to Online Store → Themes.
There, you will be able to explore both free and paid themes to spice up your store.
To switch to a new theme, first click on Add THEME_NAME. This will add the theme to your site, but not activate it yet. At this stage, you can preview the theme and see if you like it.
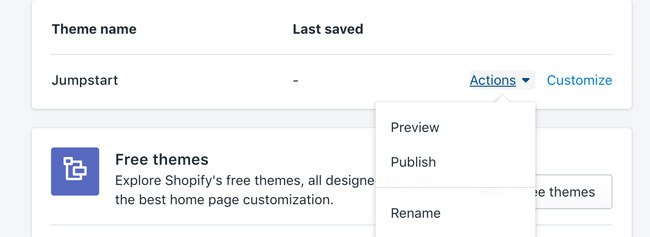
If you do, you can click on Publish.
Now it's time to customize the theme, add your own graphics, logo, colors, etc. We're doing all this to make the store fit in with your business identity.
First, click on Customize next to your theme.

To make the process quicker, Shopify will suggest you get started with a set of temporary images from a couple of categories such as food, women's fashion, home, jewelry, men's fashion, etc. This is a friendly helper to speed things up.
The design customization interface of Shopify is really cool and offers a lot of options. Here's what's up:
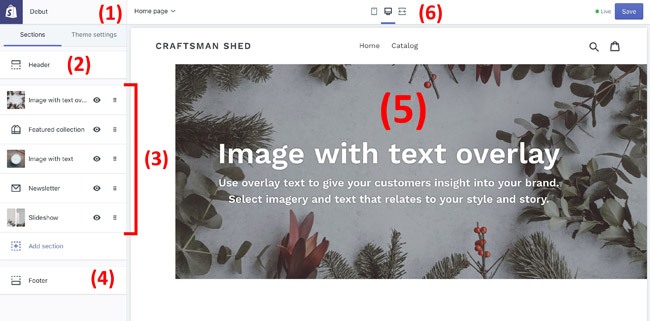
- (1) It's where you can adjust the sections on the homepage, as well as the general theme settings such as colors, typography, social media, etc.
- (2) Settings for the header of the store – upload your logo, tune up the alignment, and more.
- (3) This is where you get to configure, add/remove, and edit the current sections of the page. By clicking on any of the sections there, you can adjust their details and fine tune.
- (4) This is where you can set the footer of the store.
- (5) The main preview window of your current design.
- (6) Switch from desktop to mobile to full-width view.
Spend some time here and adjust every little detail until you like the outcome. This interface is impressively easy to use, so you should have a great time with it.
When you're done, just click the main Save button.
Path (b): How to pick a design in WooCommerce
There are two directions you can take: either go for a free theme or a paid one. The paid ones tend to be more unique and original.
For free themes, go here. This is the official repository of free WordPress themes filtered for e-commerce. Alternatively, you can go with the default WooCommerce theme, Storefront.
For paid themes, go either here or here. The former is the biggest WordPress theme marketplace online, filtered for their e-commerce category. The latter is the official theme directory of WooCommerce.
When getting your theme, you will typically download a ZIP file containing it.
Take that file, and go to your WordPress dashboard, into Themes → Add New, click on the Upload button, and upload that whole ZIP.
After that is done, click another button to activate the theme. At this stage, you have your new design live on the site.
The next step is to customize it slightly to include your logo, colors, and other visual identities.
The exact way in which you'll be able to do that depends on the theme you've chosen.
In general, most of the quality WordPress themes allow for customizations if you go to Appearance → Customize.
The panel you'll see features a lot of tabs handling different sections of your store's design.
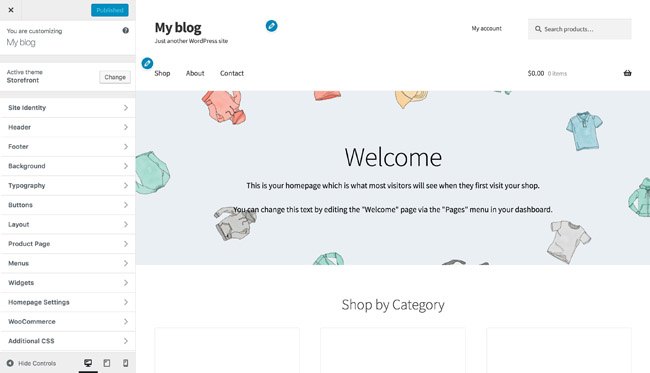
Explore each one to change your logo, typography, backgrounds, headers, and more.
The goal here is to use the colors that are in tune with your business identity, logo, and overall brand.
Here's a cool resource of ours that might help your design inspiration: the top 50 e-commerce websites and their designs.
Step 9: Dialing in your store's core settings ⚙️
With the design out of the way, we still have to take care of some core settings that your store can't run without.
While there are plenty of plugins and other tools that you can add to your online shop, you’ll need to start by making sure that you get the basics right.
This involves things like currencies, measurement units, tax settings, addresses, and everything else to that tune.
Store settings in Shopify
Click the main Settings icon in the bottom left corner. You will see a menu of all the settings you can adjust for your store. Some of the key tabs:
- General – store name and address, standards and formats (unit system, time zone, etc.), main store currency.
- Payment providers – how you want to collect payments from customers. By default, you get PayPal, but you might want to enable other payment methods to get lower fees on money withdrawal. Here are some sound PayPal alternatives. Make sure that you’re offering all the payment gateways that your customers prefer to use with their credit card and bank account purchases.
- Checkout – whether or not customers need to register to buy, plus what other info is required from customers, etc. Make sure that the checkout you choose comes with simple and easy-to-understand navigation, and plenty of security features.
- Shipping – shipping rates, saved package sizes, possibility to integrate your store with FedEx, UPS and more. Try to keep your shipping costs low, or help your audience to understand what they’re paying for.
- Taxes – aka the real fun stuff … not. Joking aside, this is a key panel to set up correctly. Consult with your local requirements and legislations to put correct rates here.
- Notifications – get notified when an order comes in, etc.
With all those sorted out, you can proceed to add your first products.
Store settings in WooCommerce
To enter the main settings, go to WooCommerce → Settings. You'll see a handful of tabs there. The key ones:
- General – the address of your store, locations you sell and ship to, whether you want to enable tax calculations, the main currency settings.
- Products – weight units, dimension units, whether you want to enable product reviews, inventory settings, settings for downloadable products.
- Tax – make sure to consult with your local authorities before setting the taxes in this panel.
- Shipping – set shipping zones for delivery to different regions of the country or globe.
- Payments – set how you want to collect money from your customers. The default option is cash on delivery, but you can enable PayPal easily. You can also get more payment gateways for WooCommerce as add-on plugins. It's actually recommended to look into some PayPal alternatives, which can be cheaper in the long run.
- Account & Privacy – do you require your customers to create user accounts before they can buy(?), etc.
- Emails – get notified when new orders come in, etc.
Once you're done with all that, it's time to start adding your first products!
Step 10: Adding your first products 🎁
Adding products in Shopify
This couldn't be easier – just go to Products and click on Add product.
For each product, you can specify its name, description, images, price, inventory, weight (and other shipping details), product type, collection (use that to group products that fit together), tags, and a couple of other parameters.
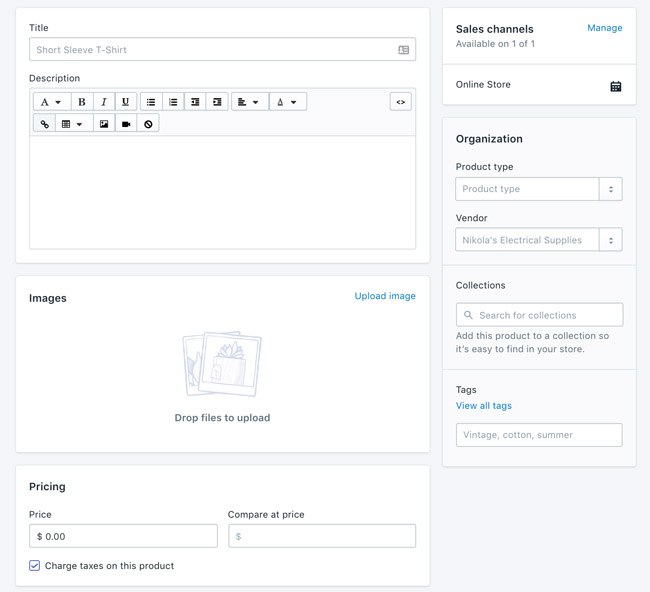
Click on Save once you're happy with your new product. You'll see it immediately in your All products list. Repeat for all your other products.
Adding products in WooCommerce
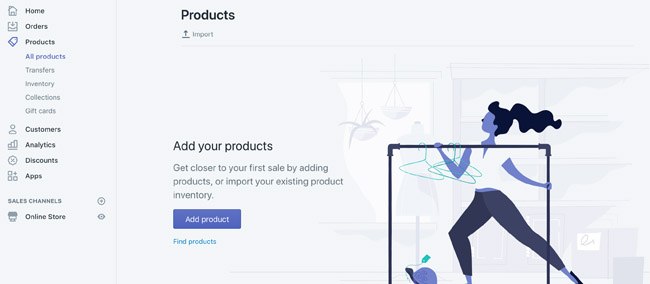
To add your first product, go to Products → Add New.
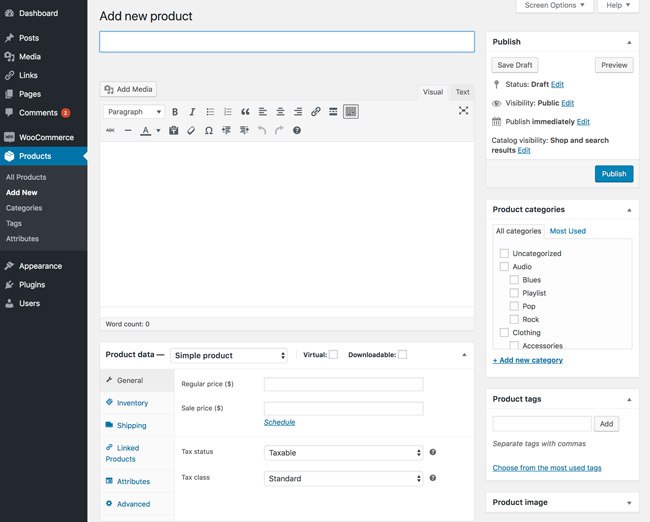
For each new product, you can set a name, main description, images, product type (simple product, grouped, affiliate, virtual, downloadable), price, tax status, inventory, shipping details, linked products (that fit together), product category, tags.
When you're done, you can click on Publish. The product is going to appear in the main list in the All Products section of the dashboard.
Step 11: Your before-launch checklist 🏁
You’re almost ready to bring your online business to life.
Following the steps above, you’ve designed a high quality online store that goes far beyond the capabilities of online marketplaces like ebay or etsy. You now have your own online store that you can rely on to attract customers and convert them into valuable long-term clients.
At this stage, you have everything set up and ready to go, and you've officially learned how to start an online store. But hold your horses! It's an excellent moment to do some final checks and make sure that everything works as it should.
- ✅ Does the main website navigation work as it should? Can you get to all the pages, categories, products without fail?
- ✅ Is your logo at the top (or top left)? Does it look correctly (not stretched or anything)?
- ✅ Is the cart icon in the top right?
- ✅ Does the cart work when you add new products / remove them?
- ✅ Does the checkout process work correctly? Can you actually buy a product from start to finish?
- ✅ Have you disabled test payments? Test payments are something that most e-commerce solutions will give you so that you can test out your checkout. When you're ready for launch, disable them so people won't be able to get your products for free.
- ✅ Do you have pages detailing all the legalities of your store, such as privacy policy, terms and conditions, returns, etc.?
- ✅ Is the registration optional when buying from you? It should be.
- ✅ Do you have an “About” page? Explain what your store is and how it came to be.
- ✅ Do you have a working “Contact” page? A page with a contact form through which people can reach you directly. Test the contact form by sending a message to yourself.
- ✅ Are all the shipping and tax calculations correct? Are your shipping costs reasonable compared to your competition?
- ✅ Does your store look good on mobile? Make sure that your on-the-go customers also get a pleasant shopping experience.
- ✅ Are you sure that all of your product pages and product descriptions look and sound professional? These are the pages that will convince your audience to make a purchase.
- ✅ Does your store integrate with any necessary online marketplaces that you may already use, such as etsy and eBay?
- ✅ Do you know how you're going to promote your store using Google AdWords, blogger techniques and other strategies?
- ✅ Are you sure that the plugins on your site are working correctly and not weighing down your page performance?
Once you've checked off all of the above, you can launch your store to the public and begin promotion…
… Content marketing, SEO, advertising, social media marketing, are just a few of the promotional methods you can use to get the word out and bring in some customers.
Make sure that you know the basics of blogger promotion and PPC before you get started. Building an amazing online store is only the first step in your strategy for enhanced sales. You’ll also need to make sure that the people in your community are aware of what you have to sell. That’s where promotion comes in.
Don’t worry, we can help with that too:
Further reading:
- 50 Out-Of-The-Box Ecommerce Marketing Tips to Skyrocket Conversions
- How to Grow Your Online Shop: 26 Ecommerce Marketing Experts Share Their Tips
Also, it's a good idea to go back to all those places where you did your research (forums, groups, etc.) and see if you can promote your store somehow there as well.
FAQ on how to start an online store 🛒
One of the most common questions that we hear from people who want to know how to start an online store is:
At the end of the day, no, not exactly.
Okay, to be more specific, you “technically” can build a store for free, but that kind of store won't allow you to accept payments. And accepting payments is kind of the whole point of having an online store, so…
…
Those things change, naturally, but I'd say that the minimum is around $60 a year. For that price, you get a domain name (yourstore.com) and a hosting plan (where your store is kept).
- In this budget model, your store will run on WordPress and WooCommerce – both free and open source software.
- For a more managed solution – where you have someone else taking care of the more technical heavy-lifting – you'll need to pay around $348 a year, plus $15 a year for a domain name. In this model, everything runs on a thing called Shopify.
More on both approaches later on in this guide.
…
Yes, you really can learn how to start an online store all by yourself. No programming or web design skills required. It’s really not as complicated as it seems anymore, thanks to the latest transformations in the digital world. The modern tools let you do everything as long as you're willing to spend a couple of afternoons going through the motions.
…
When you learn how to start an online store, you’re generally going to be doing most of the design work yourself. In this DIY approach, we'll select a ready-made design from the web and import it into your store.
…
Anything:
- physical products
- digital products (ebooks, downloads, files, software, images, etc.)
- services
- consulting, etc.
…
There are online payment methods – “gateways” – integrated into all modern online store solutions. Your customers will be able to pay for everything right from your site.
You might find that there are plenty of customers that you can use to instantly test your online store design and make sure that it’s going to deliver conversions.
Either way, you've made it all the way through this guide on how to start an online store. Here's to you! 🍾🥂
Now it’s over to you. Go and set your online store off and running. Remember, as you continue to sell products and services online, it’s always a good idea to track the performance of your store. Measuring your achievements over time will ensure that you can continue to optimize your store based on what you learn about your audience and the changing marketplace.
If there's anything we can help you with, don't hesitate to leave a comment below!


I wanted to thank you so much for the information.
I’ve been researching ecommerce for about a week now and it’s a little overwhelming but I’m starting to understand it more because of people like you,
I don’t have alot of money so my research is google search and YouTube. All free information and when someone like yourself posts this much information it shows your really there to help and not take advantage of people’s money, don’t get me wrong I understand everyone wants to make a buck but when people post articles to help others prosper free it’s a good thing.
I’ve always had the same question with any kind of online income jobs and the people who post videos and ads saying”buy my book and make 5million dollars in one year like I did”
my question is along with many others who have asked the same question, If that person made 5 million as example then why are they offering they’re book for 100 to 300 dollars ???
When I see ads like that I drop it right away if that person has that much income per yr I’m thinking they’re either very greedy or they’re full of shit (SCAM) I have seen this asked many times but you don’t usually see an answer from any of these publishers. Some will give a lame ass answer like “trust me it’s worth the money” but never get a straight up answer.
Anyway back to my appreciation for the amazing knowledge you’ve shared, I almost feel guilty asking this because of all the info you’ve already offered but if you could offer any other advice or direct me to sites to improve my knowledge with drop shipping I would greatly appreciate it
id like to find info on how to advertise worldwide with Google or facebook and I’m willing to pay a few dollars for ebooks if they offer legit information like I said I’ve only been about a week into drop shipping so anything helps
THANK YOU SO MUCH
Very useful article thank you!!
You’re welcome 😉
Thankyou very useful know I have a clearer vision on everything I was having problems with this is awesome information..
You’re welcome Jessica!