
Do you dream of one day owning the ultimate online store. Fortunately, we’re here to help with everything you need to know about creating an online store.
The good news for today’s would-be business owners, is that building an online store is extremely easy. Thanks to things like store builders, WordPress, and even dropshipping, you have countless ways to design an eCommerce website and start earning money through Pay Pal and credit card payments in no time.
Of course – there are still some challenges to overcome.
If you want to get the most out of your online ecommerce business, then you need to know how to do everything from buying your own domain name, to establishing a SEO strategy for digital growth via Google and other search engines.
So, here’s your ultimate guide on how create an online store.
How to Create an Online Store: Table of Contents
- Step 1: Picking the Right Products
- Step 2: Validating Your Ecommerce Ideas
- Step 3: Sourcing Your Stock
- Step 4: Choose Your Ecommerce Website Builder
- Step 5: Choosing the Right Plan
- Step 6: Getting Your Domain Name
- Step 7: Pick Your Ecommerce Theme
- Step 8: Customize Your Ecommerce Theme
- Step 9: Start Listing Your Products
- Step 10: Establish Your Payment Methods
- Step 11: Figure Out Your Shipping Strategy
- Step 12: Get The Extra Features Ironed Out
- Step 13: Publish and Promote Your Online Store
- How to Create an Online Store: FAQ
- Conclusion
Step 1: Picking the Right Products
Type “how to create an online store” into any search engine, and you’re bound to get tons of articles telling you how to set up your online business with an ecommerce platform like Shopify, or how to sell products through Amazon. However, before you can get to that point, you need to start by choosing the right products for your online store.
Choosing the right products means thinking carefully about what you want to accomplish with your own online store. A consideration of your passions and what you know the most about will help you to find your niche. Ask yourself:
- Which industry are you most comfortable with? Do you have a background in fashion, hair care, computing, or something else entirely? How will that affect your selling strategy?
- What problems are you trying to solve? Other than making money, what do you want to accomplish with your online business? Do you want to make life easier for parents, or help kids to have more fun?
- What kind of products are you passionate about? If you love the products that you’re selling, it’s going to be a lot easier to advertise them in a way that captures audience attention.
Once you have a list of potential products and niches that you want to explore, you’ll need to validate your idea. This means examining the marketplace to see whether there’s any evidence that your product is going to attract profits.
How to get Shopify for $1 per month for the first 3 months?
Shopify has begun offering a special deal for sellers who sign up for a new Shopify plan. That deal?
Pay Shopify $1/month for the first 3 months of full access to the platform!
This offer is is now available on all standard plans: Starter, Basic, Shopify, and Advanced.
There are a number of ways that you can validate your niche, but most people start with a keyword research tool. Entering a keyword for your industry into something like Semrush will help you to see what people are searching for online.
Remember, just because there’s more people searching for a certain product doesn’t mean that it will be the right option for your eCommerce company. The best products for you are going to usually be the ones that have high potential, but low competition.
Keyword difficulty is the metric that you’ll need to check when it comes to understanding competition. For instance, you might do a search for musical instruments, and find that there’s more volume for “buy guitar” than “buy violin”.
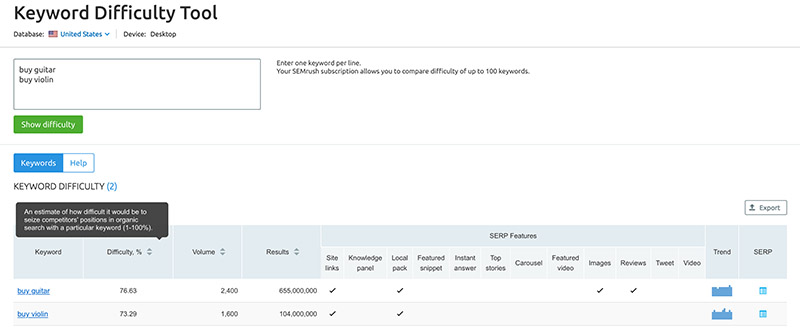
However, if the keyword difficult is also very high for guitars, then you might struggle to break free from the rat-race by focusing on guitars alone.
Step 2: Validating Your eCommerce Ideas
Aside from validating your ideas by checking that there’s plenty of search volume for the product or niche that you’re going to focus on, it’s also worth making sure that you can compete by looking at the competition.
Competitor analysis can be a tricky thing when you start your digital business.
On the one hand, you don’t want to get too bogged down worrying about what your competition is doing. That kind of thinking could lead you to try and copy and paste your competitor’s strategy, which makes it harder for you to stand out.
On the other hand, a competitor analysis will also help you to see which products sold by your competition are most valuable and popular.
If you want to be a fashion retailer, for instance, you can check out other fashion companies in your area and find out what their top-selling products are.
You can also use gap analysis to figure out whether there are any customer bases that your competitors aren’t covering. For instance, maybe the biggest fashion brands in your region offer a lot of great clothes, but they don’t have sections for tall and petite buyers. These extra niches could help you to attract more customers and differentiate yourself.
Competitor analysis also gives you an insight into how much you can expect to sell your online stock for. This information will come in handy when you’re figuring out whether your eCommerce business could be profitable after you account for supply and selling expenses.
Competitor analysis can start with a simple search on Google.
However, you can also track down competitors by assessing some of the hashtags related to your industry on social media or looking at the comments left on industry forums.
Step 3: Sourcing Your Stock
Once you know what kind of products you’re going to be selling online, you need to get your hands on those items.
Some people think that they need to track down an online store builder or create an account on Amazon before they begin sourcing stock. However, it’s usually much easier to decide how you’re going to supply your inventory first.
Deciding what you’re going to do about stock will make it easier to decide whether you’re going to need to purchase things from a supplier, or whether you need an ecommerce website builder that comes with dropshipping tools built-in.
Your first option for sourcing stock is purchasing it from a supplier and reselling it yourself. The great thing about this choice is that you have complete control over the supply chain. You can check the quality of the stock for yourself and making sure that you’re delivering the best possible experiences to your target audience.
Unfortunately, stocking your products and delivering them yourself also comes with a few downsides. For instance, you’ll need to invest cash in purchasing items that may not sell. Additionally, you need to pay for everything from storing those products in a warehousing, to dealing with shipping on your own. This can make running your own online store a lot more expensive.
The second option, dropshipping, is becoming an increasingly popular and user-friendly option or ecommerce business owners that want to keep things simple. With dropshipping, you can still source high-quality items from your online shop. The difference is that you only purchase the goods that your customers have already ordered, reducing your expenses significantly.
Additionally, with dropshipping, the supplier you choose will handle order fulfilment on your behalf. You don’t have to ship anything yourself, making your business a kind of middle-man in the sales process. There’s no upfront investment required here, and you can enjoy the benefits of being able to work with countless dropshipping suppliers through extension for WordPress and Shopify – among others. You can even access dropshipping with BigCommerce.
However, as mentioned before, there are some website builders that don’t offer the best dropshipping tools for building a successful online store. That’s important to keep in mind as you head to the next step.
Step 4: Choose Your Ecommerce Website Builder
Okay, you know what you’re going to sell and how you’re going to sell it. Now it’s time to get into the nitty gritty process of building your online store, step by step.
To sell products online, you’re going to need a website that not only attracts customers with search engine optimization and various plugins, but also encourages purchases. A good checkout process and well-written product pages are essential, as are options to make payments through multiple methods, like Stripe and PayPal.
The biggest issue that you’re likely to face when choosing a website builder, is that there are so many options out there, it’s hard to know where to start. If you don’t have any experience with designing an ecommerce site, making the choice between Shopify, BigCommerce or Wix is often easier said than done.
Although we can’t tell you which ecommerce site builder to use, we can offer our advice for certain kinds of stores. For instance:
If You’re Building a Large eCommerce Store
If your plan is to build a huge ecommerce website that sells hundreds of products to customers all around the world, then you need a very specific kind of site builder. Shopify is usually the best choice for companies that generally have a turnover of $1000 or more and need to sell at least 10 products.
Shopify is known across the globe for it’s excellent selection of themes and product options to choose from. Additionally, there are various pricing packages available, so you can find something that’s likely to suit your budgetary needs.
With premium products like Shopify Plus once your business grows to a certain level, Shopify makes it easy to scale your company according to your needs. It’s definitely one of the most scalable store building solutions on the market. What’s more, you can start off on the cheapest plans and work your way up too!
If You’re Building a Small eCommerce Store
So, what if you’re a small business just looking to get started with some new products? Well, Shopify will still give you the functionality that you need to sell items to potential customers. However, you’ll probably have a much easier and cheaper time with something else.
For instance, Wix is one of the most popular fully-cloud-based software options for companies that want to start their new online business from scratch. Wix stands out as an amazing one-stop-shop if you’re an entrepreneur with very little technical know-how. Because everything is very easy to use, you don’t need to worry about hiring a professional to do the hard work for you.
Wix breaks creating a website down into a series of simple steps, so you can move at a time and a pace that suits you. Additionally, all Wix pricing plans come with a 14 day free trial, so you can test the software before you jump in. The site offers things like drag-and-drop functionality, responsive and free themes, powerful reporting, SEO tools, and so much more.
While options like Shopify and Wix are great for business owners that need to build their entire online store from scratch – you might be wondering what you can do if you already have a website. For instance, if you already have a WordPress site, then you’ll need to look for an eCommerce store builder that allows you to plug your sales tools into your existing website.
You might even decide to stick with something like WooCommerce, which implements online store features into the WordPress experience, so you can start monetizing your website much faster.
Step 5: Choosing the Right Plan
Remember, no matter which route you choose to take when selecting an online store builder, you’ll need to think about the kind of plan that you can afford. Companies like Weebly come with very small pricing packages, starting at around $12 per month, while others are much more expensive.
Additionally, the more functionality you need, the more you will have to pay. Most online store providers will ramp the features that you can access up depending on how much you’re willing to shell out. For instance, you can get things like real-time analytics for your ecommerce site or landing pages to build your email list at higher levels.
When deciding on the plan that’s right for you:
- Figure out how many products you’re going to sell: If you’re only planning on running a small business, then you can probably get by with a small plan that doesn’t have a lot of extra features. For instance, BigCommerce and Shopify don’t put product limits on any of their plans. However, the more products you sell, the more you’ll probably benefit from upgrading to a better plan. That’s because you can save a lot of cash in transaction fees on higher-paid plan options.
- Decide which features you need: How advanced do you need your ecommerce solution to be? Are you looking for something that can accept a lot of different payments from things like PayPal and stripe? Do you need integrations with things like Google AdWords? Check the features available with each package before you invest.
- Think about support: Not only do higher-tier packages give you the option to sell more products and share your services with more people in your team, but they can come with better customer support too. If you think that you need a lot of hand-holding to get your business up and running, then a premium package may be the best option.
- One thing worth keeping in mind when selecting your ecommerce website builder package, is that cheaper doesn’t always mean better. Although it’s tempting to focus all your energy on finding something that’s going to suit your budget, the more you pay, the more you get.
For instance, paying for a higher package could allow you to access things like multi-channel integration. This means that you can sell on other channels besides your website, like Facebook and Instagram. More sales options also means more opportunities to gain new customers online.
Other features of high-level pricing plans can include things like abandoned cart recovery, which can help you to recover anywhere up to 15% of your lost sales. Before you dive head-first into choosing the least expensive ecommerce builder for your store, make sure that you’re really getting the most value for your money out of the package.
Can You Build an Online Store for Free?
If struggling to figure out the best pricing package for your needs turns out to be a hassle, then you might decide to examine free alternatives.
The most important thing to remember here is that although you can get the software for building your online store for free, there are other things that are going to cost you.
For instance, you’ll still need to pay for your supplies, and deal with the costs of things like shipping rates, or transaction rates from your card processors. Don’t get carried away thinking that you can create something out of nothing.
The good news is that you can build most of your store for free, using a SaaS solution like Square Online Store. This simple solution allows business owners to build the basics of their online store for free. The best thing is that you don’t need to know a lot about coding and website design to begin building your site. You can jump straight in with drag-and-drop functionality.
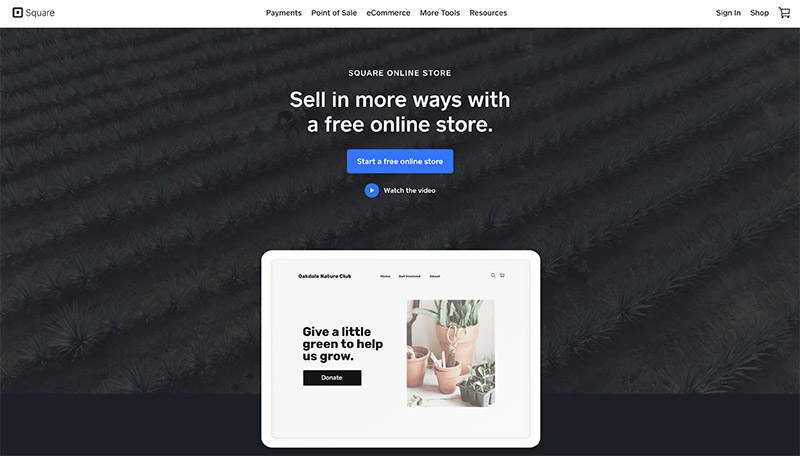
Of course, this simplicity also means that the experience you get from Square is unlikely to be as advanced as the solutions that you can find from other website builders on the market. On the plus side, without spending a penny, you’ll have access to:
- A free domain name and URL
- Free unlimited hosting for your site
- Inventory tracking and inventory management
- Responsive themes for your website design
- Integrated reporting features
- Integration with the POS tools from Square
- In-store pickup support
The only thing that you really pay for with Square is the transaction fees (and the shipping fees- but that’s standard with all ecommerce websites). The transaction fees amount to 2.9% of every sale you make, plus an additional $0.30 per sale. Really, that’s not a bad price compared to some of the other transaction fees that you can see online.
Additionally, Square Online Store also comes with extra expenses that you can opt-in to voluntarily. For instance, you can upgrade to the Professional account for $16 per month or $12 per month paid annually. This will give you access to custom code, site statistics, and marketing tools.
Step 6: Getting Your Domain Name
After you’ve chosen your digital store building tools, you can begin to think about enhancing your online presence with the right domain name.
If you’re new to small business selling online, a domain name is the bit in the URL that highlights the name of your store. For instance, if you were Ebay.com, your domain name would be eBay. That’s the primary domain, and it’s what your customers are most likely to remember.
Most online store builders will allow you to create a subdomain like yourname.wix.com which is connected to the name of the eCommerce platform. However, you’ll need to go above and beyond that if you want to create a professional image for your site.
Fortunately, you can buy your domain name through companies like Wix, Shopify, or BigCommerce, usually spending between $10 and $20 per year. Additionally, you can use other companies like domain.com to buy a domain name elsewhere and link it to your store builder.
To get the most out of your domain name:
- Choose the right top-level domain: The TLD or top level domain is the bit at the end of your URL, like .com, or .co.uk. Usually, the .com domain will be the best option to get the most customer attention, even if you’re selling in the UK.
- Be unique: Avoid any names or titles that already exist, or you could end up getting into problems with copyright law. At the same time, make sure that the name you choose is easy to remember and spell, so your customers can easily keep coming back.
- Add a keyword: Sometimes, it’s helpful to add a popular search term to your domain name if you want to improve your search engine rankings. However, be careful with this. You don’t want your domain name to be too long either.
Once you’ve registered your domain name, make sure that you set a reminder that allows you to renew it once a year. This will save you some time and energy. If you already own a domain name, don’t panic. You should usually be able to transfer your domain name to your builder page. Contact your current domain provider to do this. For ease of use, sort out a domain name with your domain builder. It makes launching your online store from scratch much more straightforward.
Step 7: Pick Your Ecommerce Theme
Got your product ideas, your domain name, and your host all lined up?
Excellent.
Now it’s time to start really bringing your online shop to life.
All of the leading store builders online come with a wide selection of themes or templates that you can use to make your site look incredible – without being a design expert. Selecting themes in BigCommerce and Shopify is easy enough, all you need to do is click on something from the builder marketplace, and you’re ready to go.
Many other store builders follow the same formula, from Squarespace, to Weebly. That’s because most companies know that today’s business owners don’t have the time to learn how to work with code on their own. A drag and drop builder makes it much easier to jump into action with your store, without having to worry about investing in expertise.
The drag and drop functionality of your store builder also means that you’ll be able to adjust different parts of the themes and templates that you choose. For instance, you could update the colors so that you can maintain a consistent brand image across every platform.
You can also add extras, like widgets, contact pages for your customers, and logos that appear on every website page.
Remember, although customization is available with virtually every store builder and ecommerce theme, you can only accomplish so much if your tool has limited features. Before you jump into any theme, make sure that you’ve got access to the key capabilities that are going to delight your customers, such as galleries, maps, and even an about-us page.

Just like online store builders, some templates will come with more features than others. There are even themes out there that come with certain pieces of functionality built in already.
Step 8: Customize Your Ecommerce Theme
Once you’ve selected the theme or template that you’re going to be using, you can head into the administrator toolkit within your online store builder to start customizing. The great thing about most modern eCommerce platforms, is that they work hard to make customization as easy as possible. You should be able to drag and drop components into your store’s pages, and change things like:
- The text size and font style
- Images and background photography
- The color scheme
- The position of products and content
- Features like social media access
Many online store builders also allow you to embed things like apps that can assist with things like calculating shipping rates or earning customers for your email list.
Remember, there’s more to customizing your online shop than just working on your homepage. While it’s true that your home page is the first thing that your customers see, and the first thing likely to leave a lasting impression on your audience, it’s also just one element of your entire website.
Everything from your product pages to your checkout process should be engaging and easy to use if you want your customers to be a success.
Don’t forget to prioritize navigation too. A smooth navigation process is absolutely critical to earning sales online. Most shoppers will simply abandon your website if it’s not easy for them to find what they want without hassle. Ensure that your navigation is easy to use on your website, whether your customers are browsing from a desktop computer or a smartphone.
As more customers continue to engage with ecommerce businesses through mobile these days, it’s becoming increasingly essential to ensure that you can provide the same seamless experience on every device. Ensure that the only templates you consider for your websites are the ones that are responsive.
While you’re working on customizing your ecommerce site theme, don’t forget to think about how your UX will effect your search engine rankings too.
Although adding more plugins and big images to your pages can seem like a good idea at first, you need to get the right balance between attracting potential customers with your product descriptions and slowing down your website.
Before you launch your site, make sure that it works quickly and loads well, this will help you to earn a better position with Google on the search rankings. It should also mean that you provide better overall experiences to your audience too.
Step 9: Start Listing Your Products
Listing your products and creating your product pages is one of the most crucial, and complex parts of designing a winning online business. Once you’ve created a stylish store using your template, you’ll need to head into the inventory management and product pages with your store builder to start adding the items that you want to sell.
Remember, the main things that you need to include with every product listing are:
- The name of the item
- The price – including shipping prices
- The category that the item belongs to
- Photos of the product
- Reviews from happy customers
If you choose a dropshipping method to deliver your items to your customers, then you may be able to directly sync the product descriptions and pictures provided by your suppliers website to your own, which can save you a bit of time and effort. This will depend on the kind of features that your store builder plugins can provide.
Remember, your ecommerce site will also dictate how many products you can add to your website, and the number of options available for each product. For instance, some sites like Shopify will allow you to sell the same shirt in a variety of different colors and sizes.
How to Write Your Product Descriptions
When you’re listing products online, one of the first things you’ll need to think about is how you’re going to make your product descriptions stand out. This is your chance to get really unique and show off exactly what makes your brand different.
Avoid any clichés or technical jargon that’s going to confuse your audience, and make sure that you’re using power words that really address the problems that you’re going to be solving for your target audience. Your focus should be on helping your audience to understand how your products are going to make their lives better.
Remember to optimize your product descriptions for SEO too. The keywords and terms that you use in your descriptions will make it easier to rank on Google and capture the attention of your target audience.
How to Take Product Pictures
Once you’ve got your product descriptions down, you need to work on the pictures next. Just like your product descriptions, your images can make or break your chances of success online. You need to ensure that you’re using high quality pictures to capture your customer’s attention and show off your professional nature.
Be consistent and keep all of your images the same size if you can. This will help to give your customers a consistent experience when they’re on your site. Additionally, make sure that you’re taking your own photos, rather than just pulling stock images from elsewhere on the web.
If you can get extra fancy with things like 360-degree rotations that allow your customer to view your product from different angles, or zoom options, then you can try that too.
What About Creating Product Categories?
You can also take the time involved in creating the perfect product listings to think about whether you should develop product categories. Product categories help to organize your items into different listings. Obviously, it’s unlikely that this kind of thing will be necessary if you only sell a handful of products. However, if you’re running a bigger company, categories will make the transaction journey a lot simpler for your customers.
Ask yourself what you would want to find if you landed on your website, and how you’re going to find exactly what you need. For instance, do you need to organize your products by price range for people who are shopping on a budget? Do you want a page of featured products where you can highlight some of the top-selling items in your list?
Some people just arrange their categories according to the different products that they sell. For instance, if you’re running a fashion company online, it makes sense that you would need to have different categories for things like dresses, skirts, shoes, jeans, and so on.
Make sure that whatever else you do with your product pages; you ensure that your customers can easily add the items that they want to their basket. The last thing you want is to convince your customers that they should buy from you, only to chase them away from the checkout page because they haven’t been able to find the “add to basket” button.
Step 10: Establish Your Payment Methods
Now we’re really cooking.
Once you’ve got your list of products on your website, you can start to think about how you’re going to be making money with these items. In other words, what sort of payment methods are you going to be accepting?
Keep in mind that the payment methods available on your small business site could determine whether your customers choose to buy from you or not. An online store with multiple payment methods, like PayPal, Stripe, and credit card payments is a lot more attractive than someone who only accepts bank transfers.
The good news is that establishing payment methods for your company is usually easier than you might think. Most ecommerce website builders make it easy for you to decide exactly how you want to accept cash from your customers. The most popular way to add payments to your ecommerce store include:
- Using payment gateway packages: These all-in-one software solutions connect the shopping cart on your store to a card processing network of your choice.
- Using payment gateways and merchant accounts: In this case, you partner with a specific bank that manages and accepts payments for you. Then, you can channel the money into your business bank account when you make a sale.
- Credit card payment processing: Here, you can use a simplified process that integrates with your existing store checkout. For instance, Shopify offers its own payment gateway for this purpose. This way, customers don’t have to leave your website when they want to check out.
There’s no one-size-fits-all strategy to implementing the perfect payment gateway. You’ll need to think about how many sales you’re expecting to make, and what kind of person will want to buy your products. Some companies, like BigCommerce give you more options than others. For instance, BigCommerce has access to over 60 different payment gateways, including Apple Pay and One-Touch from PayPal.
You may also need to ask yourself some basic questions when assessing your payment gateway options, such as:
- Will I need to pay any set-up fees?
- Are there any transaction or monthly fees to worry about?
- Are there any penalty fees to consider, and what are they triggered by?
- Are there any delays in transfers? How quickly can I claim my money?
- What do I do if I need help or support from the team? Is there a lot of great customer service available?
Remember, you can choose to take multiple different kinds of payment method if your ecommerce store builder allows for that. Additionally, keep in mind that different payment methods come with different charges and expenses to consider. Aside from transaction fees, most payment processors also come with charges like 1% of your sale and an extra $0.10 for each purchase. The price you’ll need to pay will depend on your eCommerce platform choice.
Companies like Shopify waive the transaction fees associated with payment processing if you agree to use the company’s own proprietary payment processor, Shopify Payments.
Step 11: Figure Out Your Shipping Strategy
If you decided to make a dropshipping store way back at the beginning of this guide, then you can probably skip this section. Drop shippers handle the shipping for you, although you may still need to choose exactly how quickly you want to send items to your customers.
On the other hand, if you’re dealing with order fulfilment on your own, then you’re going to need to think about a lot of different components when it comes to shipping. Different eCommerce site builders come with different options for shipping. You’ll need to start by adding the origin address of your company to your website, then start figuring out what kind of shipping settings you want to establish.
Remember to be realistic about where you’re going to be able to ship to. Although it might be tempting to ship products all around the world so that you can connect with all customers, the shipping rates would be huge. You need to think about who you can reasonably partner with to get your products to the regions that are most likely to get the best return on investment.
Here are some of the different kinds of shipping options that you can consider for your website:
- Free shipping: If you can afford to put the price of the shipping into the cost of the item production, then free shipping is a great way to sell more products. People love getting free shipping – even if it’s only available when they spend a certain amount. You could use this strategy to drive up the number of sales that you make to your customers.
- Flat rate shipping: Flat rate shipping means that you offer the same price regardless of the product that you’re shipping, or where it’s going. This is often a good choice for stores that sell a lot of similar items. You could lose out on a lot of cash if you offer this rate when you’re shipping bulky and small items alike, however.
- Real-time quotes: A lot of ecommerce stores are now beginning to offer shipping quotes in real-time based on things like order size, destination and weight. Customers often find this option to be more transparent and honest. This is also a good option for companies that have a wide range of items to sell from their online shop.
- Local or store pickup: If you also have a local distribution center for your website, then you could consider giving your customers the opportunity to pick up the items that they want from your warehouse for free. This can save you some money. However, you may need to invest in strategies that will allow you to deliver better face-to-face experiences with your customers.
Most online store builders will allow you to offer a wide range of different shipping products. Some companies may even be able to work with carriers like FedEx and USPS to deliver one-day and same-day shipping to their clients. Many big eCommerce website builders like BigCommerce and Shopify have partners with couriers already. If your website builder has a courier partnership, this could mean that they may be able to offer lower prices on your shipping services.
Step 12: Get The Extra Features Ironed Out
It’s easy to assume that once you’ve got pricing and shipping figured out, you’re ready to launch your online store. However, there are some other steps that you’ll need to take first. For instance, think about how you’re going to track the VAT rates and taxes on your website. Unfortunately, whether you like it or not, you’re going to have to deal with taxes and other expenses at some point.
Choosing a website builder that can calculate things like VAT rate for you automatically can be an excellent way to make this process a lot simpler. You could also consider looking into software solutions that integrate with your invoicing and accounting tools. That way, you can track your expenses and sales more comprehensively on the back-end of your website.
If you’re worried about your taxes and how much work it’s going to take to get everything sorted out, now is the perfect time to start speaking to a professional about your options. Though some small businesses will feel comfortable dealing with taxes on their own, the majority of big businesses will need the assistance of a professional accountant.
Along with taxes, another additional consideration that many companies forget about is security. When you’re selling online, you need a way to convince your customers that they can trust you. After all, you’re going to be taking their credit and debit card details.
Having an SSL certificate for your website can offer some additional peace of mind to your customers. A secure socket layer certificate encrypts the data moving between your customer and your website to make your site more secure. Most ecommerce platforms will come with a free SSL certificate included in their plans. However, you’ll need to add this on if you don’t get it for free with your provider.
Look into other things that might make your customers feel more secure too, such as:
- Certifications and safety badges that you can add to your website
- GDPR regulations in your terms and conditions
- A secure checkout process that includes things like verified by visa
The more comfortable your customers feel sharing their personal details with you, the more likely you are to earn sales.
Once your security and taxes are all under wraps, you’re ready to test and preview your website. Take some time to go through every page at this point. You can even test out the process of making a purchase this way. You don’t need to follow through with actually sending yourself an item, but you can check the process.
Step 13: Publish and Promote Your Online Store
Okay, you’re pretty much ready to start selling now.
You should have added your products to your website, created a theme that makes your business stand out, and arranged your shipping settings. If you’re sure that your site is secure and tax-ready, then you can preview your site. This is the feature that ecommerce store builders give you to ensure that everything works perfectly before you go live.
Once you hit publish all that’s left to do is promote your online store.
There are various ways that you can do this, including:
- Blogging and content marketing: Content marketing is one of the best ways to drive traffic to an online store. You’ll need to blog about topics that are related to the items that you’re selling. Additionally, it’s important to ensure that you’re posting plenty of high-quality blogs that are actually delivering value to your audience. Don’t just re-post the same things that your competitors are writing. Do something unique.
- Get backlinks and work with other companies: If you need an initial boost to get your business off the ground, things like influencer marketing and backlinking can be incredibly useful. To take advantage of these strategies, you’ll need to find thought leaders in your space, and convince them that working with you is a good idea. You might be able to track down the people you need on social media, or you could find them on industry forums.
- Use online ads: Online advertising through things like Google AdWords can make it much easier to sell your products online. With the right keywords and content to sell your products, you can earn tons of new traffic in no time. The only downside with online advertising like PPC, is that it doesn’t earn long-term sales. Unlike organic traffic, which gives you compounding results over time, PPC only delivers traffic for as long as you’re willing to continue investing in it.
- Try social media: A big part of building a presence for your online business online today is developing a relationship with your target audience. You can do this by creating a strategy for your favorite social media channels. Find out where your customers are spending their time on the web and create a profile that allows you to interact with them regularly. Remember, don’t just post nothing but ads for your new products. Provide plenty of other valuable content too!
- Build an email list: Remember that email lists are one of the best ways to earn long-lasting customers. When your clients come to your website, they should have a way to sign up for your newsletter. This will give you a way to keep connecting with your audience, even when they’re not ready to buy straight away. You could even use email to turn one-off customers into repeat clients. Store owners can add pop up forms to their website that turn customers into subscribers almost instantly, or just ask them to sign up when they make a purchase.
Remember, whatever promotional or sales strategy you use to sell your own products, it’s crucial to have analytics systems set up so you can measure your success. Tracking the performance of your store when it comes to everything from page clicks to bounce rates will ensure that you’re constantly growing in the right direction.
Look at metrics like:
- How long people spend on your website
- How many subscribers you gain
- Bounce rate, and how often people leave your site
- Number of visitors from different devices
- How many people come to your website from social media
- Conversion rates and profit margins
- Numbers of repeat customers
- Best-selling and worst-selling products
As you learn more about the product and pages that your customers like most, you will be able to improve and update your website to suit the demands of your target audience.
Good Luck With Your Online Store!
You’re ready to go!
If you’ve followed all of the steps above, including:
- Finding your niche and your own products
- Validating your ideas
- Getting a domain name
- Picking an ecommerce template
- Customizing your site
- Adding your products
- Choosing your payment methods
- Sorting out shipping
- Dealing with tax and security
- Previewing and publishing
- Promoting
You’ve got everything you need to run a successful online store. Just remember that you may need to consider a few extra things too depending on the kind of store that you’re going to build. Some companies will want to start experimenting with affiliate marketing to boost sales. Others will need to ensure that they have a good customer service strategy set-up, just in case their clients need help.
These bonus features will require different amounts of effort depending on your store structure. For instance, if you’re running a dropshipping store, then your supplier may also be willing to handle things like customer service on your behalf.
Good luck building your own online store!
FAQ
Setting up an online store is easier than you think. To start with, you’ll need a domain name, a website builder, and an idea of the products you’re going to sell. Launch your store with your website builder, and make sure that you customize your website theme to suit your brand. Add product listings, along with prices and shipping details, and implement tracking tools to examine the performance of your site, and how much you earn.
That all depends on you. A dropshipping store will often cost a lot less than a store where you deal with order fulfilment on your own, because with dropshipping, there’s no initial investment. Your store can be as expensive or as cheap as you like – depending on your business plan.
Inventory is one of the biggest initial costs associated with running an online store. However, you can avoid those fees entirely by using a dropshipping solution, like Spocket. With dropshipping, you don’t need any inventory. Instead, you choose the items that you want to sell and add them to your website. When a customer buys one of those products, your dropshipping supplier sends it to them, instead of you.
Not necessarily, you could sell products through a range of marketplaces like Amazon, eBay or Etsy to get started if you prefer. However, it’s much more professional for you to have your own website. There’s also some opportunity to sell through social media too, depending on your niche.
All companies require a business license. It doesn’t matter whether you’re selling from a traditional brick and mortar storefront or online. Checking with an expert to ensure that you have the right licenses in place could save you from incurring some serious fines.


Comments 0 Responses