With the built-in Mailchimp integration collecting user information right to your audience list is really easy.
The main benefit of using this feature is that you don't need to manually export and import the collected information. Data is automatically synced to the audience list you set up in the plugin.
This means, that once a hunter has been added to your Mailchimp audience list, you can enjoy all the benefits of that system. For example, you can send a follow-up message to the hunters, or move them to a separate list, etc.
Be careful though, because if someone is already on your list with the email address they used while completing the Gift Hunt form, they won't be added to your Mailchimp list again.
Read on to learn how to connect Gift Hunt to your Mailchimp account.
Get an API key
Although API key sounds like something developers used to talk about, don't worry, with the help of this article and video you can easily create one without a developer: Create an API key
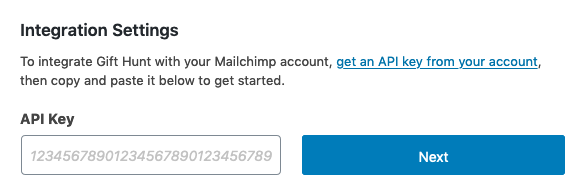
Once you have your API key, go to the Mailchimp Integration page of the Gift Hunt plugin (left navigation section in your WordPress admin).
Add your API key to the “API key” field in the “Integration settings” section and click “Next”.

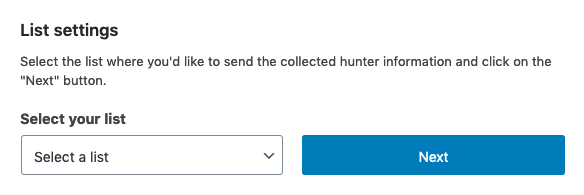
When you click “Next”, Gift Hunt will connect to Mailchimp to get the audience lists available in your account.

The lists will become visible in the “List settings” block. Select the one where you'd like to send the collected hunter information and click on the button next to the lists field. Gift Hunt will read the available fields from the selected list.
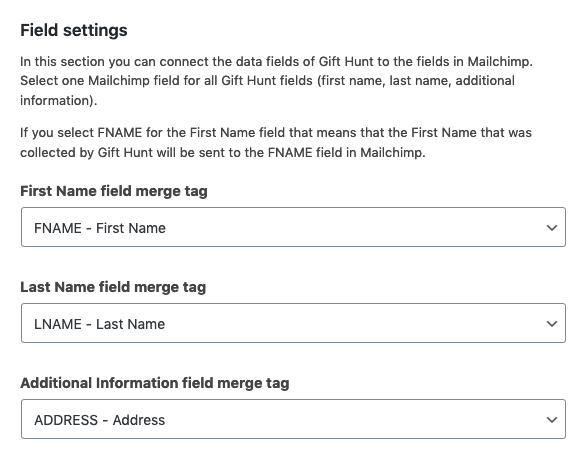
In the “Field settings” section you can connect the data fields of Gift Hunt to the fields in Mailchimp. Select one Mailchimp field for all Gift Hunt fields (first name, last name, additional information).
If you select FNAME for the First Name field that means that the First Name that was collected by Gift Hunt will be sent to the FNAME field in Mailchimp.

When your API Key, List and Fields have been set, you can save your settings. You can also turn on the Mailchimp integration by selecting the “Active” option in the “Status” section.

⚠️ Important
Previously collected user information won't be sent to your list only those that have been collected after you activated your Mailchimp integration. If you collected some user information before that and would like to keep your lists in sync, export your hunters and import the collected data to Mailchimp.
When your Mailchimp integration is active all the collected information will be stored by Gift Hunt and will be sent to the selected Mailchimp list as well.
Test your settings
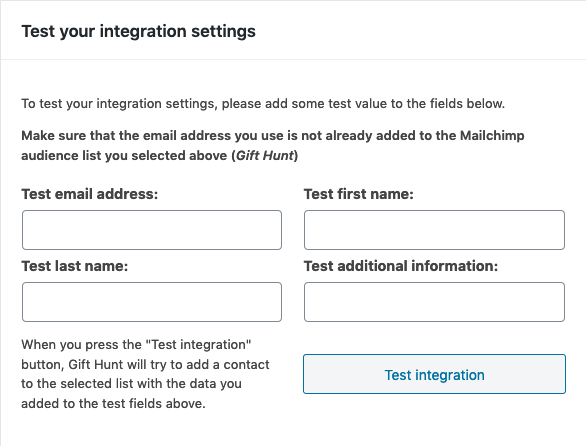
Before going live, you can also test your settings to make sure that everything works fine. At the bottom of the integration settings page, you can find a “Test your integration settings” block. Add some test data to the form and click on the “Test integration” button.
Make sure that the email address you use is not already added to the Mailchimp audience list you selected otherwise you'll get an error.

If everything worked fine you'll see a success message and you are ready to go.

Take a look at our best practices guide for a successful Gift Hunt campaign.
Get the plugin
Gift Hunt can help you drive more traffic to your website, increase the time visitors spend on your site and grow the database of your potential customers.
How to…
- Install Gift Hunt on your WordPress site
- Create your first Gift Hunt session
- Preview your Gift Hunt session
- Export the collected user data
- Upload a custom icon for your Gift Hunt session
- Change the animation of your Gift Hunt icon
- Change the position of your Gift Hunt icon
- Use a different design for your popup window
- Connect Gift Hunt to your Mailchimp account
- Display your gift hunt icon with a shortcode
- Use custom content in your popup window
- Disable the success email after someone completed the data collection process
- Display the gift icon only to logged-in or anonym visitors


