
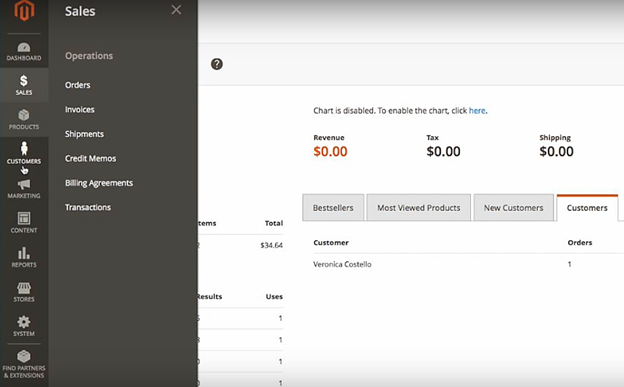
Ok, I know it, and I know you know it too. That Magento is, undoubtedly, one of the best ecommerce platforms on the market.
And now that you’ve already given it a try, I bet you’ve noticed how incredibly flexible it is. Magento is an open-source ecommerce platform that’s open to pretty much any customization you can think of.
You can, for instance, introduce as many products as you want. Plus, it allows you to expand your store endlessly, as well as create and manage multiple stores from one centralized dashboard.
So, of course, it’s understandable that more than a quarter of a million active sites are powered by Magento. And when you compare these numbers with the rest of the internet, it turns out Magento is home to about 1.2% of the web and 12% of all online stores.
That’s a heck of a lot of websites on one platform. Hence, you can think of it as the Coca-Cola of ecommerce platforms.
But, get this. While Magento continues to attract praise from many successful ecommerce store owner, it has its fair share of weaknesses. And the biggest one, interestingly, happens to come from the same thing that makes Magento so great.
The Main Problem With Magento
You see, when you come to think of it, extensive flexibility can be a double-edged sword.
How?
Well, here’s the thing. Magento is the type of open-source platform whose flexibility can only be enjoyed by technically-skilled developers. Otherwise, there’s only so much you can do here if you don’t know how to work the platform’s source code.
Therefore, if you intend to use Magento for the long haul, you either learn how to code, or hire a permanent team of developers to handle all the technical bits on your behalf. The choice is yours.
But then again, there’s the option of dropping Magento altogether and migrating to a different but equally-powerful ecommerce platform.
Ok, now hang on a minute. Where exactly do you get an alternative open-source platform that comes with as many features as Magento, but supports non-technical customization?
Enter WooCommerce
Yes, that’s right. WordPress is a good place to start. And more specifically, WooCommerce would be a perfect replacement for your Magento foundation.
Now, guess what?
WooCommerce isn’t just any popular ecommerce platform. Although it was launched three years after Magento, it managed to surpass its predecessors in no time, and even grew much bigger.
To put that into perspective, consider this- more than 3.3 million active sites currently run on WooCommerce. This translates to 4.9% of the internet and 28.19% of all ecommerce sites.
Impressive, right?
Well, you can bet WooCommerce isn’t this huge by chance.
For one, it combines ease-of-use with extensive customizability. While developers can dive deep into its source code, non-coders get to customize their stores by simply taking advantage of its pre-built extensions.
And when it comes that, there are endless extensions, plugins, themes, and website templates to choose from. Plus, there’s always the WordPress Marketplace in case you need additional options.
All these translate to endless possibilities for your online store. You can introduce extra functionalities, tweak your themes, and manage content very intuitively without touching a line of code.
And you know how much such privileges will cost you?
Nothing. Yes, believe or not, WooCommerce is absolutely free of charge. And no, it won’t charge you for processing transactions either. The transaction fees you end up paying are between you and your selected payment processing service.
Well, although we’ve barely scratched the surface here, I believe these benefits alone are enough to warrant a migration. But, if you’d like to compare the two shopping carts further, here are our comprehensive reviews of Magento 2 and WooCommerce.
That said, let’s now get down to business. How exactly do you migrate an online store from Magento to WooCommerce?
Your Options For Migrating From Magento To WooCommerce
There are three possible approaches you could use to migrate your ecommerce store from Magento to WooCommerce.
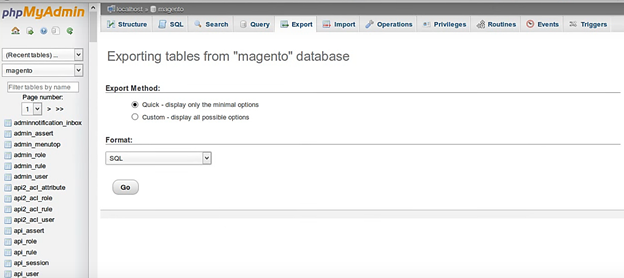
Well, for starters, you go ahead and transfer the site by manually configuring both Magento and WooCommerce. That means literally moving your database and the accompanying entities from Magento to WooCommerce without directly relying on a third-party service.
Pretty cumbersome if you ask me. Plus, you’ll need technical skills to tweak everything accordingly.
This migration option, therefore, is best reserved for experienced developers who want to take complete control of their migration processes.
And that begs the question- how then should you proceed if you don’t have the skills, but would like the control privileges that come with manual migration?
Well, I’d advise you to consider our second option, which entails hiring an experienced developer to handle everything on your behalf.
And you know what?
If your online store has a relatively complex framework, they’ll probably choose to transfer its components manually. Otherwise, developers predominantly use our third migration option when they’re dealing with a typical ecommerce site.
Well, for the sake of clarity, the third approach we’re talking about here is all about leveraging an automated migration tool.
A good one essentially saves you the trouble by transferring all your website entities and data automatically. You just need to point it towards the source and destination directories then leave it to do the heavy lifting for you.
But, here’s the thing. Based on my experience with numerous auto-migration tools, I can confirm that not every single site transfer app out there is capable of performing a full migration.
So, forget what they all claim to deliver, and instead, proceed with a proven auto-migration tool. Besides, this is one area you cannot afford to compromise, as the risks far outweigh the potential benefits. Choosing the wrong tool could ultimately be detrimental to your entire online store.
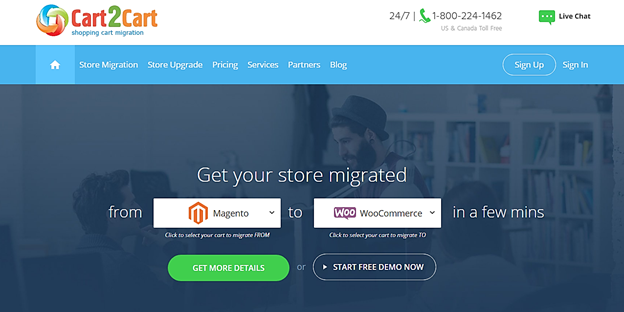
That said, I’d recommend a renowned tool like Cart2Cart. It’s simple, cheap, widely available, and we’ve confirmed that it does exactly what it promises.
Why Use Cart2Cart For Your Magento-WooCommerce Migration?
How To Migrate From Magento To WooCommerce With Cart2Cart
Step 1: Install WordPress
I’m assuming you’ve already acquired a high-performance WordPress hosting package from a reputable web host.
If not, you might want to spare a few minutes to go through our detailed guides on the Best Managed WordPress Hosting Providers, The Best Cheap WordPress Hosting Solutions, and The Top 5 WordPress Hosting Services.
Now, once you’ve secured a solid WordPress hosting service and purchased an ideal package, you can go ahead and launch WordPress through your admin control panel.
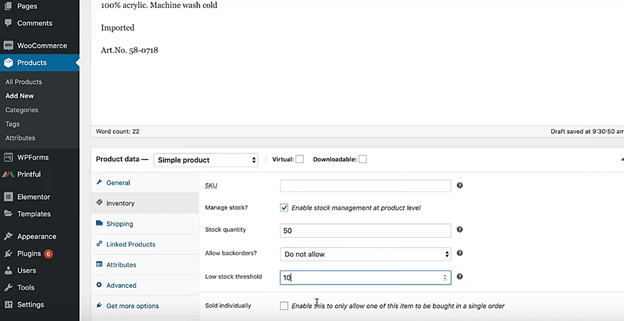
Step 2: Install WooCommerce
Since the default WordPress system doesn’t come with WooCommerce, you’ll have to install it to proceed. So, go straight to the WordPress Plugins area, click “Add New” and search for the WooCommerce plugin.
When you find it, click “Install Now”, and then activate it accordingly by clicking “Activate Plugin”. You now have yourself a WooCommerce-based online store. hence, this is where we intend to import your current Magento store.
Step 3: Install The Cart2Cart Plugin
As we’ve established already, Cart2Cart comes in the form of a pre-built ease-to-use WordPress plugin. You can install it directly from your WordPress admin panel, using pretty much the same procedure as the WooCommerce Plugin.
Go to the “Plugins” menu tab, click “Add New”, and then search for the Cart2Cart plugin. Once you’ve identified it, click “Install Now” to integrate Cart2Cart with your WordPress account for free.
But, make no mistake. The installation won’t be completed until you activate the plugin by clicking “Activate Plugin”. Cart2Cart will then embed itself alongside other menu items.
Step 4: Create a New Cart2Cart Account
With Cart2Cart fully integrated with your WordPress system, you can now set it up for migration. The first thing you need to do here is to create the account you’ll use to transfer your website files between the two platforms.
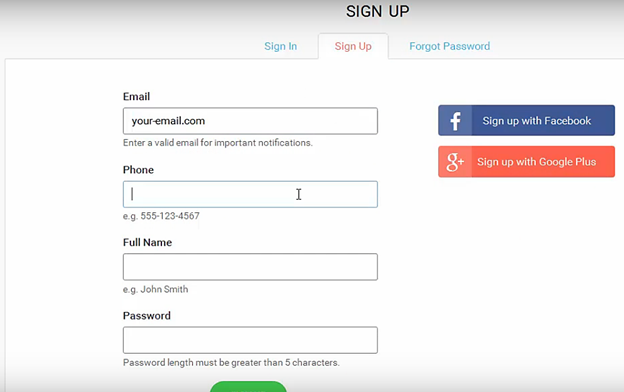
So, on your WordPress admin panel, proceed to the Cart2Cart menu item. The first order of business here is account registration, which requires you to type in your details, or alternatively, simply sign up using your Google/Facebook credentials.

Cart2Cart will then redirect you to its account dashboard window. This is where you’ll perform the entire migration procedure.
Step 5: Configure Your Magento Source Store and Its Corresponding Connection Bridge
When it comes to the actual migration, Cart2Cart requires you to first point it towards your current Magento online store, and then set up a connection with the corresponding WooCommerce store you’ll be moving into.
To achieve that, go to the Source Cart field and pick Magento. Then on the next field, enter the domain of your Magento website as the source store.
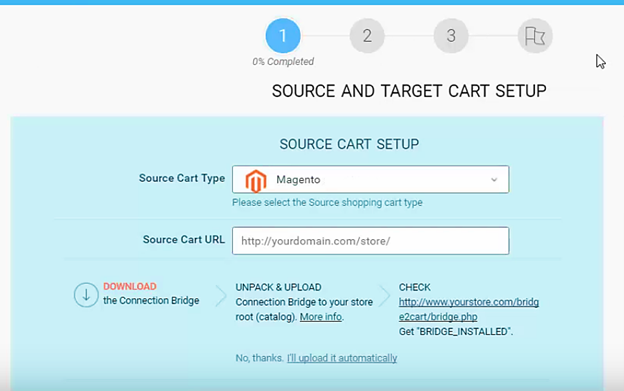
Cart2Cart will then give you some options for setting up the Connection Bridge between your Magento source store and WooCommerce.
Now, if you choose to download the Connection Bridge, Cart2Cart will give it to you in the form of a zip file.
So, download it and then extract the folder onto your local PC storage. This is meant to help you form a secure access gateway for transferring and exchanging store data.
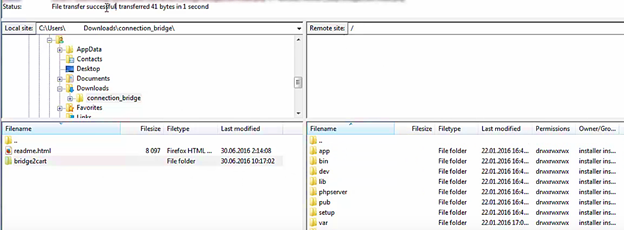
It’s worth noting, however, that the Connection Bridge can only be functional if it’s embedded onto your Magento store’s root folder. That should be simple if you know how to work with a typical FTP Manager.
To proceed, therefore, open your store’s FTP panel through a separate browser window. Navigate to the store’s root folder, copy the extracted “Bridge2Cart” folder from your local storage, and then paste it directly onto the root folder of your store.
Once you’re done, go back to the Cart2Cart window to confirm if the bridge is functional. This is done by simply clicking on the “Check Connection” button that you’ll find next to the Connection Bridge download link.
Now, if the manual process of setting up the Connection Bridge seems inconvenient, you could have the Cart2Cart system creating one for you by automatically uploading the folder.
But, of course, you’ll have to give Cart2Cart your FTP/SFTP info, as well as specify your root folder’s path.
All in all, I’d advise you to stick to the manual procedure. It’s simple, neat, and pretty quick.
Step 6: Specify Your WooCommerce Target Store and Place Its Connection Bridge
After confirming the Magento store particulars, it’s now your WooCommerce store’s turn. And yes, you can bet the procedure is the same.
On the top field, select WooCommerce as the Target Cart, and then enter its specific URL as the Target Store.
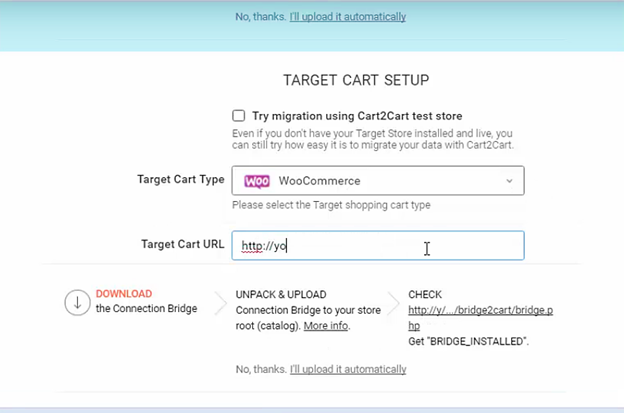
You can now proceed to set up a WooCommerce Connection Bridge that’ll mirror the Magento one.
And just like you’ve done with the latter, download the Connection Bridge file, and then extract the “Bridge2Cart” folder into a separate area of your local PC storage.
You should subsequently open a new browser window to access your WooCommerce store’s FTP client. Use it to scan your system and locate the root folder of your target website. This is where the extracted Connection Bridge folder should go.
So, go ahead and copy-paste the extracted folder onto the root folder, before testing the connection to confirm its validity.
Otherwise, and yet again, if the manual procedure doesn’t work for you, Cart2Cart is kind enough to provide an automatic option for setting up a Connection Bridge. Just type in your FTP/SFTP details and then fire it up.
Another point worth noting here is that it’s possible to set up a demo migration using a Cart2Cart test store. You might want to check it out, especially if your target store isn’t up yet.
Step 7: Select The Online Store Entities You’d Like To Move
Online store owners typically migrate their sites along with all their accompanying entities. Nothing is left behind.
Well, Cart2Cart is also capable of transferring all your store elements plus the corresponding data variables without altering a thing. But then again, it also gives you the option of selecting what you’d want to migrate, just in case you’re thinking about excluding some of the entities.
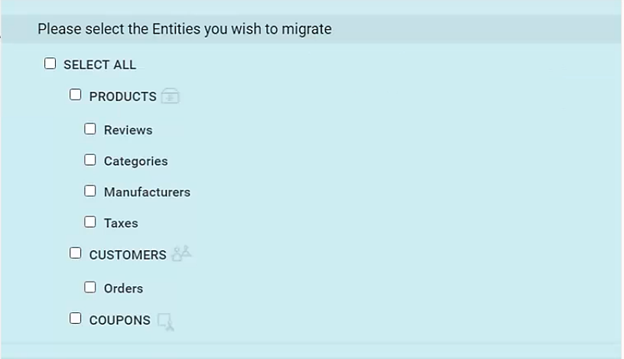
Whatever you prefer, Cart2Cart requires you to confirm the options before proceeding. So, you should analyze all the entities very keenly, and then choose the ones you’d like to transfer by their checkboxes.
Some of the principal entities include; product categories, customer reviews, orders, customers, and products.
Step 8: Choose Your Preferred Migration Options
Just below the entities selection area is a host of additional migration settings. This is where you set the finer details of how you’d want your transfer process to proceed.
You could, for instance, choose to migrate supplementary entities like 301 redirects and SEO URLs. They are particularly handy for preserving all your webpage links, down to the very last bit. Hence, you get to maintain your current SEO framework.
It’s also possible to mirror your current Magento Languages, Order Statuses, and Customer Groups onto the corresponding WooCommerce store components.
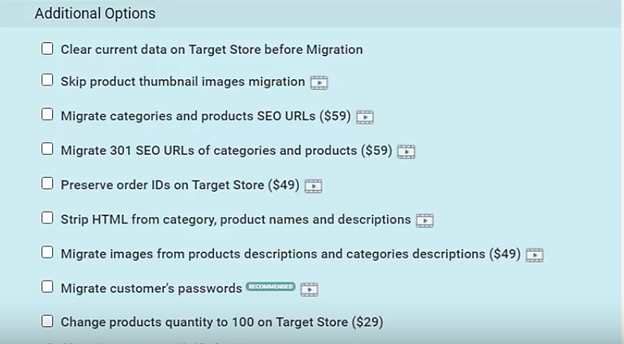
A quick word of advice though. You might want to limit your selections here, especially if you’re on a budget. Most of the additional options are priced separately, just like standard platform add-ons. So, if you’re not particularly careful here, your cumulative migration costs could rise quite sharply.
Step 9: Run a Free Demo Migration
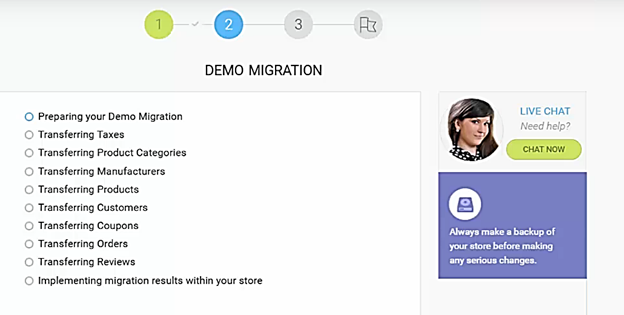
As we’ve established already, Cart2Cart comes with a free demo migration, which acts as a final measure of assuring doubtful site owners.
Not a bad idea at all, I must admit. Plus, I like the fact that it conducts a real migration using your online store as the demo subject.
Don’t get too excited though. It won’t perform a full migration. But rather, it’ll transfer a couple of your online store entities. Just enough to prove that Cart2Cart means businesses.
That said, this option is not compulsory. Starting a free demo migration is an optional procedure, which you’re allowed to skip if you intend to proceed straight to the full migration process.
But then again, it’s always a good idea to test the waters before the final thing. It’ll help you get a good idea of how your WooCommerce online store will appear once the migration process is complete.
Besides, a free demo migration takes only 30 minutes, which sounds a fair sacrifice worth making, especially when you keep in mind that a full migration typically takes several hours.
Step 10: Proceed WIth The Full Migration
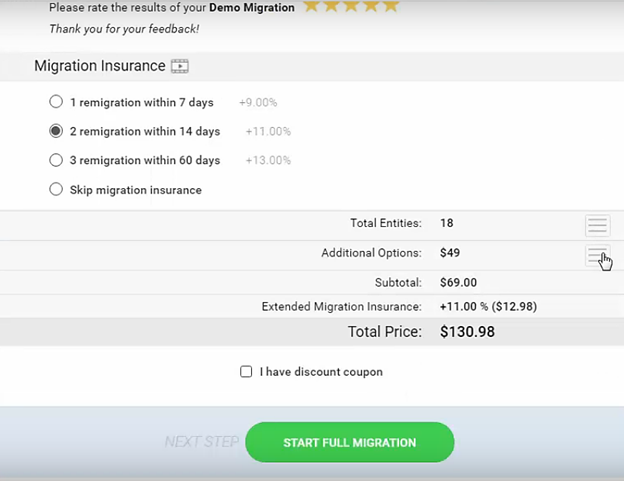
After thoroughly assessing the results of the free demo migration and you’re satisfied with how everything has panned out, you can proceed to launch the full migration procedure.
But, don’t rush into it. Take the time to counter-check all your migration options once again. Then, of course, review your entities to ensure all the critical data elements have been included.
If everything seems fine, you can go ahead and pay the applicable migration fees, after which the system will allow you to start the full migration mode.
And once you click on the full migration button, Cart2Cart will then pick it up from there and it’ll systematically copy data from the Magento source folder to the WooCommerce target folder, while using the connection bridge as the principal data exchange point.
The whole procedure should take a couple of hours though. Probably longer if you’re dealing with a large Magento-based online store. The length of time here, at the end of the day, depends on the amount of data you choose to move from Magento to WooCommerce.
Ultimately, when the process is complete, Cart2Cart will hit you up through a notification email. You’ll then be able to check out your new fully-functional WooCommerce-based site, and even proceed with your sales operations right away.
Over To You
And that’s how you seamlessly migrate your ecommerce site from Magento to WooCommerce. It’s fast, reasonably-priced, accurate, and most importantly, reliable enough to transfer all the data without any downtime.
Overall, this is quite an impressive job by Cart2Cart.
You see, Magento and WooCommerce have never been the same. Although they have a couple of similarities here and there, these two are distinctively different with varying frameworks, source codes, as well as features. Yet, surprisingly, Cart2Cart has managed to form a holistically-synced connection bridge for mapping data from one platform to another.
Well, going by these trends, you can bet I’m dying to see what they’ll come up with in the next few years.
In the meantime, however, it’s now over to you as you try to capitalize on your newfound WooCommerce capabilities. How do you find your new site? And how would you rate Cart2Cart’s migration procedure?


Ciao
se dovessi fare una migrazione devo prima preparare woocommerce? Mi spiego meglio, devo già inserire tutte le categorie, gli attributi e le pagine, oppure ci pensa cart2 cart durante il trafserimento a crearli?
Grazie
Hello Giusepe, Cart2Cart will take care of everything.