
Disclaimer:
Oberlo officially shut down on June 15, 2022. You can’t use Oberlo to import or fulfil products anymore. We recommend using DSers, which is an approved Shopify app for dropshipping and works as a direct alternative.
Also, keep in mind: the Shopify Lite plan has been replaced by the Shopify Starter Plan at $5 per month as of June 2022. New users can’t sign up for Shopify Lite and should use Shopify Starter to sell without a full online store. If you’re on the old Lite plan and switch, you can’t go back.
Building an online store used to be considered an extremely difficult task. Even today, you typically need some sort of development knowledge when working with most platforms. In addition, you have to make your own products and figure out a way to package and ship them. However, a combination of the Shopify Lite plan and Oberlo has made it so much easier on merchants.
In short, Shopify Lite provides online store tools at a reasonable price, while Oberlo connects you with thousands of suppliers willing to dropship your products to customers.
What's Shopify Lite?
Shopify is one of the most popular ecommerce platforms in the world. It helps you launch an online store and start selling products quickly, all without knowing anything about coding a website.
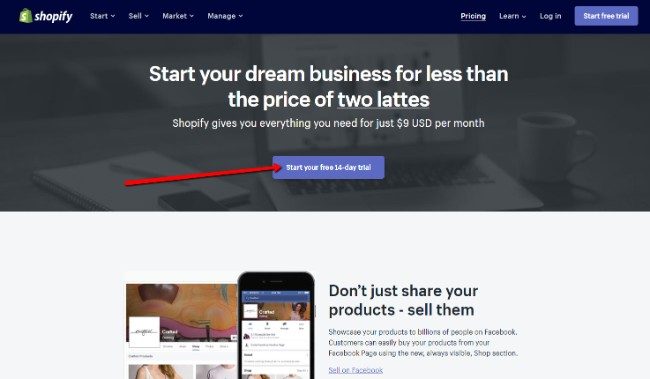
The primary Shopify plans start at $29 per month, but the Shopify Lite plan sells for only $9 per month. This not only saves you money, but it provides tools for placing Buy buttons, product pages, and a shopping cart on your current website.
The standard Shopify plans offer hosting, a full website, and a complete online store. Shopify Lite, on the other hand, expects you to have your own website with hosting. It simply provides the Buy buttons. Shopify Lite also provides options for selling on Facebook and Facebook Messenger.
We like Shopify Lite for companies that might already have an online presence, but would like to test the waters for an online store. It makes sense, because what's the point of building a completely new website?
Shopify Lite gives you the modules needed for an online store, without having to go through the web development process again. Not only that, but your customers won't get confused by having to go to different URLs just to buy products.
In addition to the primary online store options, Shopify Lite has features for creating invoices to get paid for your services. This way, service-based companies can also have online stores for booking those services, but then send out the invoices when the services are rendered complete.
Another advantage of Shopify Lite is the ability to accept credit cards anywhere. You may have seen these transactions done through PayPal or Square, but Shopify also has its own “mobile swipe” technology, where you can go to a tradeshow or conference and sell your products or services. A quick swipe of a card runs the transaction through Shopify and makes sure that it's all secure and the money is dropped into your account.
What's Oberlo?
Oberlo is a Shopify app that allows you to dropship products to your customers. Dropshipping involves partnering with suppliers that are willing to store products, package them, and ship them directly to your customers when a sale is made. In general, dropshipping is more expensive than wholesale buying, but there is less risk since you don't have to buy all of the inventory in advance. Therefore, all you have to do is market and run your website. Everything from the packaging to shipping is handled by your supplier.
The good thing about Oberlo is that the suppliers are vetted and ready to start partnering with your company. You simply choose the products you like and place them into your online store.
Oberlo connects you with suppliers from all over the world, so you can choose US suppliers if you're running a business in the US, or Asian suppliers if you're somewhere in Asia.
Oberlo lets you browse a huge selection of products, along with supplier information. When you find a product of interest, it lets you import all of the product details (including pictures, pricing, and descriptions) into your Shopify store.
After that, a customer can purchase the product and make a payment that ends up in your own account. The supplier is automatically notified of the transaction so they can package up the product and send it out. It's a pretty seamless process as long as you find the right suppliers.
There are plenty of upsides and downsides to dropshipping, but Oberlo certainly makes it much easier.
How to Sell With the Shopify Lite Plan and Oberlo
Now that we know how Shopify Lite and Oberlo function separately, let's examine how they work together. We'll walk through the process step-by0-step and show exactly how to sell dropshipped products through your own online store.
Step 1: Go To Shopify and Select the Shopify Lite Plan
The first part of the process is the same for all Shopify customers. However, you can find information about the Shopify Lite plan by going to this page. After you understand exactly what Shopify Lite can do for your business, along with the tools you receive, click on the Start Your Free Trial button to begin.
This will bring you to the configuration page and let you play around with your Buy Buttons and other sales options.
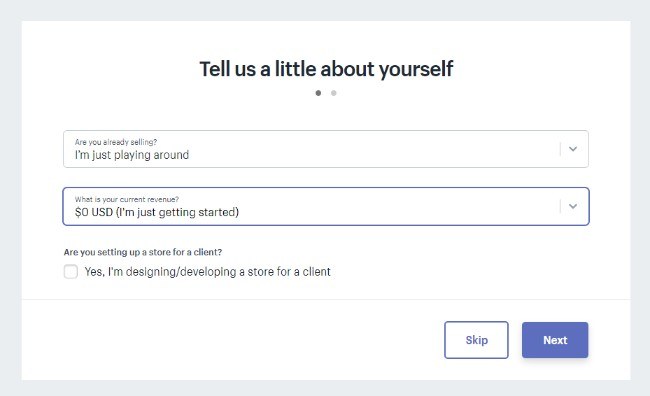
The next page is optional, but it allows you to share some information to Shopify. This helps them cater your user experience to your own business. So, feel free to specify how you're selling, along with the total revenue.
It's totally fine if you put that you're just playing around and you aren't making any money yet. Click on the Next button to proceed.
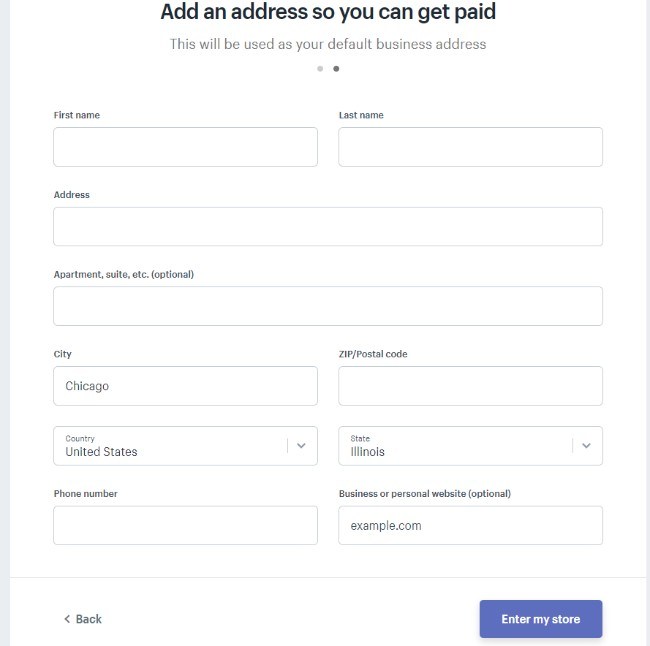
An address is required for you to get paid. Therefore, I recommend you fill in this information so that you don't forget about it later. Type in details like your name, address, phone number, and website. After that, you're ready to move onto your Shopify dashboard. Click on the Enter My Store button.
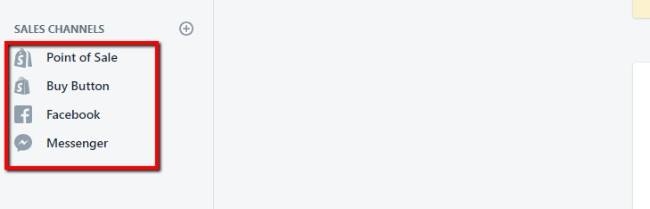
The Shopify Lite dashboard is slightly different from other plans in that it doesn't have a built-in online store for you to sell directly from a Shopify-hosted website. Instead, you receive a handful of sales channels including a POS, Buy Button, Facebook, and Messenger.
Before messing with any of those channels, let's add the Oberlo app to find some products we might want to sell. Click on the Apps tab on the left side of your dashboard.
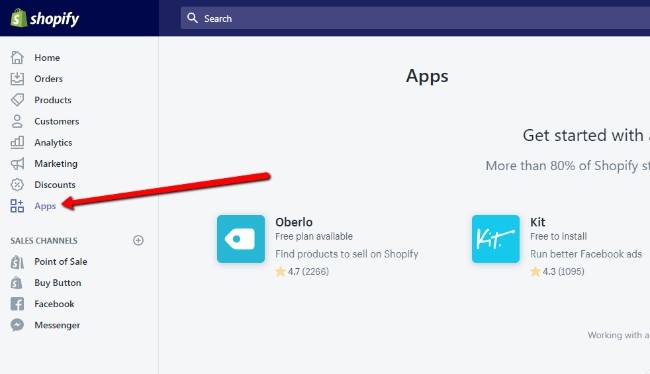
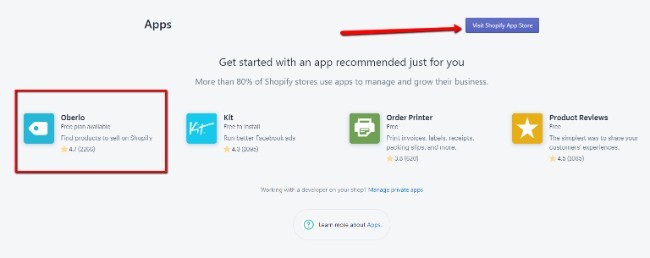
Oberlo is currently recommended on the Apps page, but you may have to click on the Visit Shopify App Store to find it. You can also look for other apps that may make your online store more useful to customers.
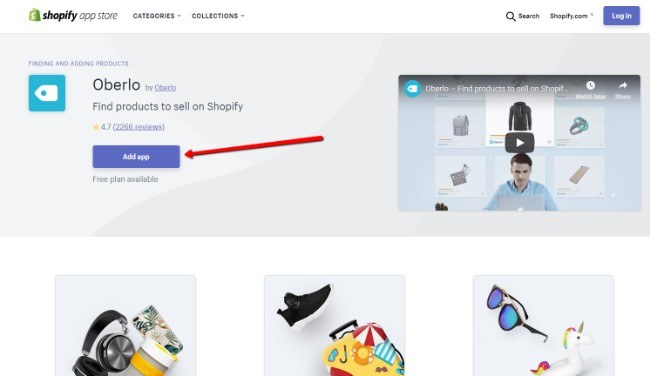
Once on the Oberlo app page, select the Add App button to proceed.
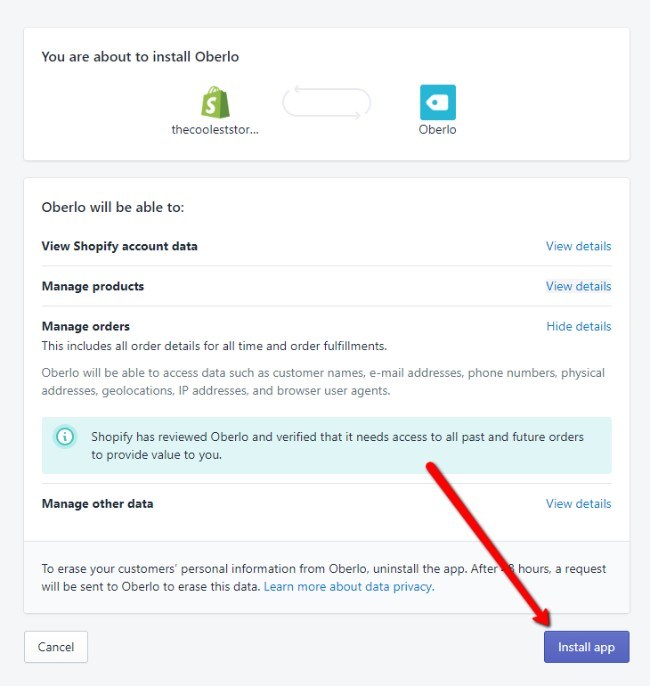
This will walk you through the process of connecting your Shopify account and Oberlo. Click on the Install App button to give Oberlo access to your Shopify store's information. This is required for the dropshipping app to work properly.
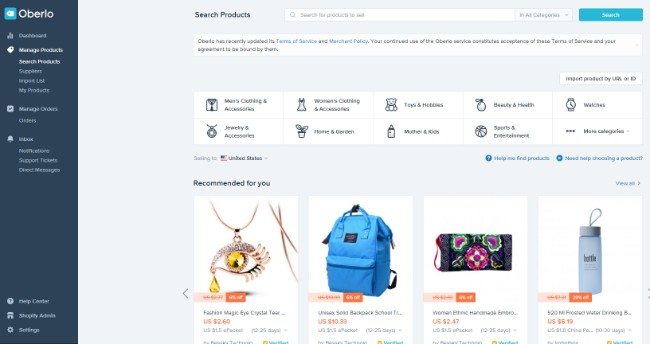
With Oberlo activated, you'll be navigated to the Oberlo dashboard, which is connected to Shopify, but on a different page. It features a great search bar and category buttons for finding the exact types of products you would like to sell online.
For instance, you may consider selling only men's clothing or beauty products. Everything on the right side of the page is there to help you locate the perfect products, and they also have information on how each of the products have been selling over the past few months.
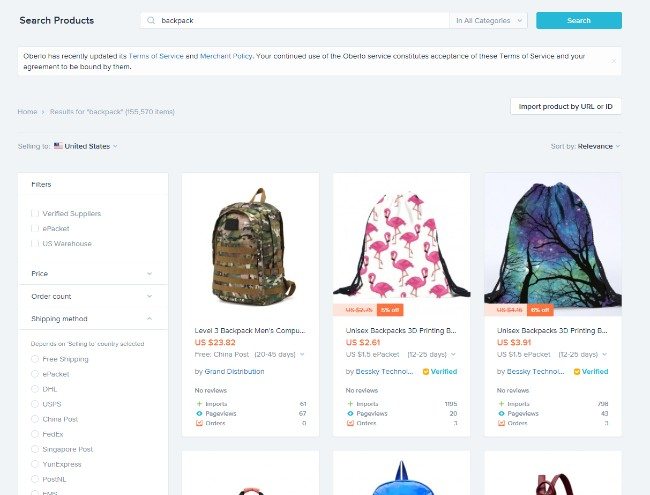
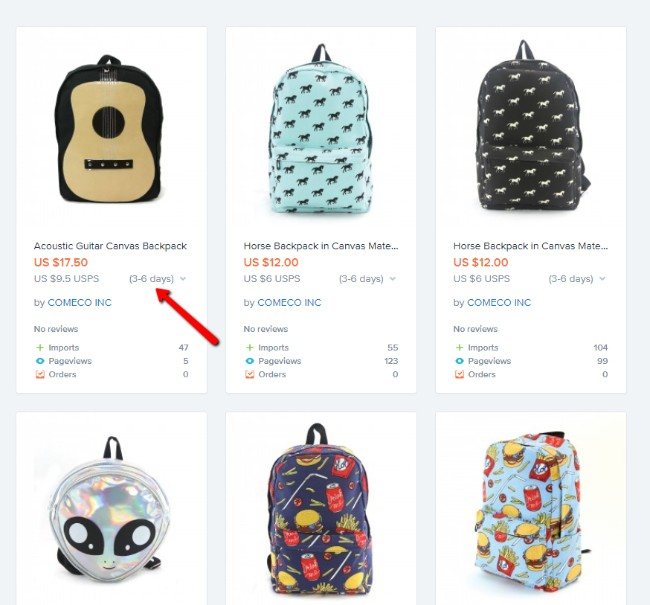
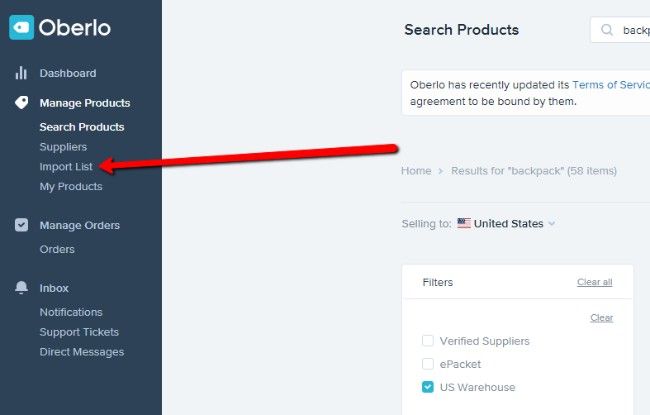
For this tutorial, I'm going to pretend that I'm running an online store that sells backpacks with different designs. Therefore, I searched “backpack” in the search bar.
As you can see, all of the most relevant options came up in the search results. If I wanted to click on one of the products I could view more information. There are also plenty of tools for filtering to narrow down the search a bit.
Take a look at the left side of the page. This is where all of your filters are located. These are extremely important for a few reasons.
First of all, many dropshipping suppliers are located in Asian countries. So, if most of your customers are from, say, the United States, it's going to take a very long time for the products to arrive.
So, it's important to filter to suppliers that have warehouses in your area. In addition, you might only want to work with suppliers that send with certain shipping methods.
An ePacket is one of the fastest international options, but you might have better luck with something like UPS if shipping from the US to somewhere in the US. You can also filter for things like pricing and order counts.
The order count is important since you may have to buy a certain number of items or get a few orders before they start shipping.
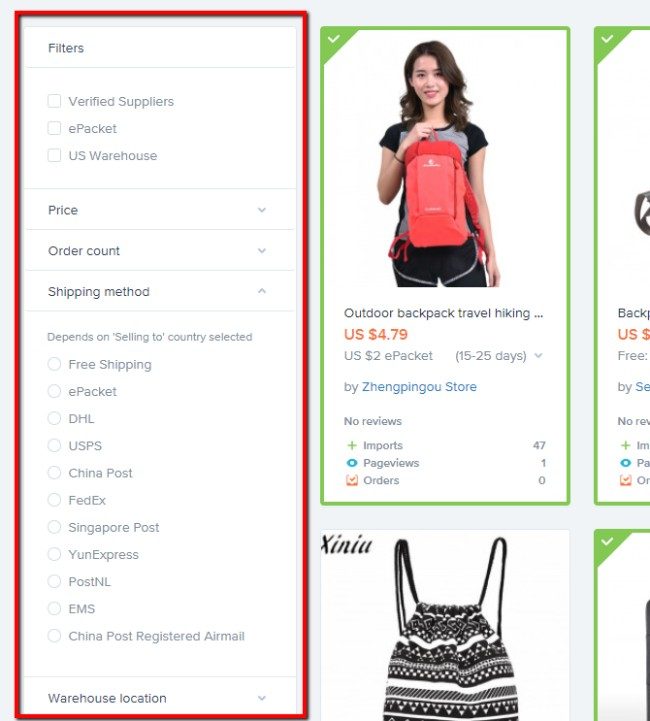
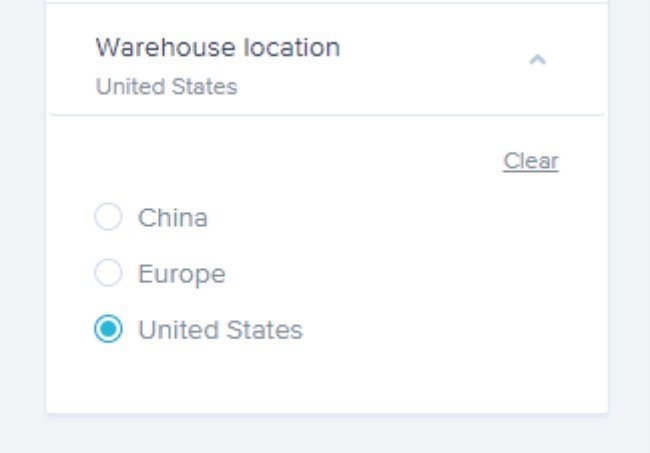
All of the warehouse location filters are at the bottom. I would highly suggest starting with products that ship from your area. This way, you can ensure faster shipping times and only turn to slower times if you really want to sell a product from someplace far away.
The search results reveal information like pricing, shipping costs, shipping times, and the product titles. It's best to sell products where the shipping costs aren't too high. It's also nice to find items that don't take more than a week to send to your customers.
If you click on one of the products, a whole new page of information shows up. This is where you can see if this is a certified Oberlo supplier and how many products have been sold in the last few months.
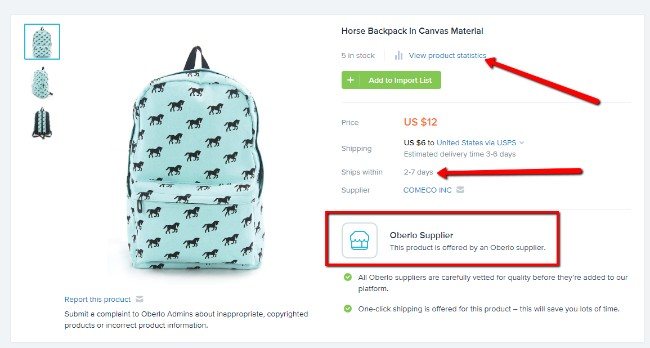
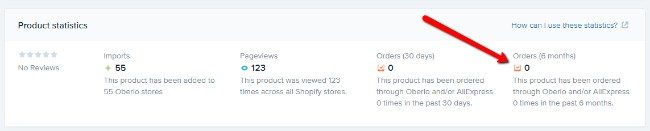
Scroll down to the Product Statistics module to see things like the number of imports, pageviews, and orders. As you can see from the screenshot below, this particular backpack hasn't sold any units in the past six months.
Although you may still try to sell it, these metrics allow you to make sound decisions before investing any time or money into a particular product. You can even just go through the entire Oberlo catalog to find the best selling products and stick with those.
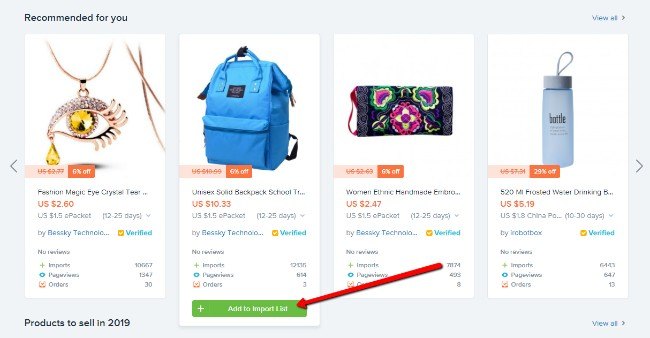
After you've found a few products to sell, it's time to import them into your Shopify store. You'll find Import buttons in several places, but you can typically scroll over the product module to reveal an Add To Import List button. Click on that for all of the products you like.
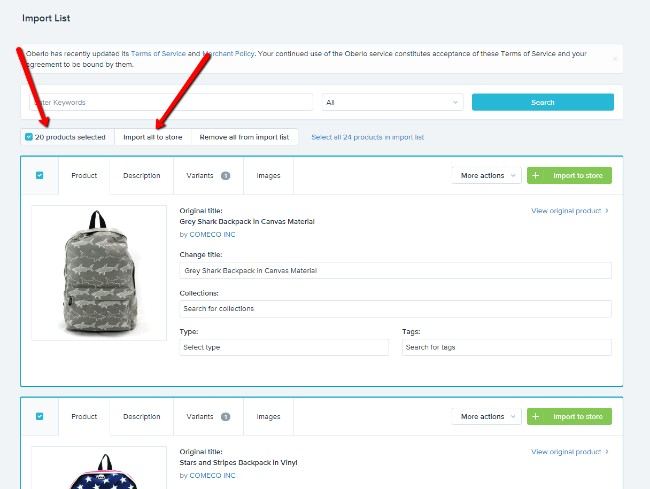
Next, go to your Import List.
For this demo, I imported a total of 20 products, most of which fit my store's brand of selling backpacks. Select all of the products in the list and click on the Import All To Store button.
This may take a minute, but until you add more products from Oberlo you can go back to Shopify.
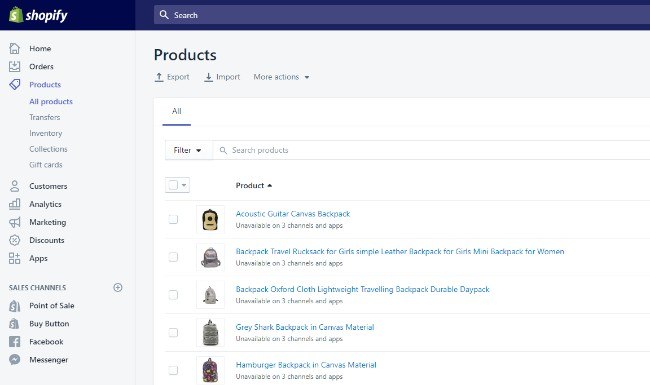
Go back to the Shopify dashboard and click on the All Products tab. Now you should see a nice list of the products from Oberlo. What's cool is that all of the product information such as pricing, pictures, descriptions, and variants is pulled from Oberlo. I suggest you go in to proofread and change pricing and text to reflect your own business.

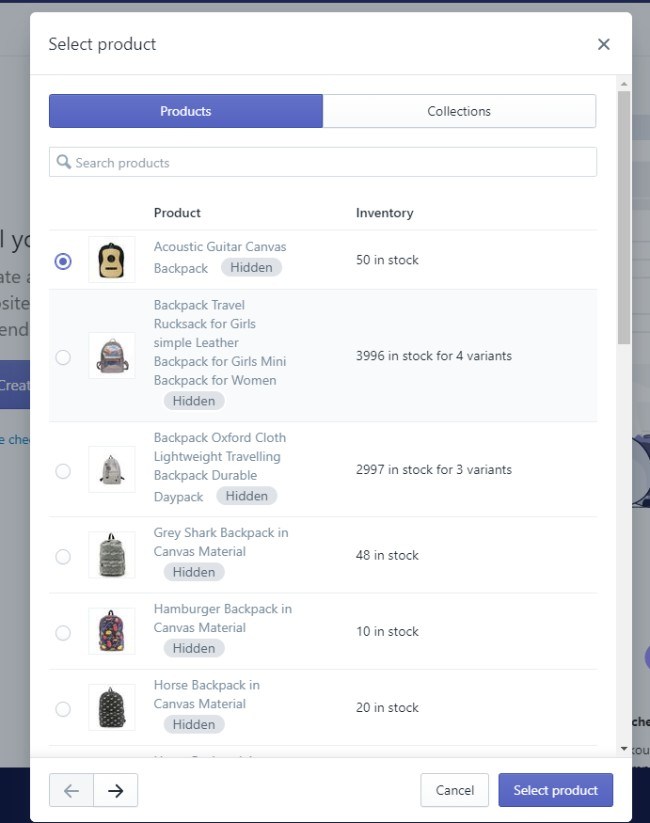
The main feature from Shopify Lite is the ability to generate Buy Buttons and place them on other websites. So, you might add a store to your current WordPress blog or even on your Facebook page. To get started, go to the Buy Button tab in the Shopify dashboard. Select the Create Buy Button option to move forward.

You have the option to create buttons for individual products or collections of products. We'll walk through both methods, but you'll quickly learn that making a collection is much easier for selling larger groups of items.
For this step, we'll choose the Products tab and grab one of the products we imported from before. Click on the Select Product button to move forward.
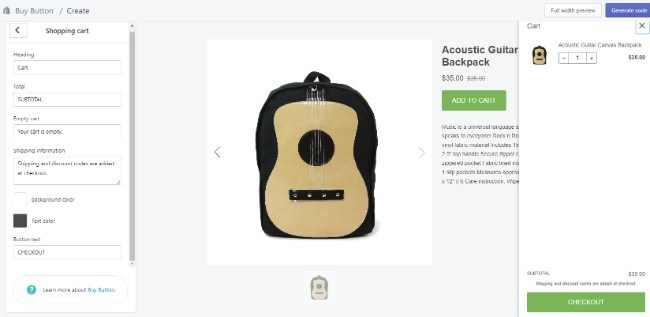
There are several customization tools for your Buy button. For instance, you can make the product display smaller or more detailed. You can also change things like the button style, font style, and shopping cart format. Everything you change is revealed in a preview on the right.
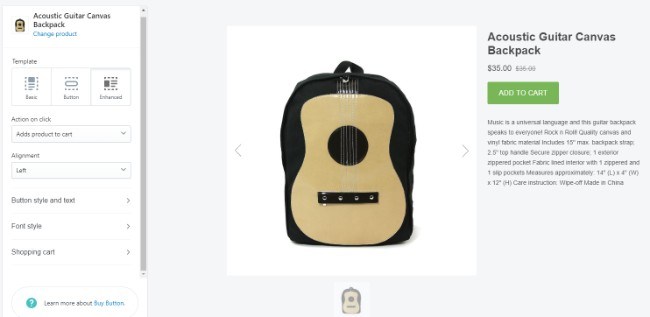
I would recommend viewing what your checkout module looks like, since this is one of the elements that convinces people to finish a purchase.
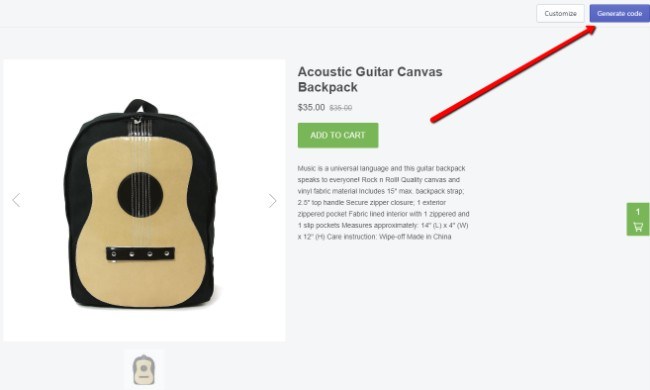
Once you're satisfied, click on the Generate Code button.
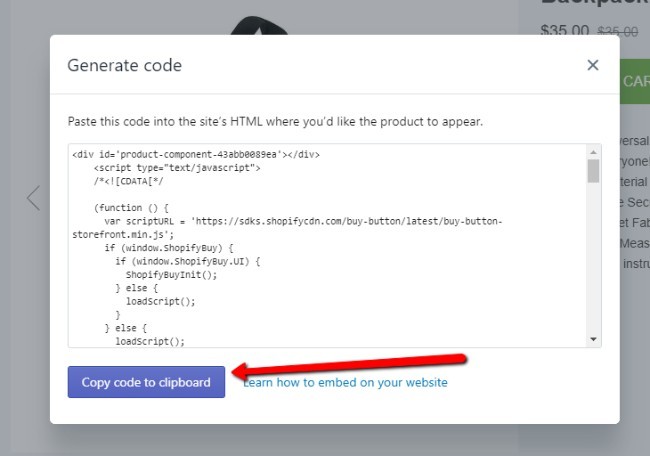
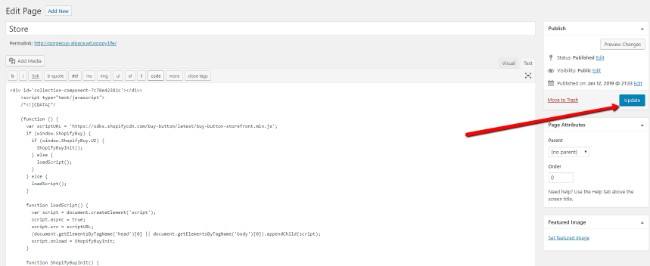
This shows the list of code that needs to be pasted into your website. The good thing is that you can pretty much copy and paste this code anywhere on your website to reveal the product Buy button. There's no need to go into your website files at all.
Click on the button that reads Copy Code to Clipboard.
For this example, I'm using a WordPress site. So, you can pretend that you're running a WordPress blog and would now like to start selling some merchandise. Create a page. In this example, I named the page “Store.”
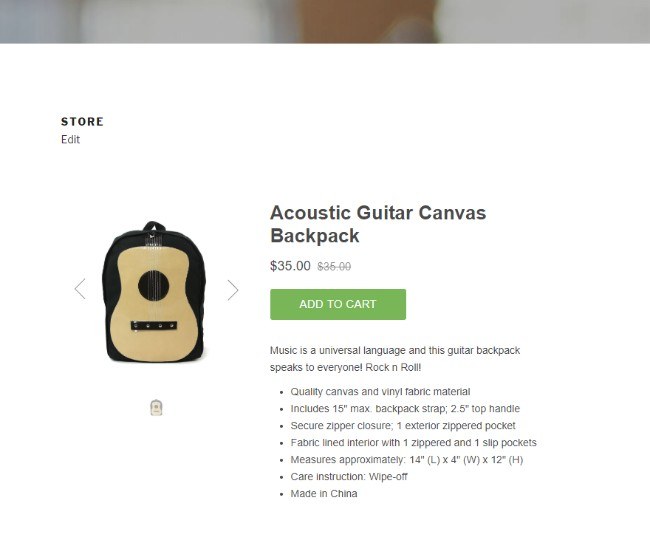
Paste the code in the text box, then click on the Preview or Publish button to see what it looks like on the frontend.
When I move to the frontend, I can now see the Add To Cart button, product image, pricing, and details.
Like I mentioned before, it can get rather tedious to add all of these products one by one. Therefore, I prefer making collections so that I can place multiple products on my website in one step.
To do so, go to the Collections tab in your Shopify dashboard. You may already have some collections created, but we're going to create a new one right now.
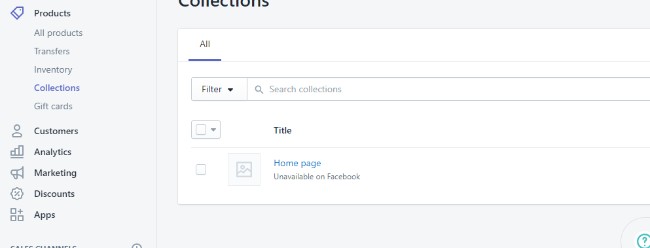
Click on the Create Collection button. This brings up a page similar to a blog post or product creation page. Make the title what you want and select the Manual Collection Type. Make sure you save the collection before moving on.
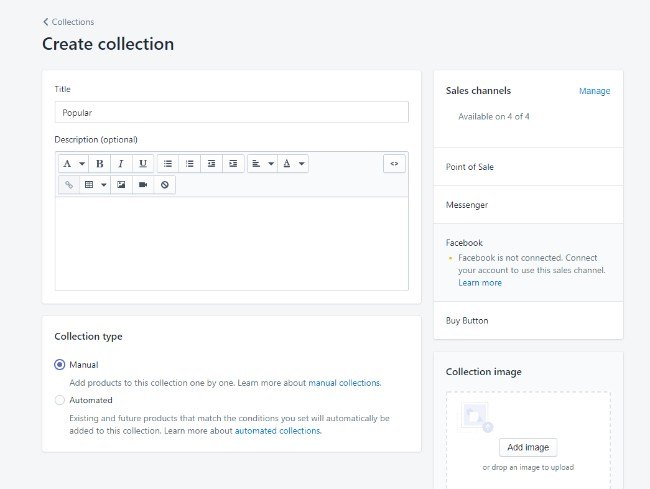
Now you must add a certain number of products to that collection. This may take a long time if you have lots of products, so you have the option for an automated collection creation if that suits you better.
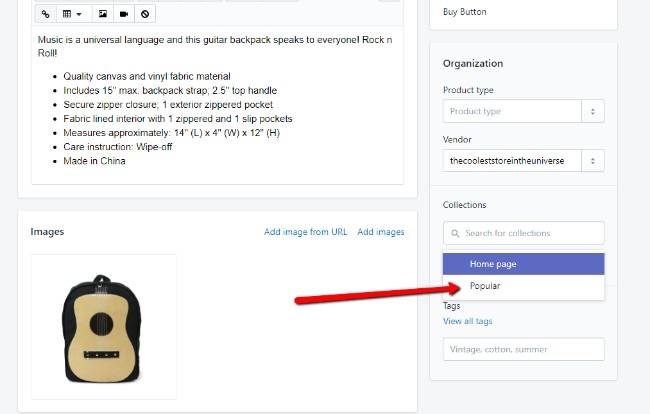
For now, we'll add products manually by going to each product page and typing in the newly created collection in the Collections field. It should show up as an option.
For this example, I'm tagging my products in the Popular collection. Once again, make sure you save all of the products after making the changes.
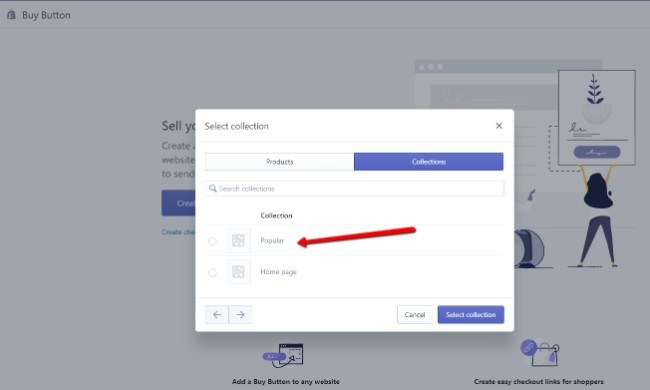
Go back to the area for adding Buy buttons. This time, you'll select the Collection option instead of the Products tab. You should see the new collection (in this case, the Popular collection,) which you can choose and click on the Select Collection button.
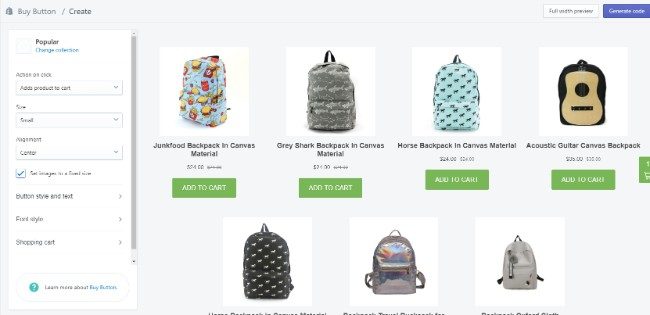
Now, all of the products in that collection are placed in a nice grid format. Each one gets its own button, image, and pricing. Once again, you can customize everything from the size of the module to the colors of the buttons.
Click on that Generate code button again when you're ready to place the collection on your website. Copy the code to your clipboard.
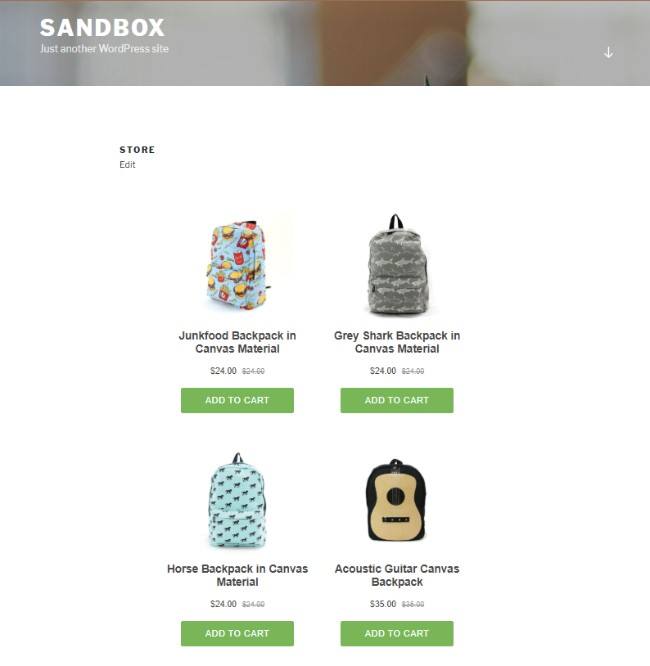
Go back to WordPress and paste in the new collection code. Hit the Preview or Publish button depending on whether or not you are ready for the public to see the products. Either way, you'll be able to get a taste of what the collection looks like on the frontend.
Although I would definitely want to format my store better, I can now see the collection of products on my homepage. Anyone can come to the website and click on the Add to Cart button, then check out so the money will be dropped into my account.
A Note on Product Availability
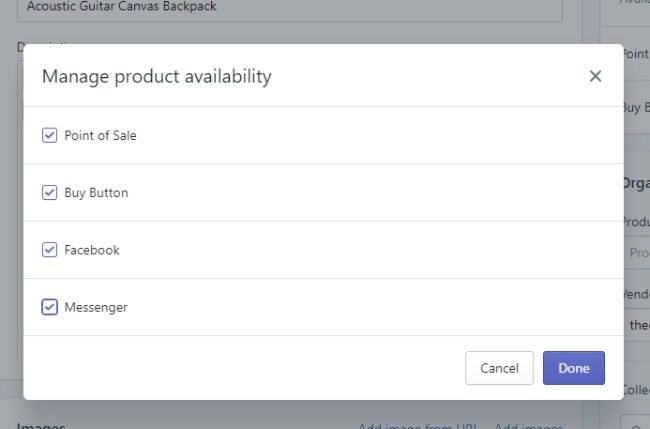
For some reason, you might find that many of your products are not available on all sales channels. This is kind of annoying–but fixable.
For instance, I noticed that most of my products weren't available through the Buy Button and Facebook. In order to change this, go to each product page and find the Product Availability module. Click on the Manage link to change things.
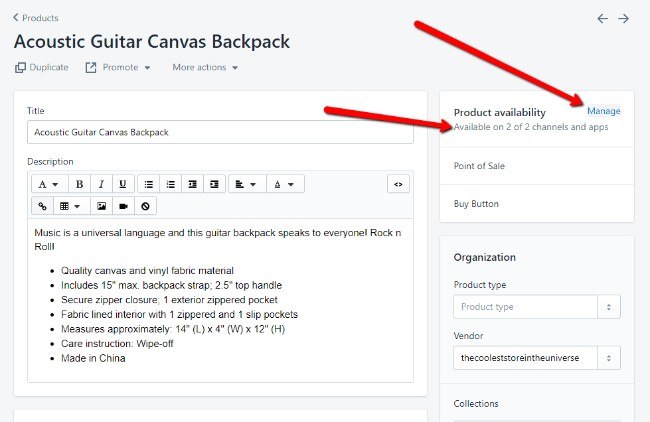
Make sure all of the required sales channels are checked off. Many of you won't need the point of sale, but it doesn't hurt to have it checked. Most online stores will want the Buy Button, Facebook, and Messenger checked. Click on the Done button to finish the process.
The next sales channel to configure is Facebook. Unfortunately, Facebook doesn't have its own checkout anymore, but you can still display your products in a store and send people back to your website for payment. To start, go to the Facebook sales channel button. Click on the Connect Account button.
You'll need to have both personal and business Facebook pages set up already. It will ask you to connect to your personal page. After that, you specify which of your business pages you would like to sell on.
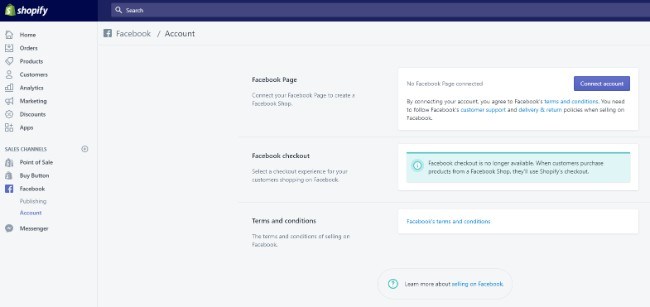
Most of the time you'll see a message that says Facebook needs to approve your account. This only took about ten minutes for me, but it can take up to 24 hours.
If you have problems with the approval, you might have to show that your Facebook page is active and that it's not filled with a bunch of spam. Otherwise, you shouldn't have any problems connecting Facebook to Shopify.
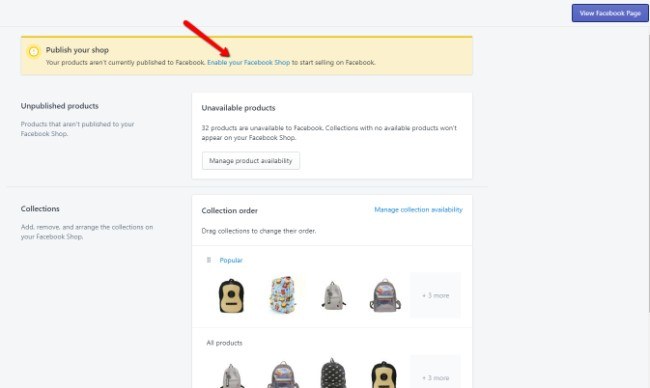
I completed this process a few times during my testing. Sometimes it asked me to enable my Facebook page by clicking on a link. However, it seems that the Facebook shop becomes active on your page even if you don't click on the link. Regardless, if you see the link below, click on it just to make sure.
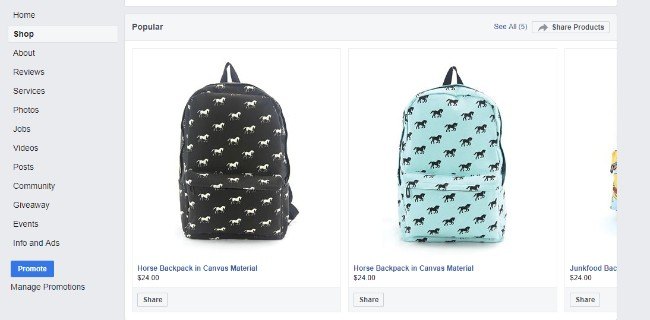
Now it's time to see your Facebook shop in action. By default, a Shop page shows up right below the Home tab on your Facebook page.
If you're not seeing it, go into your preferences to either reveal the Shop tab or to move it further up on the menu. When a customer clicks on the Shop tab, they'll see the list of products you have added to the store.
For instance, I included the Popular category, so users can scroll through those and find the items they like the most. It also provided a list of all products from my store below the Popular category.
As you can see, customers can either click on a product for more information or hit the Share button to send it to other people.
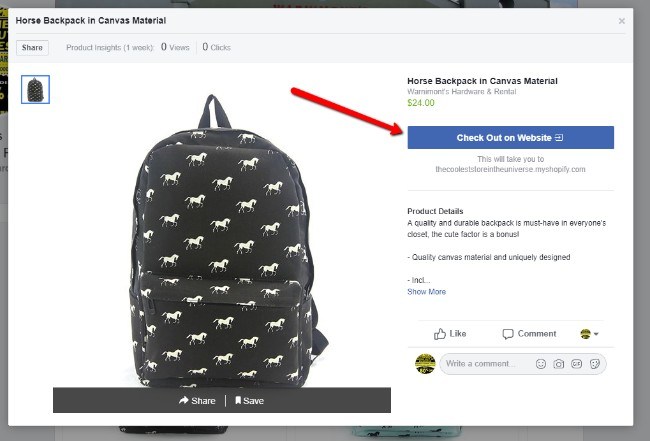
After selecting a product, all of the product information from your Shopify page shows up on the Facebook product page. Everything is revealed, from pricing to product details. Users can also comment on each of the products or like them–just like they would on a standard Facebook post.
As mentioned earlier, Facebook removed the ability for customers to check out on Facebook. This is somewhat of a disappointment (since it forces customers to walk through more steps,) but at least it's pushing more people to your own website.
Therefore, the final step for a customers would be to click on the Check Out on Website button, which would send them to your Shopify Lite store. And that's all there is to know about linking your Shopify/Oberlo shop to Facebook!
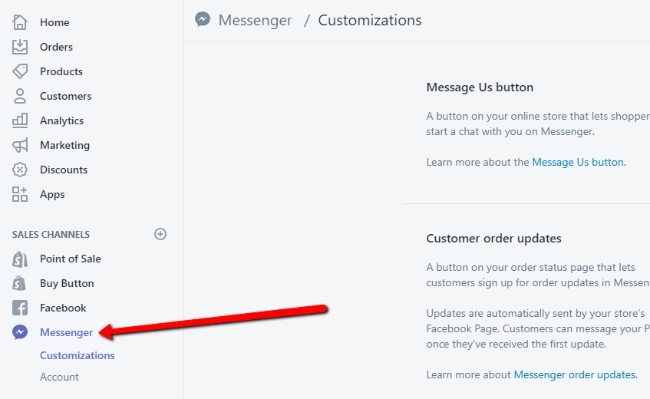
The last sales channel to worry about is Facebook Messenger. You may have noticed this in your own Facebook account or as an app on your phone. It's the direct messaging feature from Facebook, and many companies are starting to use AI bots to answer common questions from customers.
To get started with this, click on the Messenger sales channel tab in Shopify.
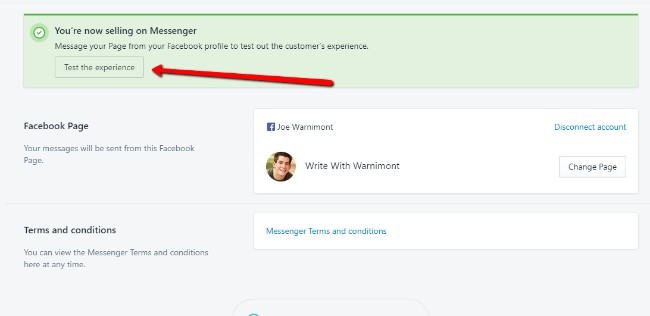
Similar to the Facebook online store, you'll need to connect your personal and business pages to Shopify. Begin by clicking on the Connect Account button. Choose your personal Facebook profile, then select the business Facebook account you would like to manage through Shopify. Remember, this is for the Messenger only.
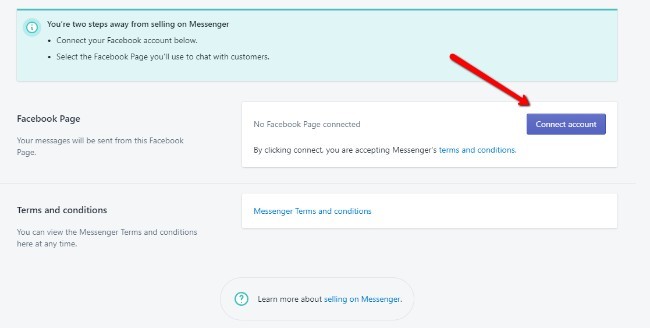
Once the accounts are linked you should notice a button to “Test The Experience.” This basically takes your personal Facebook account and pretends that you're a customer for your business page.
You can send questions or statements like “Start Shopping,” then the Facebook Messenger bot replies with information from your website, links, and more.
It seems that you can only test this once with your personal account, so it might not be a bad idea to have a few of your friends or family test it out as well.
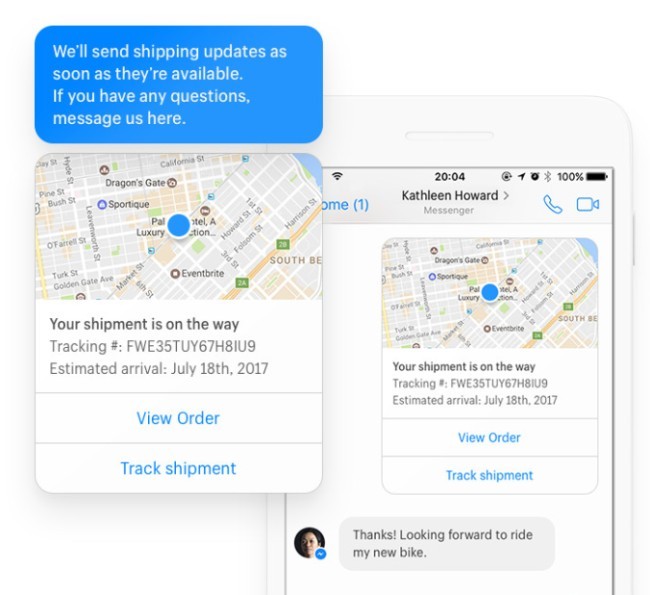
Once the Facebook Messenger sales channel is configured, users can receive product information, links to product pages, shipping updates, and tracking codes.
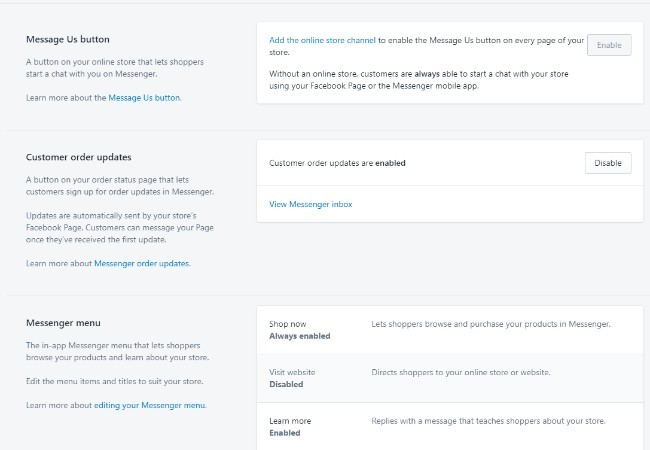
You can change around your settings if you go to Messenger > Customizations in the Shopify dashboard. For instance, you have options for enabling or disabling customer order updates. You can also adjust things like the Messenger menu and the Message Us button.
Are You Ready to Sell With the Shopify Lite Plan and Oberlo?
Shopify Lite is an excellent choice for companies that already have an established website. It allows you to build product pages and insert Buy buttons on the website, while also connecting with other sales channels like Facebook and Facebook Messenger.
You might even consider Facebook Lite if you're trying to test out Shopify and save some money. After all, you still get a shopping cart and checkout module.
The only thing missing is the hosted online store you would receive from a regular Shopify plan. Combine the Shopify Lite tools with Oberlo and you can have a beautiful dropshipping store configured within a few hours.
If you have any questions about getting set up with Shopify Lite or Oberlo, let us know in the comment below.


I have a question. I have a Marketplace account with a Facebook shop that connects to my Marketplace. Can I link products to that? I know I am lost here but can you explain that, please
Hello Ray, I’m sure that I understand you question.
Thanks for this information on shopify lite. You have done a great job here.
Thanks! 👍👍👍
In your above example, since Facebook doesn’t allow check out, using an external site like WordPress or equivalent, would be compulsory to set up the store right?
Yes, that’s correct. You can also upgrade to the Basic Shopify and build the store directly with Shopify.
You can read more about the difference between Shopify and WooCommerce here.
I noted your example above used WordPress with shopify lite, oberlo and Facebook. Is WordPress (or equivalent) compulsory since Facebook doesn’t allow check out within Facebook?