
Sometimes the thought of setting up Google Analytics can seem a little daunting,, especially if you are not familiar with the process. The purpose of this article will be to explain in as much detail as possible, how you can improve your ecommerce website by setting up Google Analytics.
Step 1: Create an account on Google Analytics
Type google.com/analytics in your browser’s URL bar. Go ahead and sign up for a new account on Google Analytics if you don’t have one already.
Step 2: View Architecture and Properties
Note the names of the subdomains and domains mentioned on which you wish to install the tracking code of Google Analytics on. You may or may not give each domain or sub domain a unique property ID. The identification can be done by the ID UA-#######-#.
In my opinion, the same Property ID should be used for all the domains and subdomains in case the business mission and objectives are connected and common. In such a situation, you may want to analyze all the data on the different domains and subdomains on one platform i.e. the same Google Analytics property. You may, however, create different views for subdomain and domain like this:

However, it will be best to create a different Google Analytics property for all the sub domains and domains given that business goals are different for each of them:

Step 3: Insert Google Tag Manager or Google Analytics Tracking Code
Analyzing traffic data from the given site at Google Analytics requires you to do one of the following:
Insert Google Analytics Tracking Code (GATC). GATC can be found in Google Analytics at Property level setting.

Insert Google Tag Manager (GTM). If you select this option, you will have to create a GTM account. It will allow you to send the data to Google Analytics. This will look like the following image:

Once you do one of the following, a code will be automatically created.
Once you receive this code, create a container for the website. Place the code on all the page’s sites like the way it has been done below:

Make sure that the GTM snippet is inserted on the website. Then, create a tag that you can fire to enable the transfer of data from the pages to Google Analytics. It will look like this:

Step 4: Use GTM or GATC to set up Ecommerce Tracking
It is essential for every ecommerce site aiming to succeed to have ecommerce tracking. Ecommerce tracking allows the details of a commercial transaction to be sent to Google Analytics. A few examples of the details include traffic sources, names of regions and countries, and keywords.
The first step you will have to take is enabling your Google Analytics account to collect ecommerce data.

The second step is to choose one of the two to place ecommerce tracking – Google Tag Manager or Google Analytics Tracking Code.

If you chose the Google Tag Manager in order to transfer ecommerce details to Google Analytics, the transaction details present on your confirmation page/ thank you page will have to be pushed into the dataLayer on GTM.
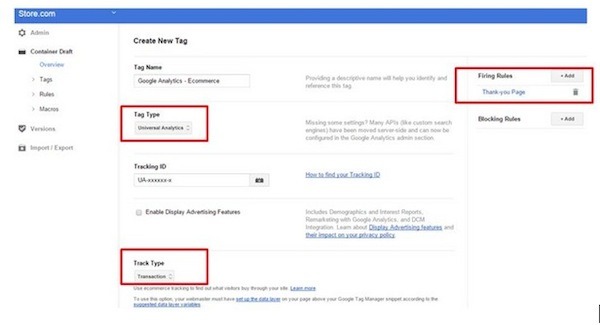
Once the code is placed, the next step will require the creation of a transaction tag in container GTM. This is to be fired on the confirmation/ thank you page.
Step 5: Popular Filters
There are many filters available for your disposal. You may make your selection considering the functions that each filter provides.

Subdomain and domain URLs should be fully visible
In case you have many subdomains, it is more useful for you to know how many visitors have moved amongst them. For example, you may have a blog on a certain subdomain. You will be surprised to see that a big chunk of the visitors on your website might actually be coming from your blog pages. Certain blog posts may be receiving and even sending more visitors than other posts.
Internal traffic should be excluded
Find the IP addresses of the place you operate from. Note it down. There will be people within your workplace who will be visiting your site for work. Using the IP address, exclude the number of visitors from within your office. This will give you a more realistic number of people who visit your site.
You can use this predefined filter for excluding one IP address.
How to exclude multiple IP addresses
If you wish to filter out more than one IP address, here is what you can do: create a filter (custom) that enables you to use the regular expressions required for a wide array of IP addresses.
STEP 6: Goal Setup
There are various activities that convert visitors on the website into strangers, potentials or even customers. Different businesses have different criteria (in the form of a sequence of web site visitor activities) that determine the level of conversion of websites. Determining such a criterion is called goal setup.
Visitors to an ecommerce site can be considered as converted customers if they make a purchase. This would be considered as a macro conversion. There could be other kinds of activities too that could be considered to have converted the visitor to a certain extent. Examples of a few such activities would be signing up, subscribing to a publication, sharing content of the website on social media, adding to wish list or shopping cart.
More about Goals:
Goals are an essential way to identify how effectively your website is fulfilling the target objectives of your business. With Google Analytics, you can easily set up individual “Goals” so that you can measure discrete actions. For instance, transactions consisting of the minimum purchase amount, the amount of time your website visitor spent on your specific webpage, etc. All these are considered as Goals. Likewise, each time any website visitor completes a particular Goal, a “Conversion” will be logged in your account of Google Analytics.
If you want to know the actual worth of a conversion to your business, you can assign a specific monetary value to your Goal. So when it’s time to evaluate the Goal conversion rates, you can make this possible by checking the Goal Reports.
For setting up your Goals, you can walk through the setup process mentioned in your Google Analytics account. To get help with its controls, you can learn more from here.
Step 7: Setting up the Conversion Funnel
It is important to know which web pages a purchaser has gone through in order to distinguish effective content on the website from the less effective one.

To do this, you may set up a funnel of pages that show progression of the visitor towards the checkout button and finally to the confirmation/ thank you page.
In the End: Your Google Analytics account is ready
Following all the above-mentioned rules will allow your important metrics from the website to be stored and tracked. You can use these metrics to take important business decisions. Once the tracking has begun and verified, you can go to the setup wizard to enable advanced tracking. Advanced tracking includes features such as user ID, enhanced ecommerce, metrics and custom dimensions, dashboards, events and many more. For more amazing tips and suggestions see this post.
Feature image curtsey of Luc Chaffard


Hello Catalin,
Glad to read your post and I am actually happy to read some specific information about Google Tag Manager and like to read the actual road of (GTM). Setting up Google analytics is quite easy. But, we really need to know some essential points to set goal and conversion funnel.
Thanks,
Thanks Catalin, It helped me a lot.
Happy hear that Naresh!