Video content often requires you to show your computer screen and either record yourself at the same time or the descriptive audio.
These are called screencasts, and they require special preparation and tools in comparison to things like webinars and livestreams. In this guide, we’ll explain the best methods on how to create a screencast, allowing you to quickly capture movements on your screen while also presenting in a professional fashion.
What Makes a Screencast Unique?
You may wonder, what makes a screencast different from, say, YouTube videos, webinars, or streaming content?
- Screencasts specifically record video for what’s on your computer screen, so viewers can see what you’re doing.
- They are typically recorded (sometimes streamed once) for users to watch at their leisure.
- Screencasts include voiceovers (audio narration) explaining what’s going on in the video.
- They also might have a picture-in-picture video box to show the presenter.
How are People Using Screencasts?
Screencasts get utilized in a variety of ways in the real world. Brands record screencasts for tutorials on their software, or for internal training purposes. It’s also common to make presentations and courses to post online for later viewing.
Here are some of the main ways people use screencasts:
- Video lessons
- Tutorials
- Recorded presentations
- Training videos
- Customer support videos
- Recorded webinars
You might also learn how to create a screencast for personal use, like if you need to send a quick explainer video on how to do something on a computer to a relative or friend.
How to Create a Screencast?
The great part about screencasts is that they’re as simple or advanced as you want to make them. It’s possible to have zero experience—and spend $0—and still come out with a respectable screencast. On the other hand, you might purchase a premium software to produce professional screencasts with annotations, quick editing keys, and picture-in-picture webcam functionality.
In this guide, we explain the most cost-effective ways to produce a screencast while still maintaining a high level of quality. We’ll also recommend multiple options when software or hardware is necessary.
Tools Needed to Make a Screencast
We’re assuming you already have a computer. It’s possible to record the screen on smartphones and tablets, but those require different apps. We’ll primarily focus on screen recording software for Mac and Windows desktop computers.
On top of your computer, you’ll need:
- Screen recording software
- Editing software (potentially included with the video recording software)
- Microphone
- Webcam (optional)
- Platform to upload the screencast online
Keep reading our step-by-step tutorial for recommendations on screen recording software, editing software, microphones, webcams, and platforms to upload videos.
Step 1: Prepare Your Screen Recording Software
Screen recording software is the must-have tool when making a screencast. It’s not the same as a webcam (instead you’re turning the focus on your screen), and you’ll find that screenshot software often lacks recording functionality.
We’re not interested in grabbing a screenshot (although you may need that to add to your screencasts). A screencast software records a video of your screen, and often allows you special features like cutting out certain parts of the screen or zooming in.
Recommended screen recording software for screencasts:
- CleanShot X: The sleekest screenshot and screen recording app for Mac. It’s a premium but affordable product with annotations, simple video editing, video and audio capture, GIF creation, webcam support, picture-in-picture, and quick keys.
- OBS Studio: Free and incredibly popular, OBS is a screencasting tool for Windows, Mac, and Linux. There’s a bit of a learning curve, but OBX provides video and audio capture from multiple sources, scene control, picture-in-picture, video and audio editing, and quick publishing tools.
- Camtasia: Perhaps the most expensive, yet feature-rich, screen recording tool on the market, Camtasia has it all if you want to create a screenshot with the highest production quality. It comes with a screen recorder, video editor, templates, webcam support, audio recording, music, PowerPoint integrations, media imports, interactivity, annotations, and more. For this robust collection of features, plans start at $299.99 per user.
- Screencast-O-Matic: This one has a limited free plan and affordable premium subscriptions. You receive screen capture tools, video and image editing, content hosting, auto-captions, quizzes, custom branding, CTA buttons, video heat maps, and collaboration tools, all depending on your plan. Premium pricing starts at $4 per month.
- ScreenFlow: Billed as the “Camtasia for Mac,” ScreenFlow boasts a professional suite of screen recording elements. Pricing starts at $169. Features include high-quality screen and webcam recording, professional editing tools, iOS recording (no Android), closed caption support, animations and graphics, animated GIF creation, and top-notch publishing options.
- RecordCast: This is a free screen recorder tool with no software to install, and no plugin needed for editing your screencasts. Record your screen and webcam, add effects, and edit with music, overlays, and logos. This is one of the simplest tools available for quickly creating screencasts, primarily because all you need is a browser.
- Movavi: The video suite from Movavi is free, with premium versions starting at around $100. It only has a Windows version. To begin, you can record your screen. Thereafter, Movavi offers a video editor, video converter, photo editor, and everything from transitions to audio editing in the dashboard. Add filters, overlay titles, and even stabilize bouncy videos with the click of a button.
Once you’ve decided on a screen recording software, it’s time to prepare the software for recording. For instance, you should set the proper dimensions, create shortcuts for quick controls, and establish which parts of your screen should be recorded.
Here’s an example with CleanShotX:
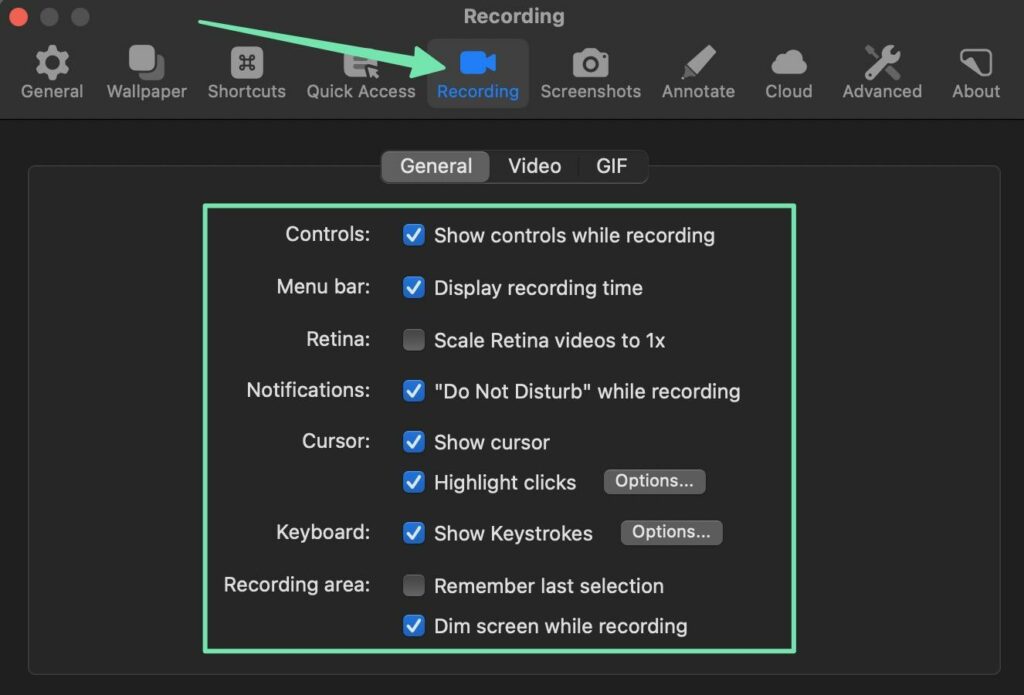
CleanShotX has a Preference panel for configuring screencast recording settings before starting. Regardless of the software you’re using, it should have a “Settings” or “Preferences” panel for videos.
In CleanShotX, there’s a Recording tab.
Although it depends on what you need for the particular project, consider the following settings before recording:
- Showing controls while recording: Otherwise, you’ll have difficulty finding a way to pause or stop videos when needed.
- Show cursor: Some people love having the cursor in videos for more of a focus on content, while others find that it clutters the screen.
- Notifications: If possible, turn on the “Do Not Disturb” mode so that computer notifications don’t ruin your recording.
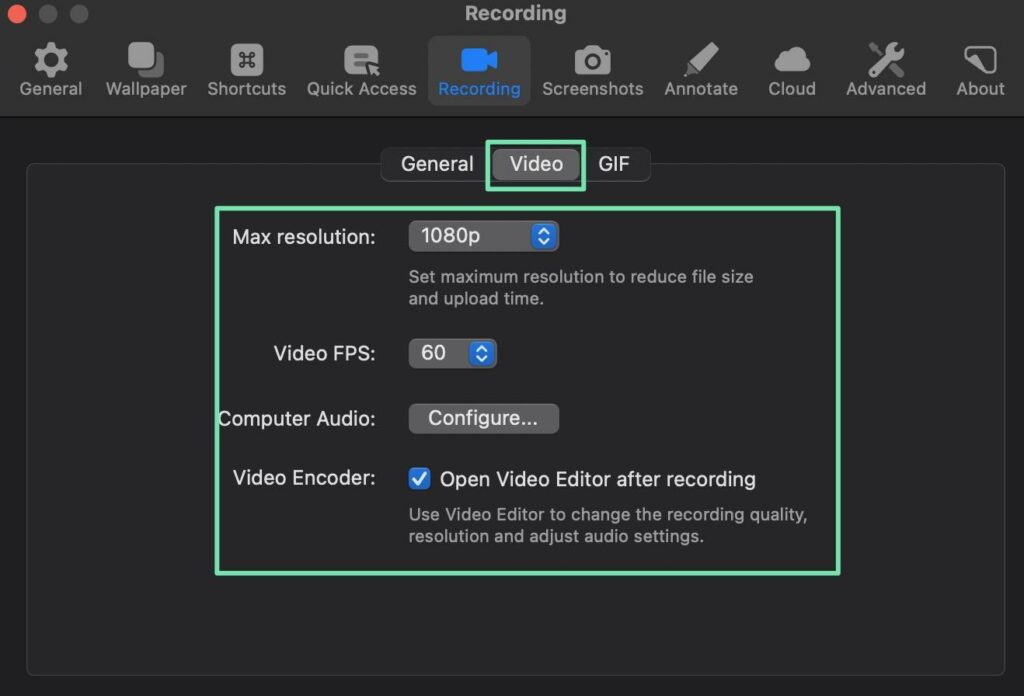
The Video tab in CleanShotX has additional settings.
In your screencast software, consider these settings:
- Max resolution: You’ll want an HD resolution (like 720p or 1080p), but anything higher than that makes an incredibly large file, and doesn’t show any noticeable improvements for online video.
- Video FPS: 60 is the standard; you can adjust this if your recording seems choppy, or if having trouble with audio syncing to video.
- Open video editor after recording: If your screen recording software comes with a decent video editor, make sure it opens when you’re done recording.
Finally, we recommend configuring keyboard shortcuts for quick recording, stopping, and pausing of your video. Shortcuts are faster than grabbing your mouse and trying to click the Pause button. You’ll save yourself a significant amount of time editing out dead air.
Set shortcuts that feel comfortable for you. Moreover, remember and practice them to become comfortable during the screencast.
We recommend shortcuts for:
- Recording the screen
- Stopping a screencast
- Pausing
- Resuming from a pause
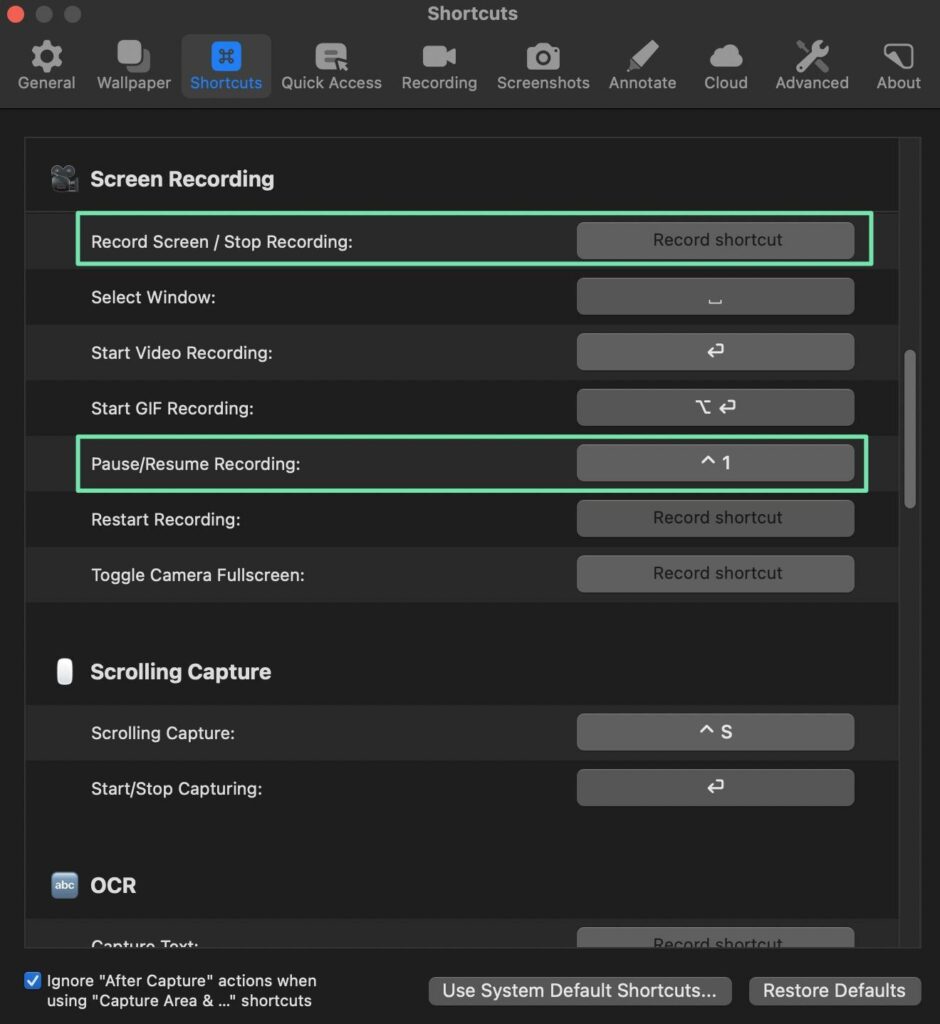
You might also streamline your screencasting process with shortcuts for toggling screens, selecting windows, or restarting a recording.
Step 2: Prepare Your Microphone
The microphone you use depends on where you’re recording, and the quality you’d like to achieve.
We’re assuming most screencasts occur in an office-like environment.
So, as a general rule:
- Pick a directional desktop microphone: This keeps the microphone out of your hands and targets your voice, eliminating much of the background noise.
- If you’d rather not lean into a desktop microphone, consider a lavelier mic: It’s hands-free and often possible to hide for a discrete look. However, lavalier microphones tend to bring in outside noise more than a directional mic.
For the cheapest microphone available, simply use the microphone built into your computer. This works best for personal screencasts. If you intend to sell the screencast, or using it for professional purposes, buy a lavelier or directional desktop mic. You don’t have to get the most expensive one; you’ll see an incredible difference with even the lower end models.
With your microphone ready, make sure it’s hooked up to your computer.
Open the screen recording software to pick the default microphone, and to configure its settings.
All screen recording software looks different. We’ll use CleanShotX; seek out similar settings if you’re using something else.
The first order of business is to open the general audio settings. In CleanShotX, that’s under the Preferences panel, by going to Recording > Video.
Here, there’s a Computer Audio option where you can click to Configure. Make sure you configure the audio source regardless of your screen recording software.
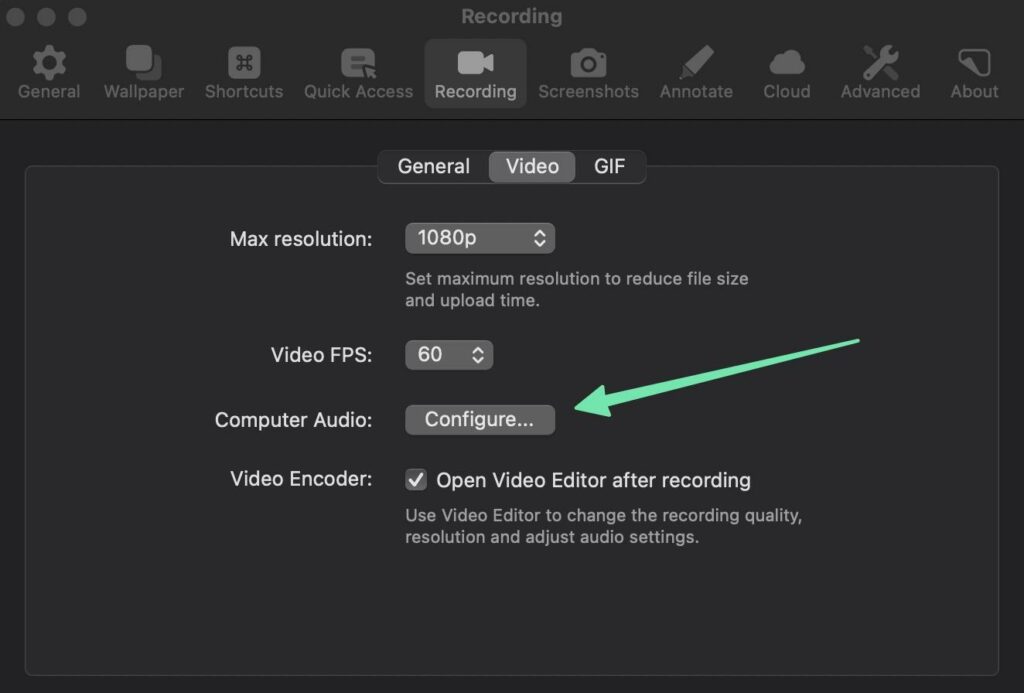
Some software offers automated audio configuring. It’s also wise to pick whether you’d like to record the audio on separate tracks or on a single track. Single track recording is easier for the average content creator, but separate track recording allows you more control, since you can edit audio and video separately from each other.
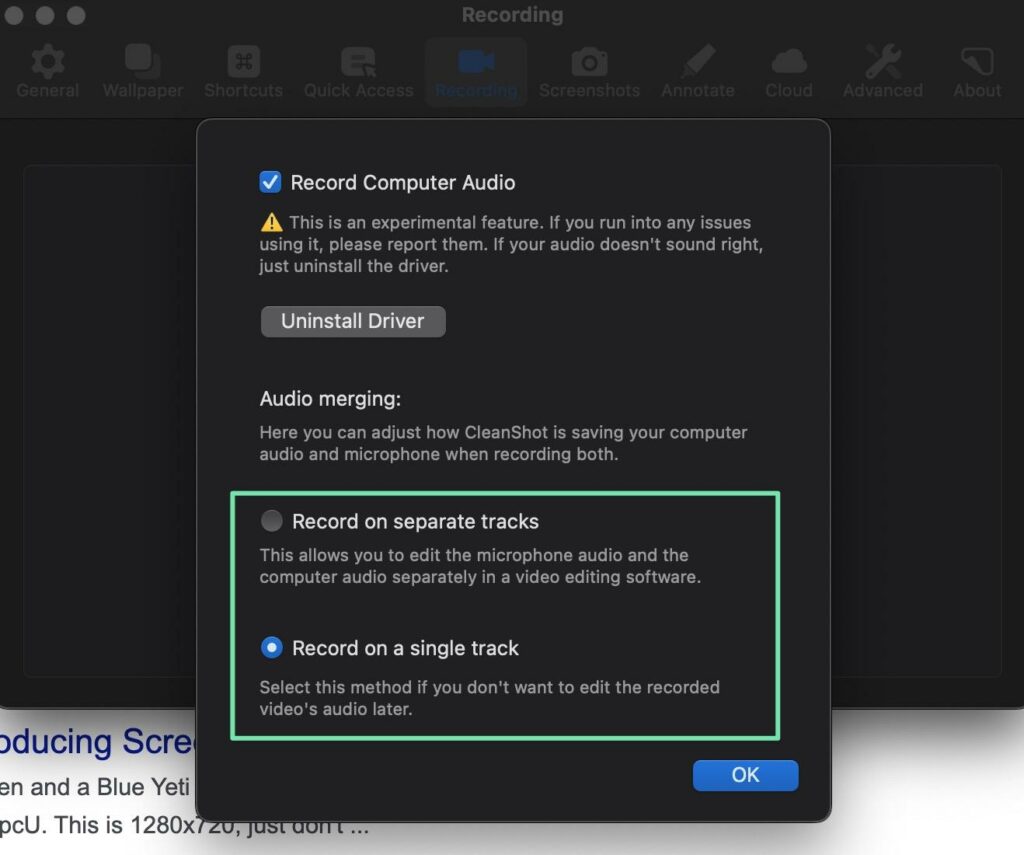
You’ll also want to select the audio source. This is particularly important if you purchase a nicer microphone; the last thing you want is for the screen recording software to use the default computer microphone over the good mic.
In CleanShotX (and a good deal of software), you must actually start a screen recording to select the default source. Occasionally, however, you pick a source in the settings.
Going to Record Screen, we can see several configuration tools before running the screencast. Look for the microphone icon or menu; that gives you a dropdown of all the microphones connected to your computer. Select the one that makes the most sense.

Step 3: Find an Editing Software that Works Well for Screencasts
Learning how to create a screencast is not only about recording a video. Unless your take is perfect (which is rare), you’ll end up editing out dead air, coughs, and screw-ups, while also inserting filters and effects.
For editing a screencast, you have two options:
- Get a screen recording software with the video editing tools you need.
- Use a separate editing software, then import the completed video into that tool.
Our recommendation is to keep recording and editing in one software. The importing process often screws up resolution, and it’s nice to record and edit in one place.
Here are some screen recording software with editing tools built in:
- Camtasia: The most powerful screen capture and editor on the market, but it’s pricey.
- CleanShotX: Not as robust as Camtasia when it comes to editing, but this should work for most users. Only for Mac.
- Movavi: Video editing with drag-and-drop effects.
- RecordCast: This has a separate editing portal run in the browser.
- ScreenFlow: Perhaps the most powerful video editing option for Mac users.
- Screencast-o-matic: Decent video editing with overlays, animations, and green screen.
External editors—those where you’d have to import the screencast from your recording software—include Adobe Premier Pro, Apple Final Cut Pro, Apple iMovie, and Wondershare Filmora, all of which provide excellent features for cleaning up screencasts.
Step 4: Write a Script
It’s certainly possible to just start talking when filming a screencast. Yet, with a few practices, many people realize just how difficult that is. You’ll miss important details, stammer, and think too much (creating dead air).
Worse, unscripted screencasts lead to rambling. You’ll end up with a longer video (which is a deterrent to people actually watching it), and your content will suffer. The goal is to stick to the crucial talking points, and remove all the clutter.
That’s where a script comes into play. It doesn’t have to be word-for-word. An outline works for some. Other people like writing down a complete script, but give themselves permission to stray from the original plan.
The idea is to remain focused, but not make it sound like a script (or look like you’re reading a script if using a webcam).
Here are some tips on how to create a screencast script:
- Start with an outline, then expand into further details.
- Maintain the right voice for your audience, whether that’s fun and whimsical or professional and to the point.
- Go right into introducing what the screencast is about.
- Write conversationally. You’re eventually going to read the script, so skip big words or business jargon. Even adding cues for laughs, jokes, or moments of thought are more natural.
- Give yourself enough time to switch from window to window on your computer. It’s common to write a script that moves quickly, but at some point you’ll have to complete tasks on the screen. Mark down short breaks in your script to account for transitions.
- Add a beginning, middle, and end. Not quite like a regular story, but there should be a clear introduction, the actual instructional video, and a conclusion that summarizes things, thanks people for watching, and states any necessary calls to action.
- You are welcome to write in actions you don’t intend to speak. Instructions on what you should do next on the screen are rather helpful.
After that, it’s time to figure out how you plan on reading your script. This is tricky. It’s tough making your eyes look naturally at the camera when you have a script to read!
Note: You don’t have to worry about your eyes if you’re not learning how to create a screencast via webcam.
Here are some ways to ensure your eyes move naturally (not like they’re skimming through a script):
- Use a teleprompter app that scrolls through the script on your computer. Many have features for adjusting the speed and remaining translucent, so the screen recording software doesn’t show them. Options are Teleprompter Premium for Mac, Teleprompter Mirror for Windows and Mac, or one of the many other options you can find by searching Windows or Mac app stores.
- Put the script in your notes app (or a teleprompter app) on a phone or tablet. Boost the effectiveness of this setup by putting the device on a tripod stand, perhaps right above your computer screen.
- Print out a hard copy of the script. Place it right on your desk, tape it to the wall behind your screen, or get something like a music stand to hold the paper.
Keep in mind: working with a physical paper script comes with its own issues, like having to flip the pages (distracting) and causing a paper-flipping noise that your microphone could pick up. Although testing it out is all part of learning how to create a screencast.
Step 5: Prepare Your Screen
It’s not until you learn how to create a screencast that you realize just how cluttered your computer screen has become.
People would rather not see that you have 10 tabs open in your browser. It looks unprofessional. Not only that, but you’ll want to close sensitive items, or other apps that cause your computer to slow down.
Really, the only things you should have open are the pages you plan to record, and the screen recording software. And potentially a teleprompter app with your script.
Go through the checklist to remove/close:
- A homescreen full of shortcuts.
- Irrelevant browser tabs.
- Apps and software that don’t pertain to the screencast.
- Background programs that may slow down your computer and cause issues with the recording.
- Sensitive information; anything from your personal photos to files with financial documentation.
- Unprofessional wallpapers; really any type of browser or computer wallpaper that isn’t a neutral image. There’s nothing wrong with your sports team, but it’s not a good look for a screencast.
- Distracting materials or extra clutter, like the tabs in your control panel, or unexpected notifications.
Finally, run through the screencast a few times (practice) using your freshly cleaned desktop interface. Work with shortcuts to streamline movements, and have a structure so that you know exactly where to click when the next script point comes along.
Step 6: Prepare Yourself (If Recording Your Voice or Face)
Your voice is the main talent being showcased during a screencast. If using a webcam, you’ll also want to make yourself presentable.
Here are some tips to ensure your voice, face, and environment are ready for filming:
- Drink some water, and have a glass nearby throughout the recording. You can always pause the recording to take a sip.
- Cough out any roughness in your throat, and run through vocal warmups like reading tongue twisters or poems.
- Get rid of any gum or food that may cause lip-smacking through the video.
- Make sure you’re fresh! Shower, get a haircut, brush your teeth. These help you feel more confident and looking cleaner for the camera (if using a webcam).
- For webcam screencasts, prepare the environment with proper lighting, a decluttered background, and perhaps a backdrop with a uniform color.
It’s also not a bad idea to walk around to practice your script. Bring up your level of energy so that viewers follow along with that energy and get excited about what you’re saying.
Step 7: Record the Screencast (Your Screen, Voice, and Potentially Your Face)
It’s showtime! After all that preparation, it’s nerve-racking to click “Record.”
Just know that everything you’ve put in before this has trained you to perform the best possible screencast. And, lucky for you, any screw-ups can be edited out in post-production.
The guidelines for recording are simple:
- Set the dimensions of your screen recording software to only show what you want the viewer to see.
- Pick a high-resolution, universally accepted output format and dimensions.
- Important: Make sure you’ve actually hit the “Record” button. There’s nothing worse than reading through half your script only to find that it wasn’t recording.
- Leave a few seconds of dead air at the beginning of the recording to make for a less abrupt entry. You can trim this in editing, and potentially add a transition effect that removes it for you.
- Use keyboard shortcuts to speed up movements on the screen.
- Always have your finger on the “Pause” shortcut in case you need to take a sip of water, or to cough.
- Keep your mouth near the microphone, so you maintain a consistent audio level throughout the recording.
- Have fun with it!
Step 8: Save the Original (Rough) Screencast
When it’s all said and done, make sure you click the Stop Recording button. Then, save the recording to a place on your computer you’ll remember.
Never delete or replace the original recording. Save it in a safe space, just in case you accidentally go too far with the editing and need to retrieve something from before.
The saved screencast file is not meant for sharing. Therefore, you should save it in the best resolution possible (just stick to the original resolution).
We recommend using a high-storage external hard drive, since these original files end up pretty large.
Step 9: Edit the Screencast
Editing a screencast takes place in various stages.
You can actually cut out much of your post-production time by utilizing keyboard shortcuts during the recording. Hitting the Pause button when you need to take a sip of water (then resuming the recording when you’re done) is far simpler than having to dig around for those outtakes in the final recording. In a sense, you’re editing while recording with the Pause/Resume buttons.
Many screen recording software provide quick editing tools right before you send video to the real editor.
On the other hand, you might utilize an editing tool separate from the screen recording software, like:
- Apple iMovie
- Adobe Premier Pro
- Apple Final Cut Pro Apple iMovie
- Wondershare Filmora
- The built-in Windows video editor (Clipchamp or the Legacy version)
Regardless of your setup, make sure you hit all the essential editing steps for the best result when learning how to create a screencast.
There are others to consider, but here are the main editing tasks to complete:
Video Quality
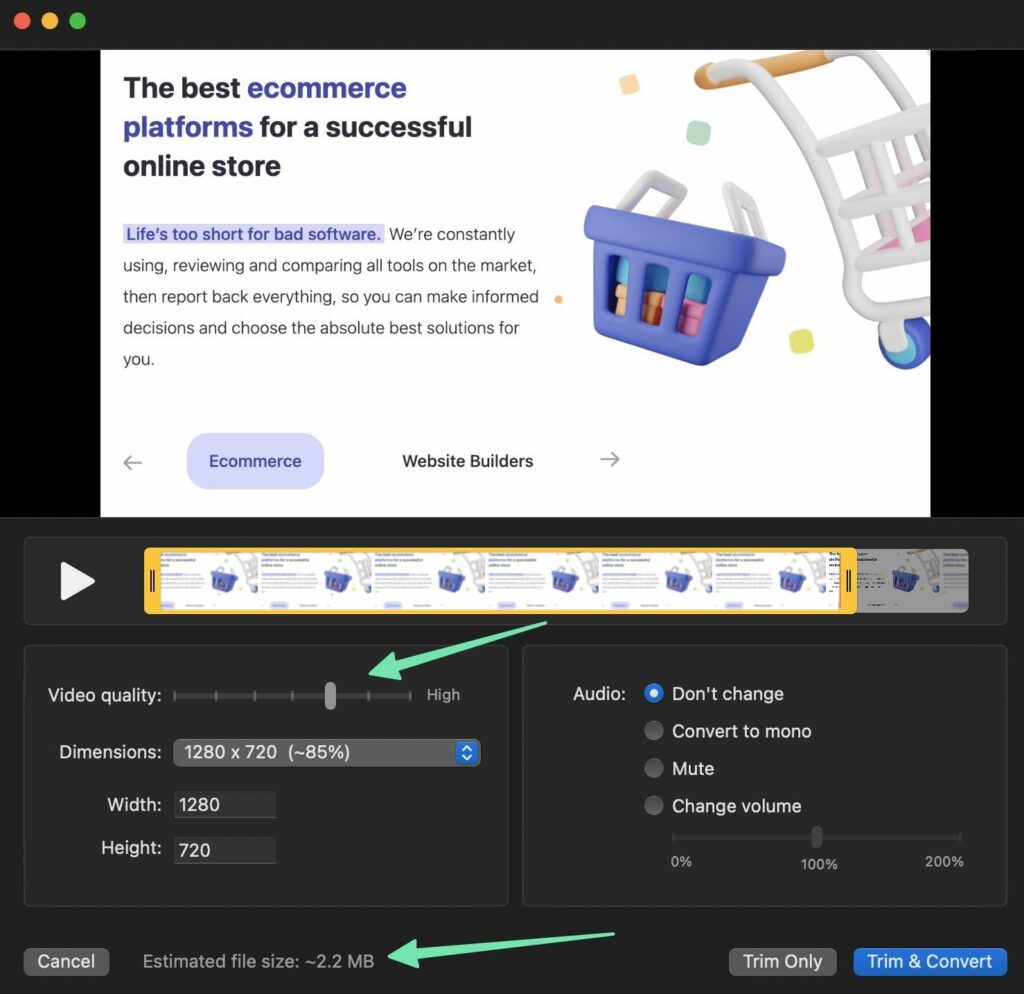
Video quality asks whether you’d like to compress the video or not. For a screencast, you want high-quality video that’s still optimized; otherwise you run the risk of overloading your website, or forcing users to wait a long time for your video to load. Not to mention, the file takes up too much space on your hard drive.
Consider making the video quality High or Very High, then check to see if the estimated file size is appropriate.
Dimensions
Shoot for standardized video dimensions for compatibility with all website builders (like Wix and Shopify), video sharing sites (like YouTube), and social sites (like Facebook).
Optimal dimensions are:
- 1280×720 (720p)
- 1920×1080 (1080p)
Anything higher than this becomes overbearing for many websites, and you won’t see the quality desired when served online. This is one of the best tips when learning how to create a screencast.

In general, that means to avoid the original file dimensions. They probably won't fit well on sites like YouTube, and you’re saving an unnecessarily large file.
Trimming
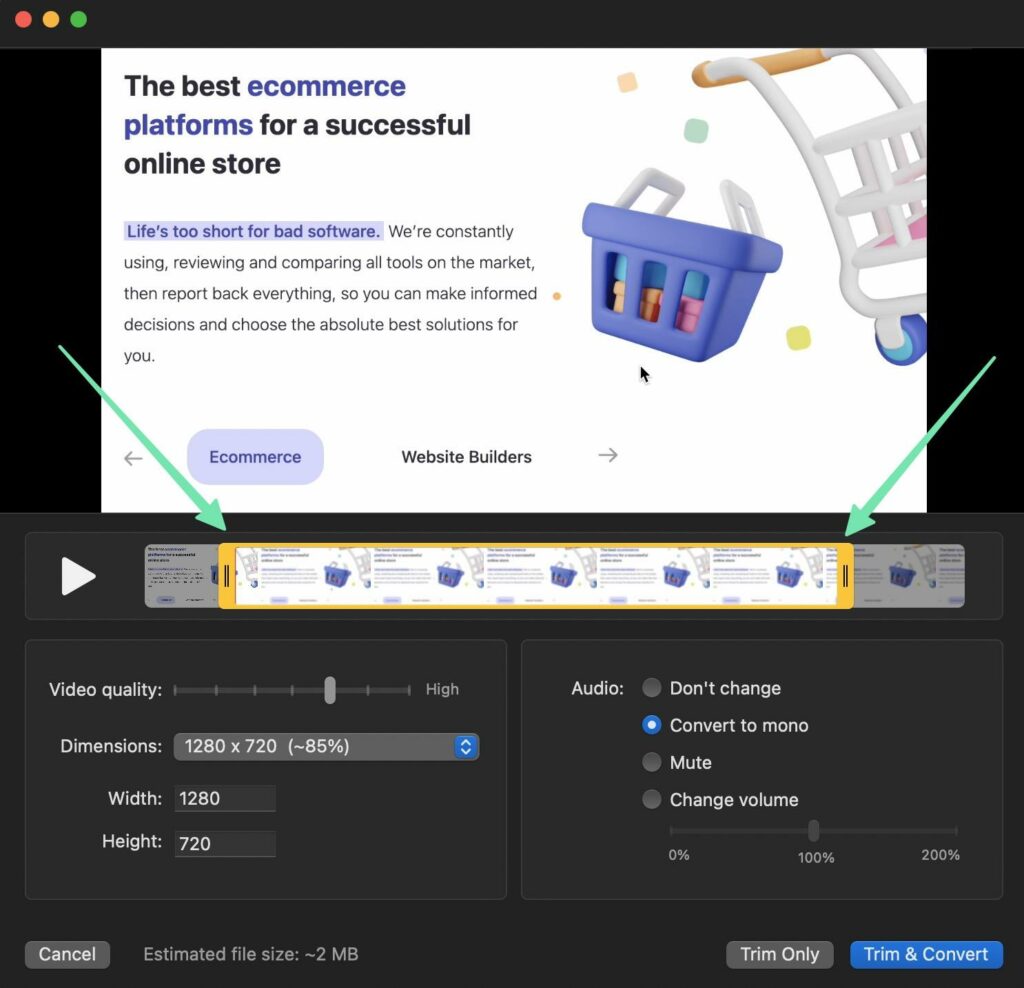
Trimming is the easiest edit you can make, and it serves you well when needed to get rid of the beginning or end of a screencast.
To do so, drag the trim tools in your editing software to remove portions of the beginning or end.
Audio Conversion
Audio conversions make further editing easier to manage.
You have two options:
- Convert to mono
- Don’t change (keep multiple tracks)
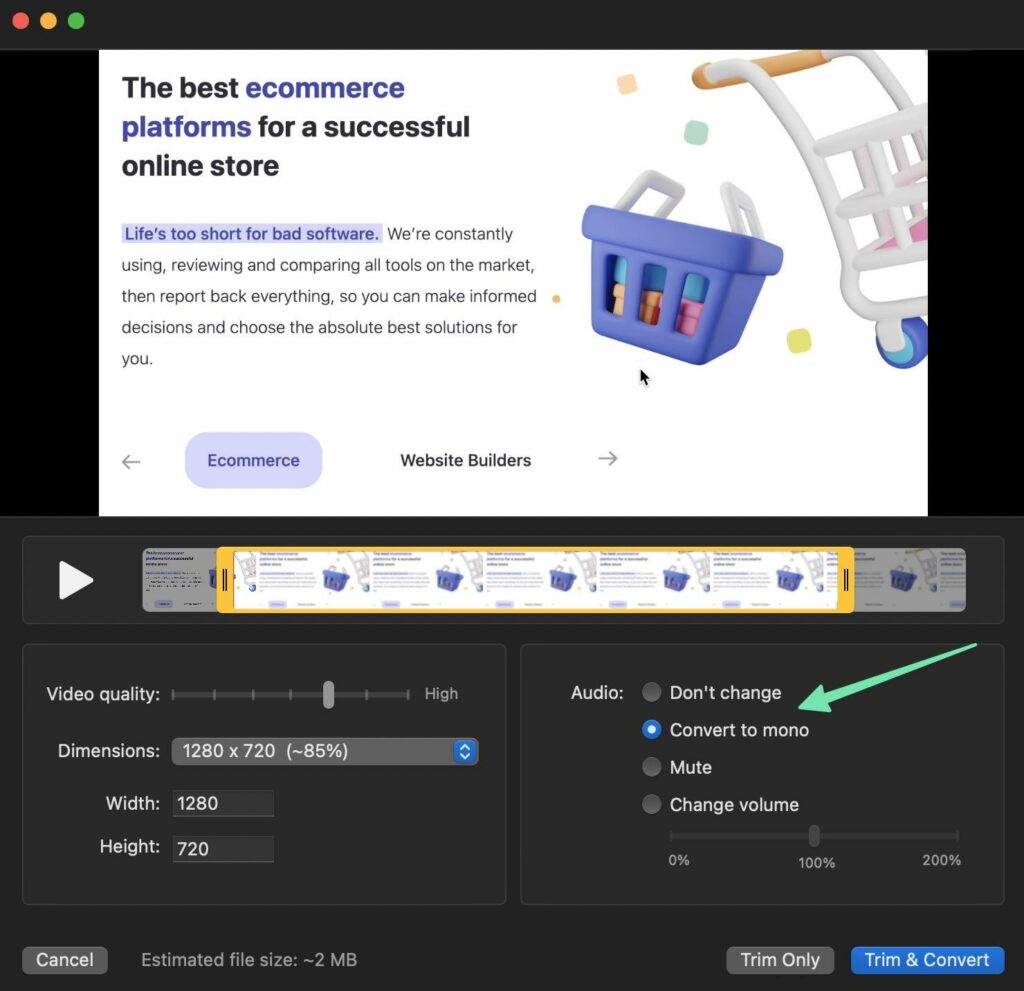
Converting audio to mono means that it’s putting audio on the same track as the video. Many people like this for the simplicity of just editing one track.
Keeping multiple tracks (one for audio and another for video) gives you more control over the separate audio and visual tools, without affecting the other.
Split, Move, and Delete Clips
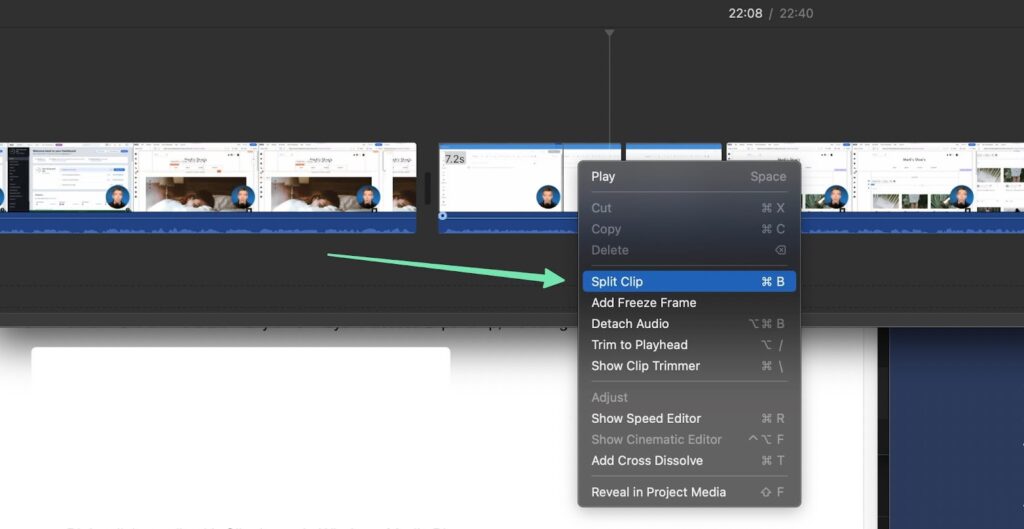
Trimming functionality only allows you to clean up the beginning and end portions of your screencast, whereas Split features offer greater control of clips in the middle of your video.
When using a Split feature, you can chop up bits and pieces of your video, leaving space to insert transitions and effects. In addition, the split allows you to move that new clip to another place, or delete it altogether.

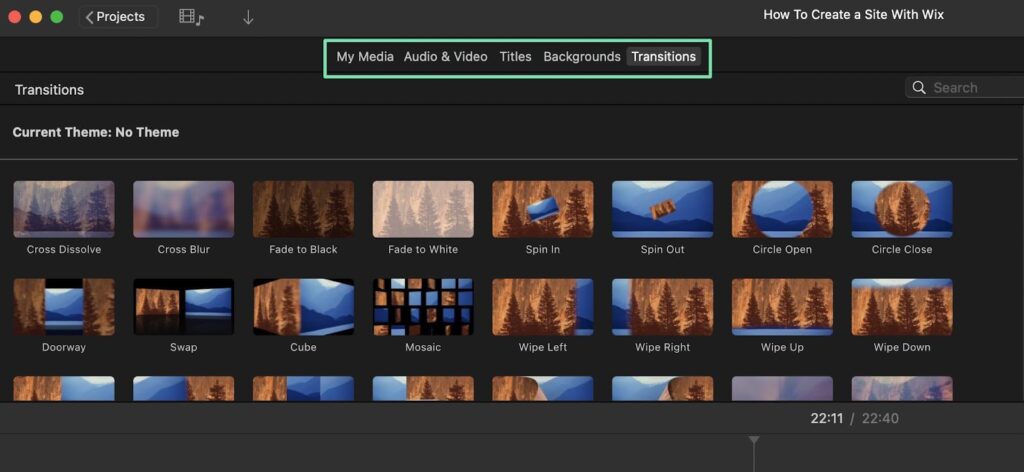
Add Effects, Titles, Backgrounds, Transitions, Annotations, and More
Every editing tool has its own set of design features, so it’s impossible to say what you can do with your video. However, you should be able to find features for:
- Effects
- Titles
- Backgrounds
- Transitions
- Annotations
- Media elements
These are the parts of the video that help your screencast stand out. They’re the smooth transitions from one clip to another, the introduction with logo, and the section titles that pop up, similar to a news program.
Explore and test these options until you figure out the ones that work best when learning how to create a screencast.
Step 10: Share the Screencast Online
Learning how to create a screencast really only makes sense if you intend to share it with others.
You can publish a screencast on:
- A course or training ecommerce website
- Video hosting sites like YouTube or Vimeo
- Your company’s backend website
- Social media sites
Sharing on social media is simple enough. Go to Facebook, Instagram, or whatever site you’d like, and upload the video to a new post.
Before doing anything, be sure to download or export the edited screencast as an MP4 file. Again, stick to a higher video quality and standardized dimensions, like 1080p or 720p.
To add the video to your website (backend or frontend) you’ll upload via the platform’s media library.
Here are video uploading guidelines based on your platform:
- Shopify: Go to Settings > Files > Upload Files. It’s also possible to add videos from a product page.
- WordPress: Go to Media > Add New. Click Select Files. You can also add videos as blocks in posts and pages.
- Wix: Go to the Video Library in the Wix dashboard. Click Upload Videos or Add Videos. There’s a block for adding videos to pages as well.
- Squarespace: Embed videos with a block, or upload videos to the media section.
- Teachable: Under Curriculum > Edit Lecture, click the Add Video option.
- Thinkific: Go to Manage Learning Products > Video Library. Click the Upload button to select a video file.
As another option, you can upload screencasts to video hosting websites/marketplaces. Some of these sites are like social networks but for videos, where you upload the video to a channel and anyone can come to view the video. Others are marketplaces for selling course and tutorial videos.
Examples:
- YouTube
- Vimeo
- Udemy
- Skillshare
Every marketplace and video sharing site has its own process, but you can generally look for an Upload or Add Video button.
YouTube, for example, has a Create button that brings you to YouTube Studio. When you click the Create button, you’ll see a dropdown menu, where you’d pick Upload Videos.

Once published on a video marketplace or hosting site, users of those websites can search for keywords that relate to your video. You can optimize your videos with relevant keywords in the title, description, and tags, while also managing things like comments/students.
The great part about sites like YouTube and Udemy is that you receive powerful features for everything from editing videos to marketing the content. In addition, your screencast content mostly gets indexed by search engines for even more people to find your videos.
In addition, YouTube, Udemy, and other similar sites, provide “channels” and landing pages for you to list information about the creator (yourself, or your brand) and organize a collection of videos for users to pick.
Best Practices for How to Create a Screencast
To send you off with confidence, we’ll share our favorite best practices for making screencasts. This way, you don’t stumble into the roadblocks that every else does.
- Make movements as smooth as possible: This means limiting how much you move the mouse, ensuring all scrolling is smooth, not clicking around too much, and utilizing keyboard shortcuts.
- Consider zooming and highlighting: Especially for important areas, or points of emphasis during your screencast.
- Speak slowly and keep it short: It’s hard to keep up with someone who’s speaking too quickly. And it’s easy to get bored with a video if it’s too long.
- Think about using a teleprompter: This way, you avoid going off-topic, cut down on editing time, and minimize issues with skipping essential points.
- Focus your eyes on the camera: It’s natural to move your eyes around a bit, but you ideally want them trained on the camera as much as possible (if using the webcam).
- Get rid of all clutter on your screen: Files, personal wallpapers, unneeded browser tabs, and other software; close it all down.
- Practice several times before you start recording: This is another way to reduce editing time, while also making yourself more confident.
- Stick to standardized screencast video dimensions and formats: You can’t go wrong with 720p or 1080p when publishing online. The same goes for MP4 files.
- If embedding your webcam, pick an unobtrusive spot: Keep it in one of the corners, away from content that people need to see. And make the embedded video small.
- Utilize annotation elements: Arrows, highlights, titles, and other annotation elements help clarify your message when learning how to create a screencast.
- Try your best to complete a clean screencast in one take: It’s incredibly time-consuming to go back and edit out hundreds of “ums” and pauses. Save yourself the time by rehearsing and getting as close to perfect in one take.
- Trim out the beginning and end if necessary: This leaves room for a nice introduction/conclusion.
- Cut out as much dead air as possible: But avoid making your cuts too abrupt. You want it to sound and look natural. The YouTube generation has become far too obsessed with rigid jump-cuts, and it doesn’t look good.
- Towards the end, share a summary of everything you covered: This serves as a pleasant refresher for everyone who just watched your video.
- End the screencast with a call to action, and more resources: Ask people to visit your website, view the next video, follow your YouTube channel, or buy a product. That’s the only way they’ll act. And, layout any helpful resources that complement the screencast.
Learning How to Create a Screencast is as Simple as That!
And there you have it! You’re now well versed on how to create a screencast, whether that’s for internal employee training, selling courses, or filming tutorials for your ecommerce brand.
Please let us know in the comments if you have any questions about how to create a screencast. What are your favorite tools for building an entire screen cast?


Comments 0 Responses