


Can you sell directly from Printful? The quick answer is yes.
In June 2024, Printful launched it’s “Quick Stores” service – a free solution that allows beginners to create a simple store and start selling products instantly, without a traditional ecommerce platform.
Here, I’ll tell you exactly how this feature works, and explore some of the other options you have for selling Print on Demand products with Printful.
Can You Sell Directly from Printful?
Yes, you can sell directly through Printful, as of June 2024. However, there are some limitations. First, it’s worth noting that Printful’s solution for direct selling isn’t the same as what you’d get from some other POD companies.
There’s no “marketplace”, like you’d get with Spring or Redbubble.
Instead, Printful offers access to a simple storefront where you can list the items you’ve designed with Printful, and start accepting payments.
The experience is very similar to using Printify’s Pop-up Store solution. I should say, while the “Quick Stores” feature is great for beginners, and free to use, it’s not going to give you the same functionality as a full ecommerce platform.
You can’t really customize much of your store, beyond the name, logo, and your product names and descriptions.
There are no themes to choose from, and you can’t sell any other products that aren’t created specifically with Printful.
Additionally, unlike Printify’s Pop-Up Store service, Quick Stores from Printful are currently only available for retailers and sellers in the US.
This means not only can you not launch a store if you’re outside of the United States, but you can’t sell to global audiences either.
How to Sell with Printful’s Quick Stores Feature
Provided you (and your customers) are located in the US, getting started with Printful’s Quick Stores feature is very simple.
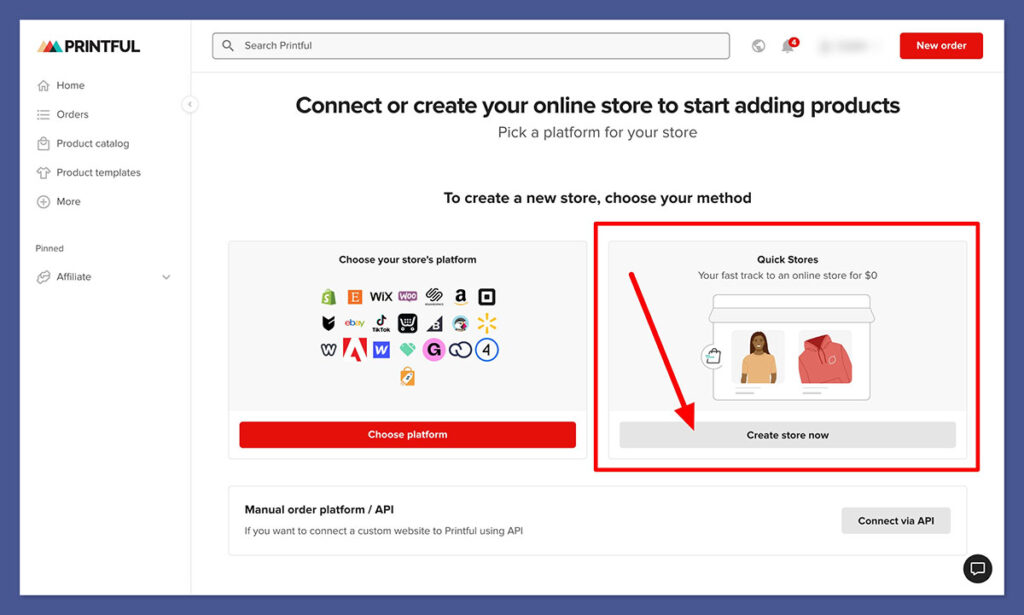
All you need to do is sign up for a free account with Printful, and visit either the “Quick Stores” page, or your Printful dashboard. If Quick Stores are available in your region, you’ll find the option to create one in the “Stores” tab of your account.
Printful will walk you through the process of setting up your store, asking you to choose a business name, add your logo, and configure payment and shipping details.
Once you have your store, you can design your products in Printful’s Design Maker, or add the ones you’ve already created.
You can pick which product images you want to showcase, set your prices, and add descriptions to engage your customers.
Then, you simply share the unique link for your store with your customers, and they can make purchases from the link directly.
With Quick Stores, Printful takes care of the entire fulfillment processes, applying standard shipping rates to each purchase automatically.
Every month, Printful will automatically transfer the profits from your sales to your bank account (provided your payout amount exceeds $25).
Other Options for Selling with Printful
The Quick Stores feature from Printful is excellent for beginners who want to start selling online without managing a full ecommerce platform, or using a marketplace like Amazon. However, it’s still pretty limited.
First, for now, you can only sell in the US. Printful might expand this feature to other regions in the future, of course.
Secondly, you’re not going to get a lot of the features you would get with a full ecommerce platform, such as access to marketing tools, themes for store design, or the option to sell various different products and services.
The good news is there are other ways to sell on Printful. In fact, Printful integrates with dozens of platforms, including marketplaces like Etsy, Ebay and Amazon, and ecommerce platforms like Wix, Shopify, and Squarespace.
You can even sell through TikTok shop! Getting started is simple (and free). Start by visiting the Printful website and creating an account.
You can do this by clicking the Sign Up or Get Started buttons on the website. Log in with your email, Facebook, Google, or Apple ID, and a password.
Next, follow these steps:
Step 1: Connect to your Chosen Sales Channel
Once you have an account, you can connect Printful to dozens of sales channels. Simply click on the “Stores” tab in the left-hand menu, then select “Choose Platform.”

Printful will guide you through the process of connecting your store step-by-step. Notably, some connections take a little longer to set up than others. For instance, Etsy, Shopify, and Square Online stores can be set up in a few minutes. However, other platforms take a little more work.
Step 2: Choose your Products
Once you’ve connected your storefront, the next step is choosing your products. There are more than 300 options to choose from, ranging from home accessories to t-shirts and sweatshirts. Click on Product Catalog in your dashboard to start browsing through options, and use the filter buttons to narrow down your choices.

After you find a product, you want to customize, click on Create Product Template, and this will take you to Printful’s design maker. When choosing your products, it’s worth keeping a few things in mind, such as the price of the product (how much it’s going to cost you before you add a profit margin), and the printing methods available.
Printful offers Direct-to-Garment, All-Over print, embroidery, and sublimation, sot here are plenty of great ways to customize your catalog. It’s also worth noting that some products are available for express delivery, so you might want to check if this is an option before you decide on your items.
Step 3: Add Your Designs
In the Design Maker, after you’ve selected your products, you can customize each item with unique images and content. You’ll be able to upload images directly, or choose from a library of pre-existing assets. You can also use text presets, clipart, quotes, and premium images to customize products.
If you’re using your own images, it’s worth making sure they’re in PNG or JPEG format before you upload them to the platform. This will boost your chances of a high-quality print.
Once you’ve chosen your images and text, you can move them into the ideal position on your products, adjust your design and text to fit within the print area, and more. Then, click “Save to Templates”, to prepare your product for selling.
Step 4: Adding Products to your Store
When you’re done designing, click on the Product Templates tab on the left-hand menu, and hover over the item you want to sell. When the three dot “menu” button appears, select Add to Store.
This will connect you immediately to the sales channel you’ve connected to Printful.

Add the mockups you’ve created with Printful to a new product page, and include a description. You’ll also need to choose a price for your product.
Remember, when setting your prices, you’ll need to account for the base price of the product (Printful’s fees), the shipping fees, and the profit margin you want to end up with. I’d recommend a profit margin of about 30-40%.
Click Submit to store to finish.
Step 5: Manage Shipping and Fulfillment
After your products are added to your store, you’ll need to choose your shipping options. Printful offers two options.
Flat shipping is the standard option, where you’ll pay set fees based on the products you’re selling and their destination – this is the most cost-effective shipping method.
Alternatively, you can choose “Live shipping”, which calculates the cost of shipping based on the customer’s address and the location of the fulfillment center.
There are times when this option can be cheaper, if a customer is located close to a Printful fulfillment center. However, live shipping is only available for some platforms – like Shopify.
When you’ve chosen your shipping options, you have two ways to submit orders to Printful for fulfillment. One option is to manually send order details to Printful through your Printful dashboard.
You can do this by clicking on “Product Templates”, hovering over the item, and selecting “Make an Order” when the menu button appears.
Alternatively – and this is the better option in my opinion- you can automate order fulfillment. In the Printful dashboard, go to Settings and select Order. Then, in your Order Import Settings choose to “automatically” fulfil each order, and click Save.
Step 6: Paying Printful
The good news is with Printful, you only need to pay for orders after your customers actually make them, this reduces your upfront costs as a seller. Whenever you submit an order, manually or automatically, you’ll be charged (rather than your customer). The amount you’re charged includes the base price of the product, taxes, shipping, and other fees (like fees for branding).
Notably, you do keep all of the money your customer pays you through your online store. Printful accepts various payment methods, including PayPal, debit, and credit cards.
To set up your payment options, go to the Printful Dashboard, then click on Billing followed by Billing methods.

Click Add new Billing method, and submit your payment details. You can set different billing methods for each sales channel you use, if you prefer.
Alternatively, you can set up a Printful Wallet in the Billing section, which you can add funds to whenever you choose. This is a good way to save yourself some time adding payment details every time a customer makes an order with your store.
Read more:
Can You Make Money with Printful?
Just because Printful doesn’t give you a full ecommerce platform, and currently limits its Quick Stores feature to US sellers, doesn’t mean you can’t make a profit with the solution. If you are based in the US, the new Quick Stores feature is a great way to dive into online selling with minimal effort, and absolutely no upfront costs.
Based on my experience, I’d definitely recommend branching out into a few different sales channels, even if you can use the Quick Stores feature, to boost your revenue.
If you’re based outside of the US, or you want more freedom to design your own storefront and sell to customers all over the world, Printful gives you a ton of integration options to choose from. Plus, it’s one of the most reliable POD companies I’ve reviewed, offering a wide range of high-quality products, and fantastic tools for creators.



Comments 0 Responses