
I’ve been working with creators and ecommerce brands (helping them build their online presence) for over a decade now. In that time, I’ve seen plenty of business models rise and fall – but the print on demand space is one option that hasn’t lost its appeal.
It’s easy to see why people love print-on-demand. No annoying inventory to worry about, no fulfillment issues, and pretty much no up-front risks.
All you do is create products, list them on your website, and you’re ready to make a profit. You even get to be a lot more creative than you would be with a standard dropshipping business.
Still, the success of your print-on-demand venture is going to depend on a few key things – like your choice of selling platform, and POD partner. I think Etsy and Gelato are an amazing combo.
Sure, Etsy doesn’t give you all of the branding options and scalability as a platform like Shopify – but it does give you a built-in audience of millions of buyers, and an affordable way to dive in.
Combine that with Gelato – a POD partner renowned for its fast global shipping, eco-conscious production network, and powerful personalization tools – and you’ve got a recipe for success.
So, how do you use Gelato with Etsy? Here’s your step-by-step guide.
60 Second Summary:
- Etsy + Gelato = Ideal for Creators: Etsy’s marketplace offers a built-in audience of millions looking for unique, creative goods while Gelato provides the largest print on demand network with 140+ print providers across 32 countries, fast global shipping, and easy integration – it’s a great match.
- The Simple Setup: Signing up for Gelato and Etsy, and connecting the two platforms only takes a few minutes – no coding necessary.
- Product range: Gelato gives creators tons of options to choose from (make sure you check out theirWall Art, Posters, Cards and Calendars). Plus, you can allow users to personalize their own products with the Personalization Studio.
- Simple Shipping: Gelato’s local production means speedy delivery and lower carbon emissions. Plus automatic order syncing lets you skip manual fulfillment—focus on designing and marketing instead
Tips for Success
- Optimize your listings with keyword research and compelling mockups
- Use Etsy Ads to gain visibility in a crowded marketplace
- Emphasize your brand story, sustainability, and personal touches
- Monitor analytics from both Etsy and Gelato to refine your approach
Why Etsy and Gelato are a Great Combo
Before we jump into the nuts and bolts of integrating Gelato and Etsy, it’s worth taking a deeper look at why these two platforms fit together so well.
There’s no shortage of ecommerce platforms (or marketplace) and POD partner combinations to consider – but Etsy and Gelato have a lot to offer.
First, while Etsy isn’t the most scalable platform out there for sellers – it is a great option for beginners, particularly in the creative market.
I often recommend Etsy to influencers and beginners who want to sell a wide range of unique, hand-crafted, or customizable products, without a bunch of up-front costs.
You get a built-in audience, a supportive community, and a straightforward experience.
While you can use Etsy with a few different POD solutions – Gelato is one of my favorites. There are a couple of reasons for that. First, Gelato always delivers consistently great product quality – particularly in specific niches (like the paper products space).
Secondly, it offers ultra-fast global fulfillment. With production partners in 32 countries, orders automatically route to local manufacturers. This delivers products to customers faster while reducing carbon emissions.
Plus, Gelato has some great extras to rave about too – like it’s Personalization Studio (more on that later), sales tools, and a bunch of extra branding options.
If you’re looking for low costs, and fast results, Etsy and Gelato are hard to beat.
How to Use Gelato with Etsy: Step by Step
Alright, let’s dive straight in. Connecting Gelato and Etsy is super straightforward. You don’t need to deal with any complicated APIs – because Gelato has a pre-built Etsy connector.
All you need are active accounts on both platforms, plus a few minutes to follow some basic instructions. Here’s your step-by-step guide to getting started.
Step 1: Setting Up Accounts with Gelato and Etsy
The first thing you need is an account for both Gelato, and Etsy. A couple of things to keep in mind when you’re getting started with Etsy.
You can technically create an account for free – but there are fees. There’s a listing fee ($0.20 for each item listed), transaction fees (6.5% for all sales), and a payment processing fee.
Plus, if you want extras, like a Pattern store, or access to extra advertising tools, you might need to pay subscription prices. Things like Etsy Plus start at $10 per month.
Here’s how you can set up your Etsy account:
1. Go to Etsy.com and click “Sell on Etsy.”
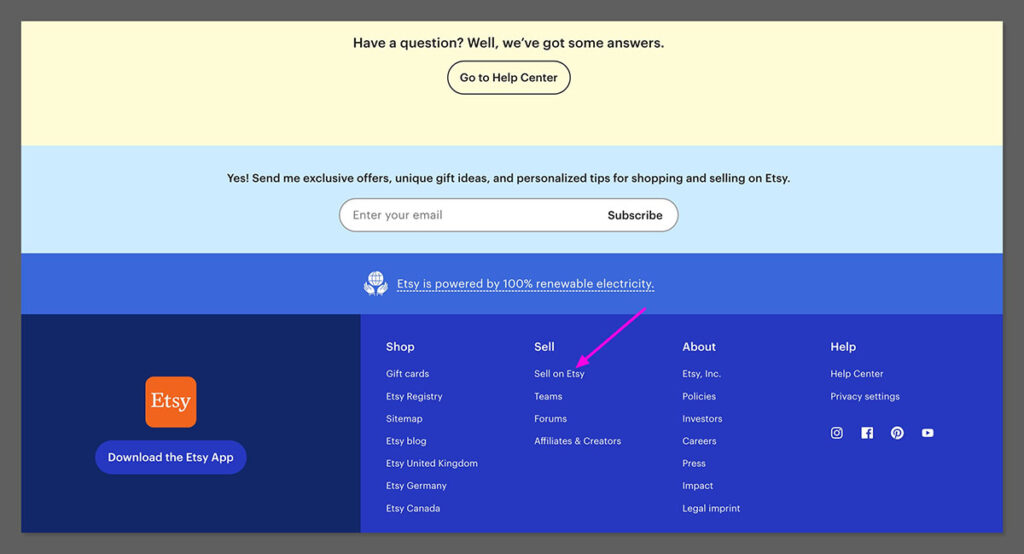
2. Create your seller account by providing an email address, username, and password (or use Google, Facebook, or Apple to sign in).
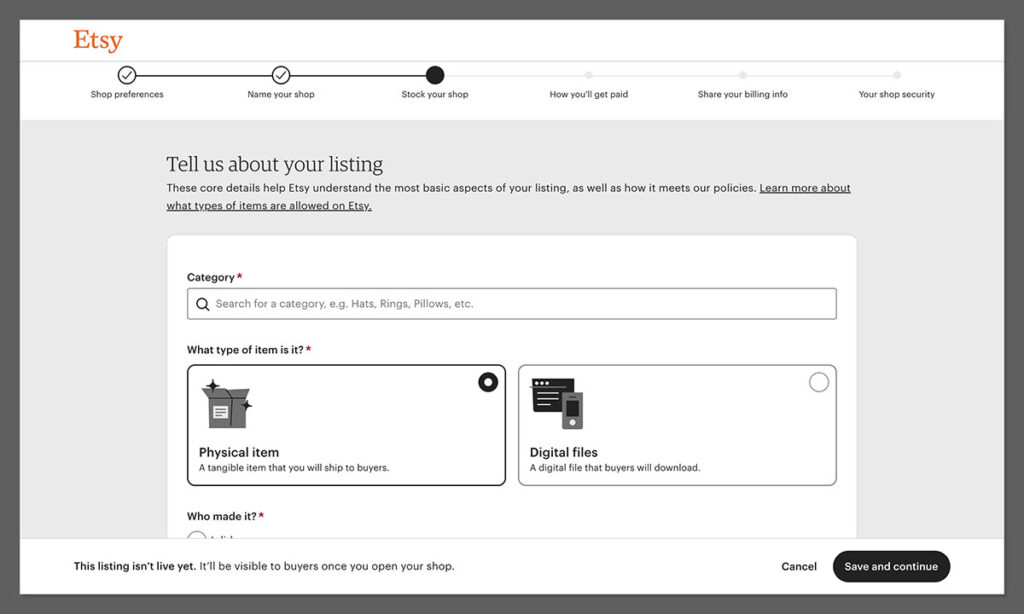
3. Follow the on-screen prompts to name your store, choose your default language/currency, and set up your shop preferences.
4. List a product – Etsy requires you to create at least one listing to open your shop. If you’re not ready to publish a “real” product, create a placeholder and delete it later.
Provide billing and payment details to cover Etsy fees and receive payouts from customers.
Once you have your Etsy account ready, head over to Gelato and create an account there. Just click on “Sign up for free” and enter your details.
I’d recommend starting with a free plan if you’re a beginner – but you can upgrade to premium plans later, for perks like higher discounts and premium mockups.
Step 2: Integrating Gelato and Etsy
Now, it’s time to bridge the gaps between your accounts. Don’t worry – it’s pretty simple. Log into Gelato, then navigate to the “Stores” tab, and click on “Etsy”.
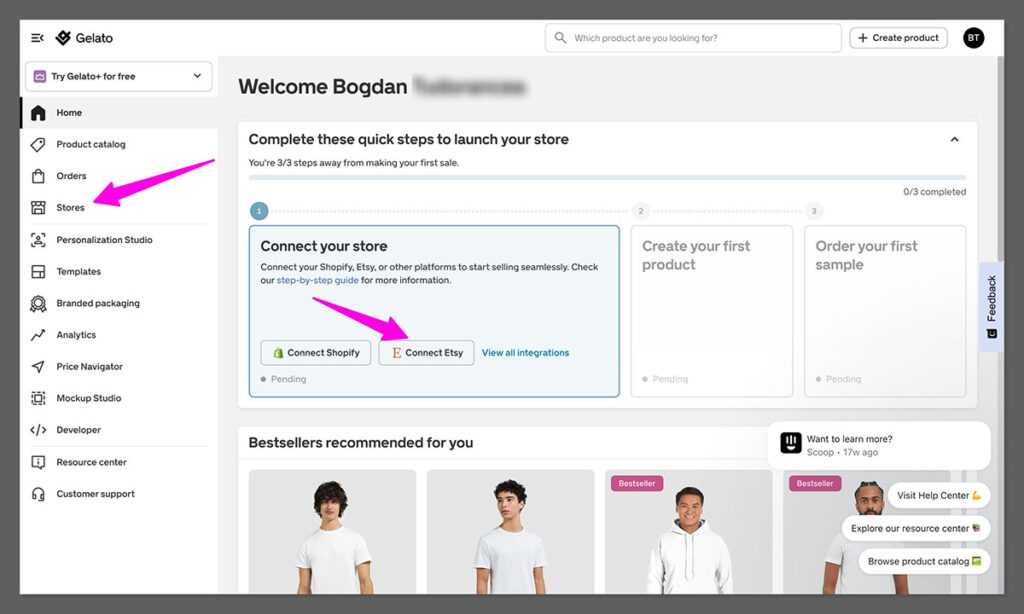
Next:
- Log into your Etsy account
- Click “Authorize” to let Gelato access your Etsy store info
- Wait to be directed back to Gelato.
That’s it! Gelato will now be able to automatically “listen” to events in Etsy (like new orders), and trigger the fulfillment process for you.
From here on out, whenever a shopper buys one of your items on Etsy, Gelato can produce and deliver that product on your behalf.
Keep in mind you can connect multiple Etsy stores to Gelato, but if you do this – make sure you know which one you’re logged into when you’re creating products.
Step 3: Choosing Products and Adding Them to Etsy
Now it’s time for the fun part – choosing what you want to sell. Once your Etsy store is connected with Gelato, you’ll be able to migrate products from another print on demand provider into your account – you can learn how to do that here.

But you’re probably going to want to create some fresh new products to sell.
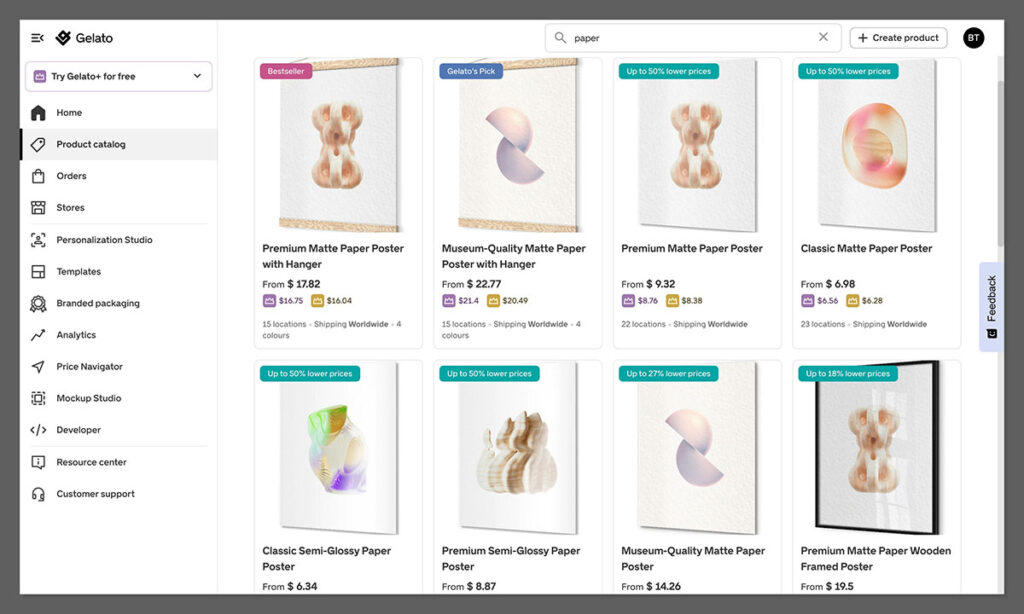
The good news is that while Gelato might not have as many products as some POD providers – there’s still a lot of choice, from clothing and drinkware, to wall décor.
I really love Gelato’s paper products – the company offers one of the widest selections worldwide, and gives you plenty of unique options, like the opportunity to print on wood or foam – so if you want to stand out, check these products out first.
Something else worth pointing out—Gelato has recently rolled out its new CreateAI suite, which is now available to all users on the free plan. It includes helpful tools like magic mockups, fast-track product launches, and one-click store migrations. All of which can make setting up and iterating on your store a lot quicker.
Once you’re ready to create a product, log into your Gelato account, and find your Etsy store in the “Stores” tab. Then click on the Product Catalog and choose the item you want to sell.
Next:
1. Click Create Order
2. In Gelato’s design tool, add the unique designs and elements you want to add to your product. You can upload images, or experiment with Gelato’s free assets, like images from Shutterstock.
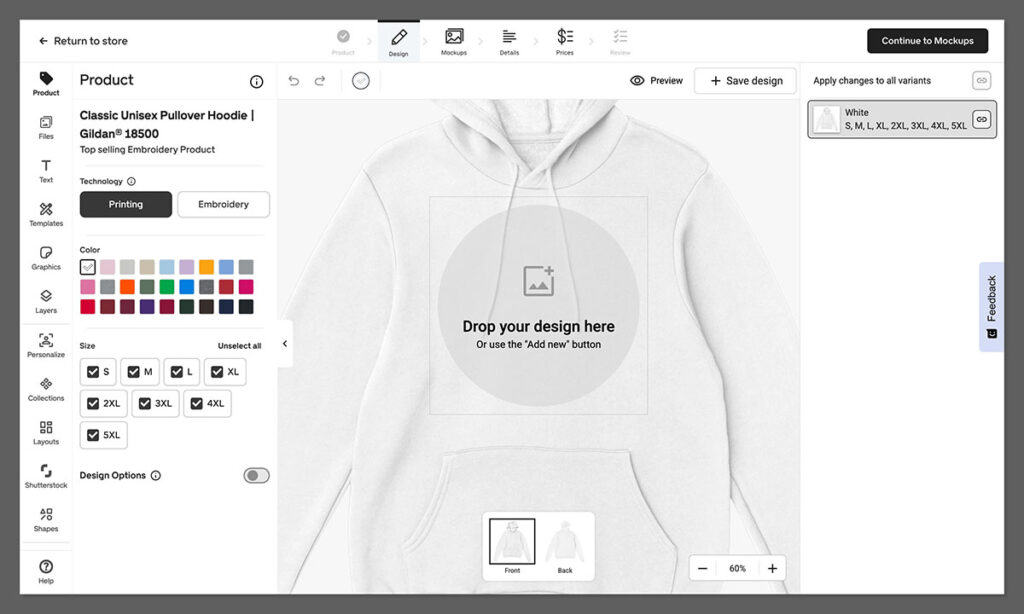
3. Adjust the design placement, and check for any “low resolution” warnings. You can also check the price of your product in the top right hand corner.
4. Optional: Add a “personalization layer” – if you’re going to be using the Personalization Studio with Etsy (so customers can add their own images).
Click Save Design.
Gelato will automatically save your product as a template, and you can head to the mockup studio to create mockups for your store listing.
Step 4: Managing Your Listing (and Shipping Rules)
Once you design, you’ll see a base cost for your item, which I recommend using to choose the price for your product. A general rule of thumb is to aim for at least a 30% margin.
But if you’re in a niche where design creativity or personalization can warrant a premium, feel free to go higher.
After you set your price, head to your Etsy account, and click on your Shop Dashboard, then click Listings followed by Draft to find the product you created with Gelato.
When creating your listing, remember to:
- Pick a memorable title, packed with keywords and useful descriptors.
- Write an engaging and compelling description (also packed with keywords), to help your listing rank, and give customers more information.
- Add tags, like “custom mug” or “gift” to make your listing more visible.
- Upload your mockups (and unique photos).
Remember to set up your shipping settings too. Unlike with Shopify, Gelato doesn’t offer pre-built shipping profiles for Etsy. However, you can still see how much shipping is likely to cost on your account – so that should help.
If you want to boost your chances of sales, consider offering free shipping, or taking advantage of Gelato’s various shipping options.
For instance, Gelato does offer “Standard” and “Express” shipping for some regions and products – which could help your items to stand out.
Step 5: Using the Personalization Studio
For many Etsy sellers, personalization is the secret to winning a loyal audience.
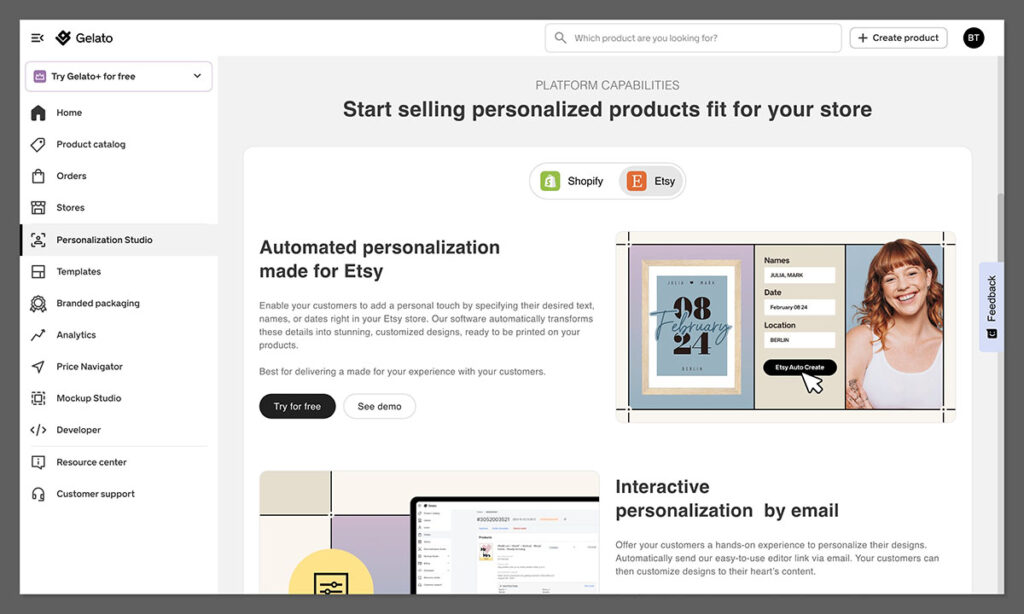
Whether you’re adding a pet’s name to a mug or letting someone upload a photo for a custom poster, personalized items can dramatically increase sales and allow you to charge premium prices.
Gelato takes care of the complexity of personalization with its Personalization Studio. With this tool, you can set “layers” in your design that a buyer can edit—such as text fields (for a name or phrase) or even image placeholders (for a photo).
When a customer on Etsy selects your listing, they can fill in the text or upload their picture, and Gelato automatically generates the final print file.
How to enable it:
- Go to your Gelato dashboard and select “Personalization.”
- Turn on the feature for the relevant products. Note that there may be a small extra fee for each personalized order processed (about $1 per sale).
- Specify whether you want auto-approve or manual review for personalized designs.
Ultimately, this is a great way to boost your chances of higher sales as Etsy becomes a lot more competitive – so I’d recommend giving it a go.
Step 6: Enabling Auto-Fulfillment
Gelato makes life super-easy for sellers with automated fulfillment. As soon as you connect your Etsy and Gelato account, the Gelato app will automatically collect orders, and ensure that they’re produced and shipped directly to your customers.
For each order placed on Etsy, Gelato receives an API call – and you should be able to see that order in your “Orders” dashboard on Gelato.
You don’t really need to do anything to optimize this process. Gelato will automatically route the order to the closest production partner to your customer. Plus, it will update your order status with real-time order tracking information automatically.
Step 7: Marketing Your Products and Boosting Sales
Now it’s time to give yourself the best possible chance of higher profits. Ultimately, boosting sales does take a bit of experimentation, but here are my top tips:
- Optimize your Listings: Research relevant keywords and use them throughout your title, tags, and product descriptions. Talk about the product’s benefits in the descriptions (like the fact that it’s eco-friendly), and always include eye-catching images.
- Build Your Brand Presence: Promote your Etsy listings on Instagram, Pinterest, TikTok, or any platform where your target demographic is active. Share design updates, behind-the-scenes snippets, or customer testimonials.
- Use Etsy Ads: Etsy allows pay-per-click (PPC) ads to boost your listings in search results. Even a small budget of $1-$5/day can significantly improve your discoverability when competing in crowded niches.
- Experiment: Because print on demand involves no inventory risk, you can experiment with limited-edition seasonal items. Offer a Valentine’s Day card collection, holiday-themed sweatshirts, or a wedding gift line.
- Use Reviews: Good reviews help listings rank higher in Etsy’s search engine and build trust with potential buyers. After each sale, send a friendly note (via Etsy messages) thanking the buyer and gently requesting a review.
As always – make sure to track your results. Etsy’s shop stats can give you insights into where your traffic is coming from, which keywords lead to the most clicks, and which listings perform best – so take advantage.
Gelato also has analytics to track sales volume, shipping costs, and other important data points.
Use the insights you gather to refine your product offerings, focus on popular designs, or experiment with new personalization features.
Using Gelato with Etsy: The Simple Guide
Etsy might not be the most scalable platform for big brands, but for smaller creators, ready to get started with Print on Demand – it’s a great pick.
Combine Etsy’s ease-of-use and existing audience with Gelato’s amazing products and automation tools, and you’ve got the perfect match.
Remember, you don’t have to create a huge product collection straight away. Start small and scale up, experimenting with new trends as they emerge.
Take advantage of the unique features Gelato has to offer – like sustainable shipping and the Personalization Studio, to boost your sales.
Once you start really making a massive income – consider expanding onto new platforms (remember, Etsy integrates with Shopify, and Gelato connects to both platforms).
Now it’s over to you! Good luck on your Etsy POD journey!


Comments 0 Responses