
Wondering how to upload products from Gelato to Etsy? No problem – I’ve got you covered. If you ask me, Gelato and Etsy are the perfect partners for creators looking for a simple low-cost, way to sell creative products online.
Etsy might be a little limited in terms of “scale”, (and a bit competitive), but it’s also pretty easy to use, doesn’t charge a lot of upfront costs, and comes with a built-in audience of millions of customers already looking for unique, creative products.
Gelato, on the other hand, gives you the tools you need to really impress your audience on Etsy – high-quality products, personalization options, and fast delivery speeds.
Ready to dive in? Here’s your step-by-step guide to the (easy) uploading process.
60 Second Summary
- Etsy has a massive customer base, with over 90 million active buyers, making it a prime marketplace for selling unique, print-on-demand items.
- Gelato handles printing and shipping, integrating seamlessly with Etsy, so you can focus on designing and marketing, rather than logistics.
- Getting started is easy: create free accounts on both platforms, integrate them in just 1-click within Gelato’s dashboard, and either move existing Etsy listings or create new ones in Gelato’s user-friendly interface.
- Personalization is a proven way to increase your margins, and Gelato’s Personalization Studio automates the process, letting buyers add text or images with zero extra work on your end.
- Optimize your Etsy listings by using strategic keywords, high-quality images, and compelling product descriptions. Then, consider running Etsy Ads to boost visibility.
- Aim for consistent growth: add new products, refine your pricing, and gather reviews. The more active and responsive you are, the higher your Etsy listings can rank and the more sales you’ll generate.
How to Upload Products from Gelato to Etsy
The good news for beginners is that you don’t need to be a tech or business expert to use Gelato and Etsy together. Gelato has a pre-built integration for Etsy, and once you’ve set up your accounts, it automates the hard work for you.
Don’t let the various steps below scare you off – trust me, you can finish most of this stuff in an hour or two, and then you’re good to go.
Step 1: Setting Up a Gelato Account and an Etsy Account
If you’re wondering how to upload products from Gelato to Etsy – you might already have an account for both – but just in case you don’t, here’s how you can dive in.
Creating your Etsy Account
You can create a seller account on Etsy for free – but remember you will need to pay fees. The listing fees are $0.20 per item (and they automatically renew every 4 months).
You also have to pay a 6.5% transaction fee (6.5%) and payment processing fees. You can also pay extra for things like Etsy Pattern and Etsy Plus – but I won’t dive into that right now.
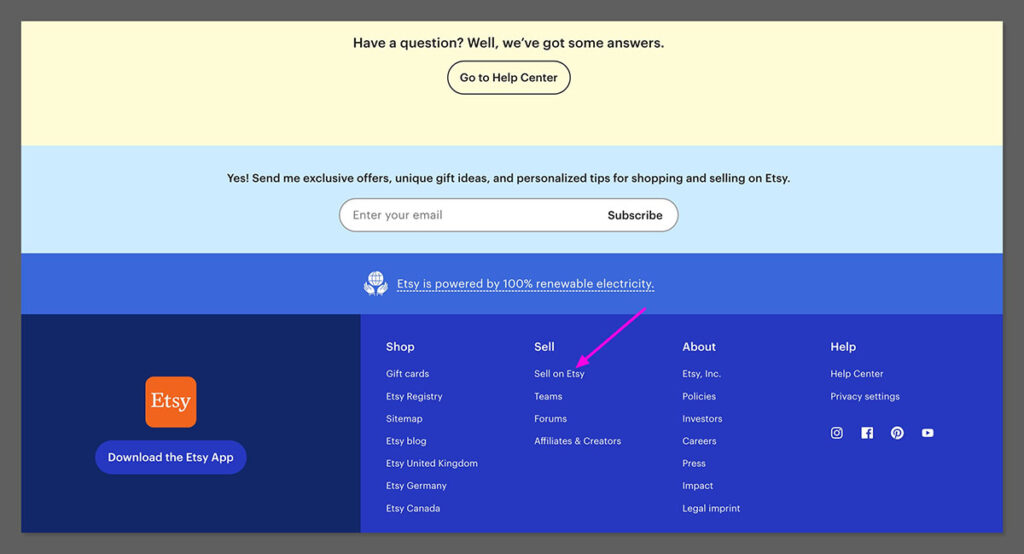
Create your free account by visiting Etsy.com and clicking “Sell on Etsy”. Then:
- Sign up with your email, Google, Facebook, or Apple ID.
- Follow the prompts to open your Etsy shop:
- Choose your language, currency, and country.
- Pick a catchy shop name (4–20 characters).
- Create a “dummy” listing to satisfy Etsy’s initial setup (you can delete it later).
- Add payment and billing info for fees and future payouts.
- Click Open Your Shop.
Creating Your Gelato Account
Again, you can create an account with Gelato for free – and I’d recommend doing this as a beginner. The free plan still gives you access to a wide range of products and features.
As your business grows, you can always consider upgrading to a paid tier, like Gelato+, Gold or Platinum.
They give you extra perks like deeper product discounts or advanced branding options. If you’re selling in high volumes, these discounts can make a difference. To create your Gelato account:
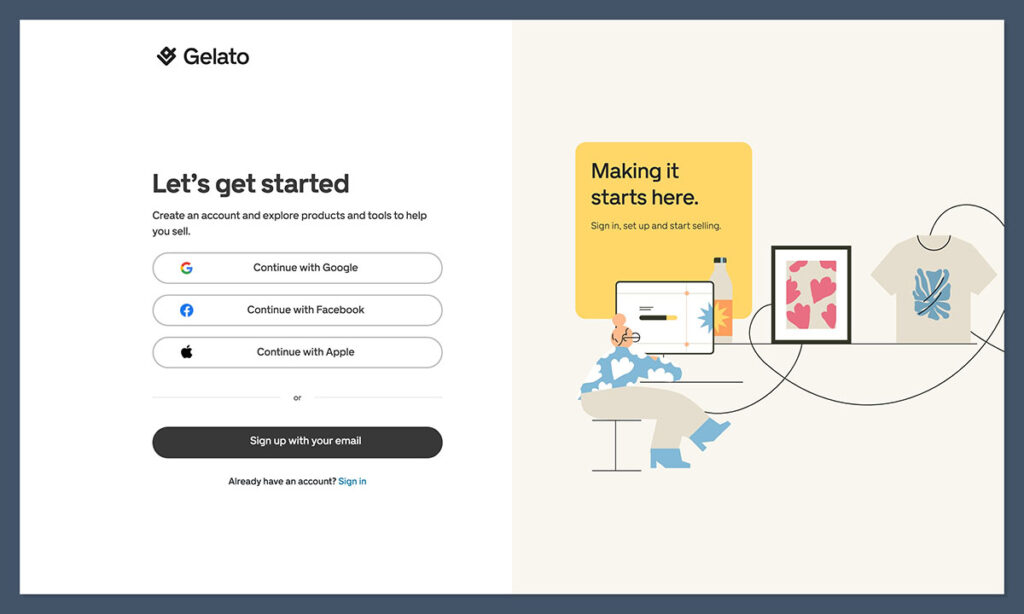
- Head to Gelato.com and click Start Selling.
- Sign up using your email, Google, or Facebook.
- Fill in basic account details, like your store name and password.
Step 2: Integrating Gelato and Etsy
Ok, now you have your accounts, you need them to “speak” to each other. Fortunately, Gelato has streamlined the integration process so you don’t need any coding knowledge.
Once your Etsy and Gelato accounts are ready, do the following:
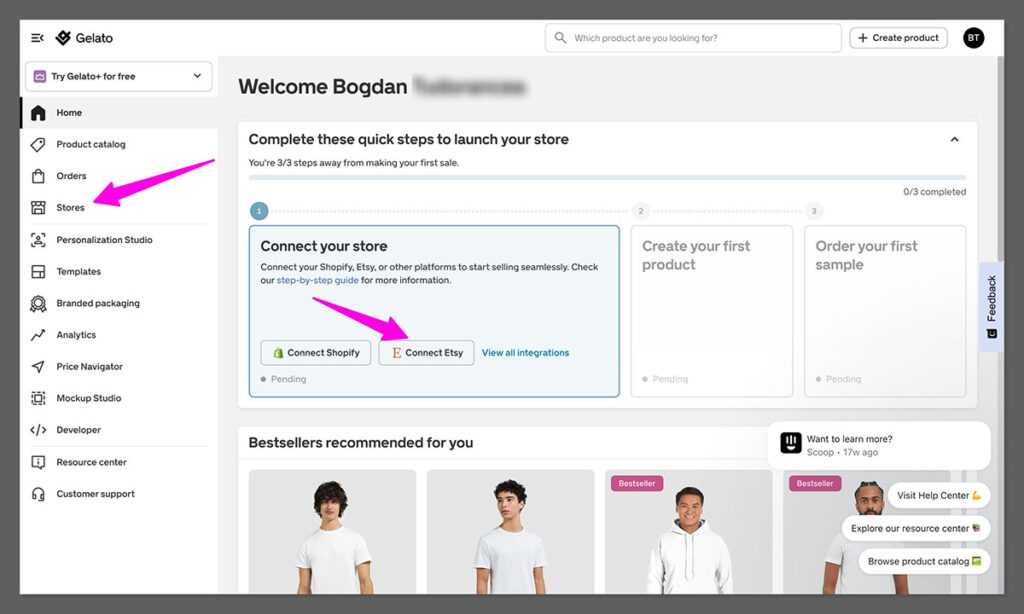
- Log in to Gelato.
- Navigate to Stores in your Gelato dashboard.
- Click Connect next to the Etsy icon.
- You’ll be prompted to log in to Etsy (if you aren’t already) and authorize Gelato to access your shop.
- After authorizing, you’ll land back in Gelato with a message confirming that you’ve successfully linked your accounts.
That’s it – you’re all done. Now, when an order comes through Etsy, Gelato automatically retrieves all the necessary details to handle printing and shipping.
Step 3: Move Existing Etsy Listings to Gelato (Optional)
If you don’t have any existing Etsy listings, or you don’t want to move them to Gelato, skip this step.
However, if you’ve been selling on Etsy for a while, you might already have existing listings – perhaps T-shirts fulfilled by another POD provider or items you used to make in-house.
You can “move” those listings to Gelato so future orders will be automatically fulfilled by Gelato.
You’ve got three main ways to do this:
- Import Orders: This is the easiest and my recommended route. Whenever an order for a particular Etsy listing comes in, Gelato will create a draft in your Gelato dashboard (marked “Not Connected”). Simply open it and connect that Etsy listing to a Gelato product. From that moment on, Gelato handles future orders for that listing.
- Connect Individual Listings: If you only have a few items, go to your Gelato dashboard under “Stores.” You’ll see a list of your existing Etsy products as “Not Connected.” Just click each one to assign it to a Gelato product.
- Bulk Import: For those with hundreds (or thousands) of Etsy listings, Gelato supports a bulk import feature. You’ll need a CSV file matching Gelato’s format, which you upload, map variants to Gelato’s products, and confirm. This method saves you hours of manual linking. You can also use Velocity Switch, the quickest way to transfer your print-on-demand listings from Shopify, Etsy, or WooCommerce directly into Gelato.
Pro Tip: If you’re moving listings that already have positive reviews and SEO traction, connecting them to Gelato’s POD service is a fantastic way to maintain that momentum but offload production responsibilities.
Step 4: Choosing and Designing Products
If you’re starting fresh or simply want to create brand-new listings, here’s how to do it with Gelato. Start by deciding on your product range. Gelato offers T-shirts, hoodies, posters, mugs, tote bags, and more. From personal experience, I find Gelato especially great for art prints and framed products, given their high-quality paper and color fidelity.
If you’re not sure where to get started – research what sells. On Etsy, personalized items and eye-catching artwork often do really well. Make sure to brainstorm trending niches (like pet illustrations, wedding gifts, or motivational quotes).

Gelato has also introduced a toolset called the CreateAI suite. It includes small, time-saving features like Magic Mockups, Instant Collections, simplified product launch flows, and tools for moving your store setup from other platforms.
It’s especially useful when you’re creating multiple products quickly or building out your first catalog from scratch. You’ll find it in your dashboard — and it works on the free plan, too.
Once you’re ready to get creative, go to the Product Catalog in Gelato and select the item you want to design. You should be taken to the Design tool where you can:
- Upload your own artwork or photos,
- Use Gelato’s built-in assets (shapes, clipart, Shutterstock images).
- Optional: Add Personalization layers (if you want customers to be able to add their own text and photos through the Personalization Studio).
Tweak your design until it’s perfect, then click Save Design and Gelato will automatically calculate the base price for you. Click Save Template and you can head to the mockup studio tap to create your Etsy page images. Once you’re content, click Continue to Pricing to choose your product prices.
If you’re not sure what kind of price to pick, Gelato has a great profit margin calculator that can help you (aim for around a 30% profit margin or more after Etsy fees).
Step 5: Syncing Your Products to Etsy
After you finish designing in Gelato, and you’ve chosen your prices, log into your Etsy account. If your integration was successful, you should be able to find your Gelato templates saved in the “Drafts” part of your Etsy Shop Dashboard under Listings.
Click the Draft button, and start fine-tuning your listing:
- Title: Insert relevant keywords. If you’re selling a “Personalized Pet Mug,” make sure those words appear up front in your title.
- Description: Start with a punchy first sentence that includes your main keywords. Provide details like materials, sizing, shipping info, and any unique selling points (like “hand-drawn pattern” or “printed locally to reduce carbon emissions”).
- Tags: Use all 13 tags that Etsy provides, filling them with relevant keywords. If you’re stuck, see what top sellers in your category are using.
- Photos: Upload the mockups you generated in Gelato, plus any lifestyle images if you have them.
Once you’re done, hit Publish (note that Etsy will charge $0.20 for each published listing). Boom – your product is now visible to potential Etsy buyers.
Step 5: Enabling Auto-Fulfillment and Managing Orders
Here’s where the real magic happens: hands-free order management. By default, Gelato sets your store to automatically process orders.
That means whenever someone buys your item on Etsy, Gelato receives the order data (product details, shipping address, etc.). Gelato then charges you the base cost + shipping, produces the item at the facility closest to your buyer, and sends it out.
In your Gelato account, you’ll see an “Orders” tab. Here, you can check the real-time status of your orders – whether they’re “In Production,” “Shipped,” or “Delivered.”
Etsy also updates customers automatically with shipment tracking.
Keep in mind, since you’re selling made-to-order products, Gelato doesn’t normally accept returns. But you’ll need to create a customer-friendly returns policy in your Etsy shop.
Often, if the item arrives damaged or with a printing error, Gelato will reprint or refund as part of their service—just reach out to support.
Also, when it comes to billing – Gelato bills you directly for each order’s production and shipping cost. Etsy handles the buyer’s payment, then deposits your profits (minus Etsy fees) into your account.
Pro Tip: Check your notifications on both Etsy and Gelato daily. Although most orders flow smoothly, sometimes a design, shipping address, or payment method needs a quick manual fix.
Step 6: Integrating the Personalization Studio (Optional)
Personalization is huge on Etsy. Buyers love having the ability to add a name, date, or photo to gifts – especially for weddings, birthdays, or Christmas. Fortunately, Gelato offers its “Personalization Studio” that you can plug into Etsy – allowing users to customize their products.
Gelato handles all the files and printing processes for you – so there’s nothing for you to manage on your back-end. All you need to do is pay a little extra for each personalized item (about $1 per product). To use the Personalization feature:
- Go to Gelato, under “Personalization,” turn on the feature for the products you want to offer custom text or images on. It’s pretty straightforward.
- When you design a product in Gelato add a text layer (e.g., “Add your name here”). Alternatively, create an image placeholder layer for photos. Gelato automatically merges the customer’s input into the print-ready file.
- Enable approval settings: You can choose to auto-approve personalization so that orders go straight to production or manually review them first to ensure everything looks correct. The latter is safer but more labor-intensive.
If you decide to embrace personalization, highlight it in your listing title, description, and images. Let people know they can create a unique piece – they’ll usually pay more for it.
Step 7: Optimizing Your Etsy Listings
Finally – make sure your listings are visible on Etsy. Before you actually publish anything, here are some top tips to follow to make your products stand out:
- Do key word Research: Use tools like eRank, EverBee, or even Etsy’s own search bar to identify popular keywords. For instance, if “funny cat mug” is trending, incorporate that exact phrase into your title and tags.
- Use Strong Titles & Tags: Place your main keyword near the front of your title for better visibility. Fill all 13 tags with relevant, long-tail keywords that real shoppers use.
- Write Compelling Descriptions: The first sentence is especially important – Etsy’s algorithm sometimes references it for additional context. Also, talk about the benefits: “Printed on high-quality, eco-friendly paper,” or “Ships from local print hubs for faster delivery.”
- Use Quality Imagery: Crisp, appealing mockups can dramatically boost conversion rates. Show your product from multiple angles. If it’s apparel, feature people wearing it in lifestyle shots. If it’s a poster, show it framed in a trendy, well-lit room.
- Competitive Pricing: Keep an eye on competitor prices for similar items. Gelato’s price navigator can guide you on recommended sale prices. Factor in your shipping rates, Etsy fees, and the margin you need to profit.
- Use Ads: Once you’ve got a good foundation, consider testing Etsy Ads. Even a small daily budget can help your items appear in prime, high-traffic spots. Track performance and fine-tune your bids and keywords.
- Request Reviews: After an order is delivered, reach out (with Etsy’s messaging tool) to thank the customer and gently request a review. Listings with a solid review count rank higher and convert better.
Remember to keep an eye on your stats and metrics too – this should help you find ways to optimize your income over time.
Start Selling with Etsy and Gelato
I’ll be honest: building a thriving Etsy-Gelato POD business can feel a bit overwhelming at first. But once you’ve integrated the two platforms and uploaded a couple of products, you’ll realize how effortless everything can be.
My final words of wisdom:
- Pace Yourself: Start with a handful of products. Learn what sells, study your reviews, then expand into other categories.
- Stay Consistent: Etsy rewards frequent activity. Update your store regularly, add fresh listings, and optimize old ones.
- Test and Learn: Don’t be afraid to experiment with new product ranges or designs. Gelato only charges you for orders that actually sell, so there’s minimal risk in trying new ideas.
- Leverage Personalization: This feature can be your secret sauce. Personalized items often command higher prices and encourage repeat purchases.
- Embrace Feedback: Chat with your customers, read your reviews, and make changes to your listings when necessary. Building that personal connection is what Etsy is all about.
Above all, keep going. The POD model, combined with Etsy’s massive audience and Gelato’s global footprint, offers a fantastic opportunity to develop a flexible, creative, and profitable side hustle – or even a full-time business.
Good luck, have fun, and happy selling!


Comments 0 Responses