
Shopify is a robust platform that’s easy to use even for complete beginners and it’s the best choice if you’re serious about making a living from selling your art.
In this article, you’ll find all the necessary steps to launch your art store with Shopify.
In this article:
Step 1: Get Started With Shopify
The first step is to sign up for an account with Shopify. To get started, visit their website and enter your email address. You’ll then need to enter a password and a name for your store. Once you’ve filled out those details, Shopify will begin the setup process for your store.
You’ll need to enter your address and select the type of store you’ll launch. This information is needed so you can collect payments and after you have entered this information, you’ll see a button prompting you to enter your store.
Step 2: Get Familiar With Shopify’s Interface
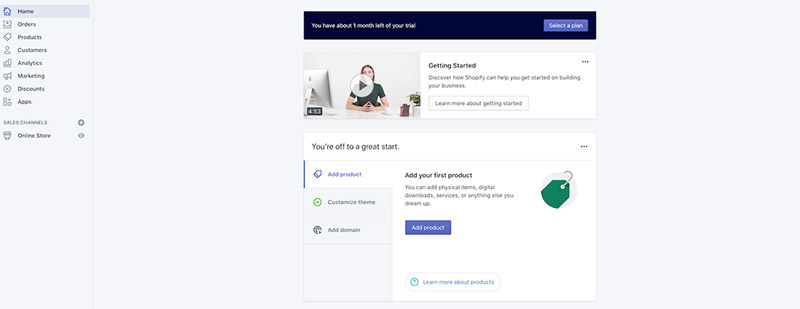
When you enter your store, you’ll notice a couple of helpful prompts from Shopify. They’ve included the Get Started video and the ability to immediately add your first product.
The left-hand side is where you can access all the settings for your store. Using the menu on the left, you can add your products, see store’s analytics, view a list of your customers and recent orders, and more.
You can also preview your store, add sales channels, and control how your store looks.
Lastly, your profile photo in the top right corner makes it easy to access your Shopify account, access the community forums, and Shopify’s support center.
Step 3: Setup Your Store Settings
Now that you’re familiar with Shopify’s interface, let’s take a quick look at the store settings. This is a good place to start to ensure you won’t forget any important settings before you start selling your products.
The settings panel allows you to configure your store details such as your address, contact information, and default units. You can also configure payment methods, add store locations, customize your checkout process, and more.
You’ll also use the Settings panel to manage your sales channels, upload files, and set up your store’s language.
Before officially launching your art store, be sure to configure your payment settings as well as your shipping and taxes settings. You’ll also want to add your terms and conditions and your privacy policy to make sure your art store complies with the legal requirements.
Step 4: Style Your Store
The next step in setting up your store is to style it. By default, your Shopify store will have a theme already installed. If you like the look of it, feel free to keep it but if not, you’ll need to choose a different theme.
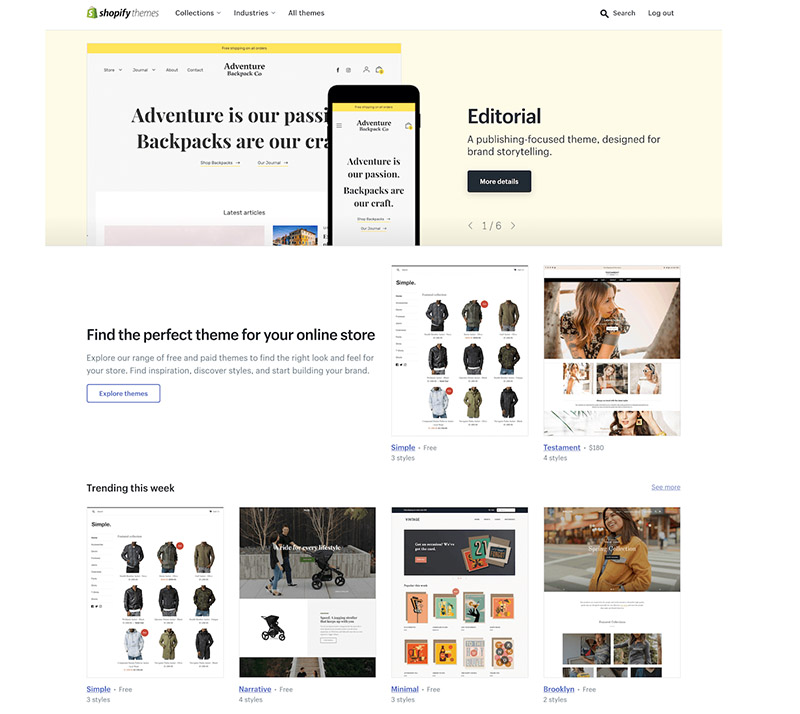
Luckily, there are a number of free and paid themes that you can choose from and that are available on the Shopify theme marketplace. You can browse the themes by clicking on the Online Store icon and pressing the Themes option.
A new page will load where you’ll have the option to customize the theme that’s already active on your site or to explore other themes. Go ahead and explore other themes.
As you’ll notice, Shopify offers 73 themes total, 9 of which are free. Free themes are a good starting point if you’re not ready to invest in a premium theme. If you want a more professional look and more customization options, browse through their paid themes and find the one you like.

You’ll then need to install it by adding it to your theme library and clicking on the Actions menu. Choose Publish and the theme will be live on your site. You can customize how the theme looks by clicking the Customize button.
Once the theme customizer loads, you can add sections to your homepage and change colors, fonts, and more. If you want to style other pages, simply select the corresponding page from the drop-down at the top.
You can also see how your store will look on mobile phones and tablets and adjust your style settings accordingly.
Step 5: Create The Pages For Your Store
When you’re happy with how your store looks, it’s time to create the pages for your store. Your store will already have a homepage and a page where customers can see your art catalog. But there are a few more pages you need to add if you want your store to be successful. These include:
- About page where your customers can learn more about you and your art
- Store policies page where you can share your refund or exchange policy
- Contact page where customers can get in touch with you regarding a particular art piece
Shopify also makes it easy to add a Blog page which is a great way to market your products.
You can add a page to your site by clicking on the Online Store menu and pressing the Add page option. The page editor allows you to add the page title and content.
Below the editor, you’ll find the options to configure the SEO settings for that page which includes adding a meta title and a meta description. You’ll want to keep this short and use your keywords naturally to improve the chances of your store getting found by the search engines.
When you’re done adding the contents of your page, make sure the visibility is set to Visible on the right-hand side and click the Save button.
To add other pages to your site, simply repeat the steps above. It’s a good idea to set up your navigation menu at this point and add the most important pages to the main menu. To do this, click Navigation > Main Menu. Click Add item, choose Pages, and then select the pages you want to show. Save the menu.
Step 6: Add Your First Product
Adding your first product to your art store is easy. If you already have a list of your products stored in a .CSV format, you can import them by going to Products and clicking the Import link.
However, if you’re brand new to selling art online, you’ll need to follow the manual process of adding products to your store. Let’s cover this process below.
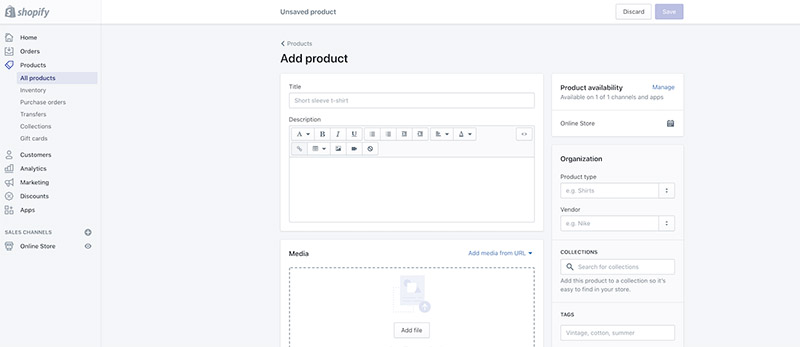
Click on the Add product button and start by entering the name and the description of your product. Below the product editor, you’ll have the option to upload product photos as well as add the price and the inventory details such as SKU number, quantity, and barcode.
The shipping section allows you to enter product dimensions, weight, and other shipping details.
Other product information includes product variants and SEO settings, product categories, collections, and tags.
After you have filled out all the details, press on Save and your first art piece is officially ready for sale.
To add more products, repeat the steps above. Keep in mind that you can use the Products section to manage product collections and purchase orders, view your inventory, gift cards, and more.
Step 7: Add Features With Apps
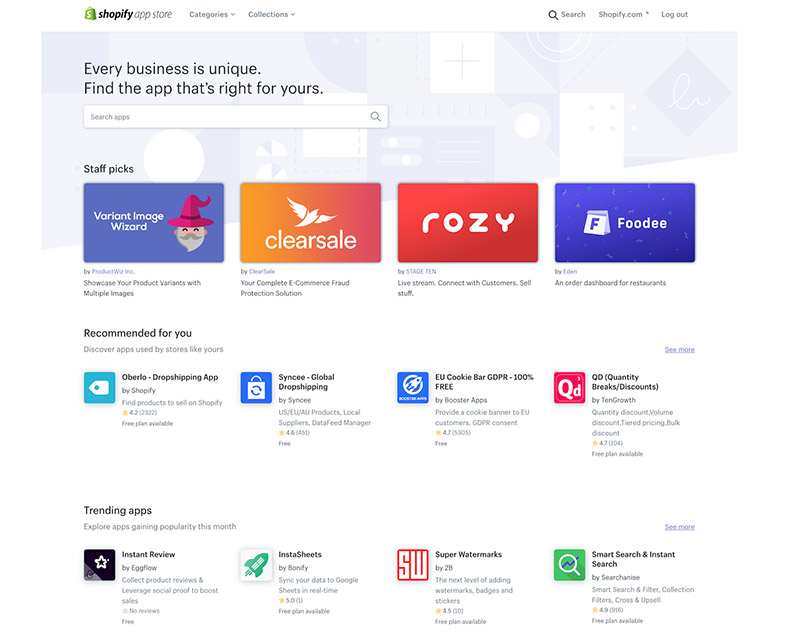
When you’re done adding all of your products, you can add extra features to your store with third-party apps from the Shopify App Store.
The apps you’ll find there are organized into various categories such as Store Design, Marketing, Reporting, Abandoned Cart Recovery, and similar. You can also search for apps using the search bar at the top.
To install an app, all you have to do is click Add app and then complete the installation process by reviewing the app’s permissions and clicking on the Install App button.
Conclusion
Be sure to set aside a few minutes to decide which functionality you want for your store and then install appropriate apps from the Shopify App Store.
However, don’t feel pressured into completing this task immediately. You can always come back later and install the apps you want once you’re more familiar with selling your art and running your online store.


Comments 0 Responses