
It's always nice to get paid faster, and to have a business cashback rewards card for spending, and to pay bills, manage ecommerce expenses, and manage a business account from one place.
Quick verdict:
Shopify Balance is a financial product from Shopify that caters to independent businesses with financial services, a Shopify Balance card, and multiple tools to manage cash flow. It is primarily aimed at merchants using the Shopify platform.
Overall, Shopify Balance seems to do the trick for minimizing the number of debit and credit cards you carry around for your business. It also merges together your tools, since all of that card information drops right into your Shopify account.
In this in-depth article we;ll highlight the overall functioning of Shopify Balance, how to set up an account, pros and cons, and the top features.
Keep reading to answer the question, what is Shopify Balance?
Table of contents:
What is Shopify Balance?
Shopify Balance is a money management and business banking solution from Shopify. It integrates with your online business and offers no monthly fees to track expenses, use a virtual card, and take advantage of various other banking products.
Essentially, Shopify is marketing this product/service as a way for online businesses to “skip the bank,” allowing you to accept payments from customers and receive the money from those transactions the next business day with no additional fees.
It combines with the Shopify ecommerce platform to advance your business finances and merge your checkout builder, order management, and the Shopify Balance account into one dashboard.
Much like Shopify's many other products, you can log into your account with the same account credentials you use for your Shopify store.
In addition, Shopify entrepreneurs gain access to a business card with no minimum balances, access to ATMs, and a direct link to Shopify Capital if you need funding for your business.
Pros and Cons of Shopify Balance
Shopify Balance has far more advantages than disadvantages, but there are still some limitations, primarily for those outside of the US. Check out all the pros and cons below to guide your decision.
Pros 👍
- Seamless Shopify integration
- No monthly fees
- Instant access to earnings
- Rewards and cashback options
- Built-in financial management tools
- Improved cash flow management
Cons 👎
- Limited to Shopify users
- Fewer features than traditional banks
- High dependency on Shopify
- Regional availability varies
- Less established financial service
- Risk of platform-centric limitations
How to Set Up Shopify Balance – Step by Step Guide
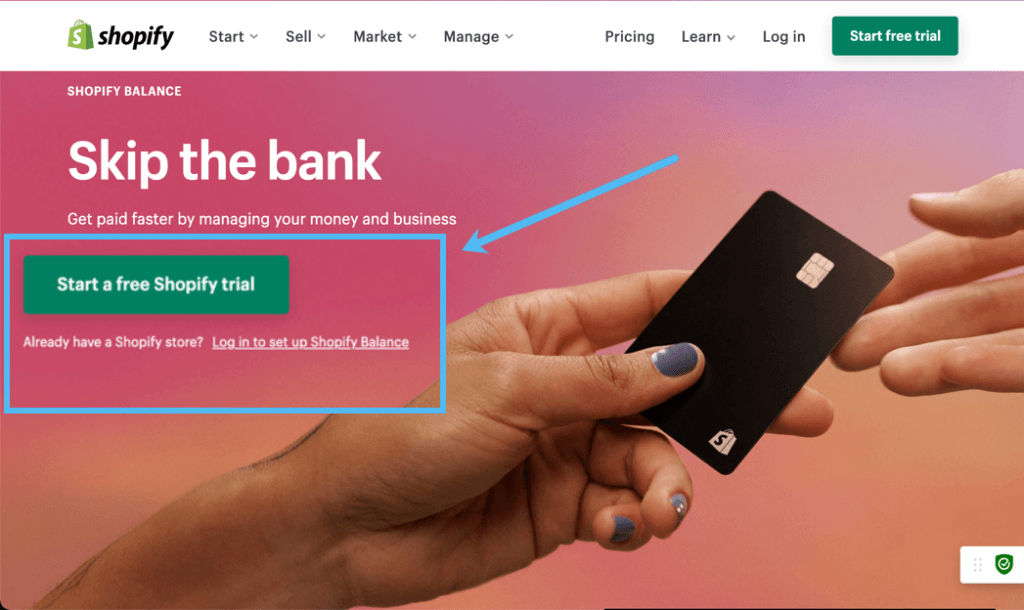
Start by going to the Shopify Balance landing page.
You have two options to make a Shopify Balance account:
- If you don't already have a Shopify store, start a free Shopify trial and launch one; you must first open a Shopify account and create a store before gaining access to Shopify Balance.
- If you currently have a Shopify account, log into your account to set up Shopify Balance.
Both options are available on the Shopify Balance homepage, where you can either start a free Shopify account trial or log into your current account.
Once you've launched your store, or logged into your account, Click on Finances > Balance.
Note: This section of the dashboard may not appear unless you click through the Shopify Balance landing page we mentioned above.
This reveals a page that explains everything you need to know about Shopify Balance, like how it doesn't have any fees and allows you to get paid faster.

If you don't see a button to sign up for Shopify Balance, make sure you've followed all requirements; you won't see a Sign Up button, but rather a read-only landing page, if missing one of these requirements:
- Your Shopify store must be located within the United States.
- You must have a valid US Social Security number and save it to the Shopify dashboard (they ask for this in the Shopify Payments setup).
- You need to have a mobile phone number and save that into your Shopify account details. This is used to send you necessary text messages.
- You must activate Shopify Payments within your dashboard.
If you've checked all of those requirements, you should see an Open Account button on the Shopify Balance page. Click that to proceed.
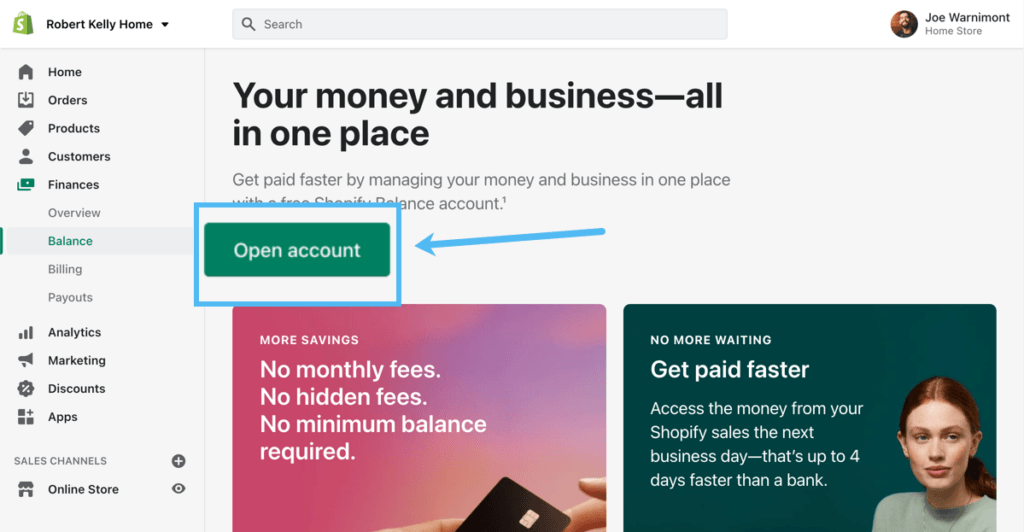
This brings you to the Shopify Balance Account Setup section, where it offers a few simple steps to launch the account and link it to your store.
Choose the Getting Started tab to read how Shopify Balance works, then click on the Continue button.

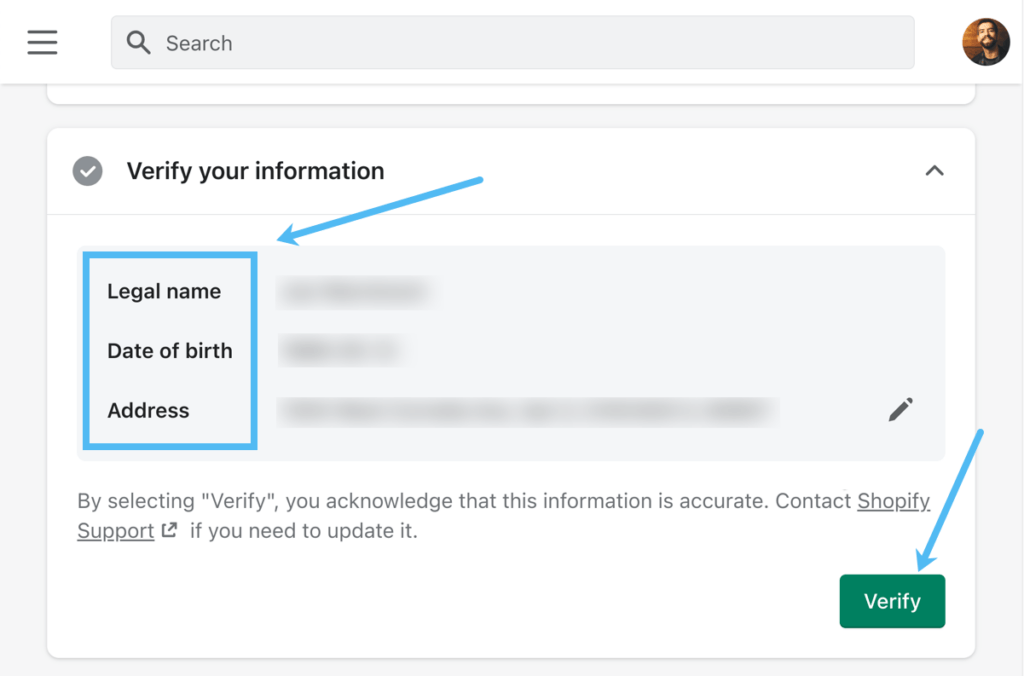
Under the Verify Your Information tab, check the fields for Legal Name, Date Of Birth, and Address. Ensure this information is correct before moving on. If it's not, click on the Edit (Pencil) icon to change what's there.
Click the Verify button when you're done.
You now see a tab to Enter Your Social Security Number. Type your social security number in the field then click Confirm.
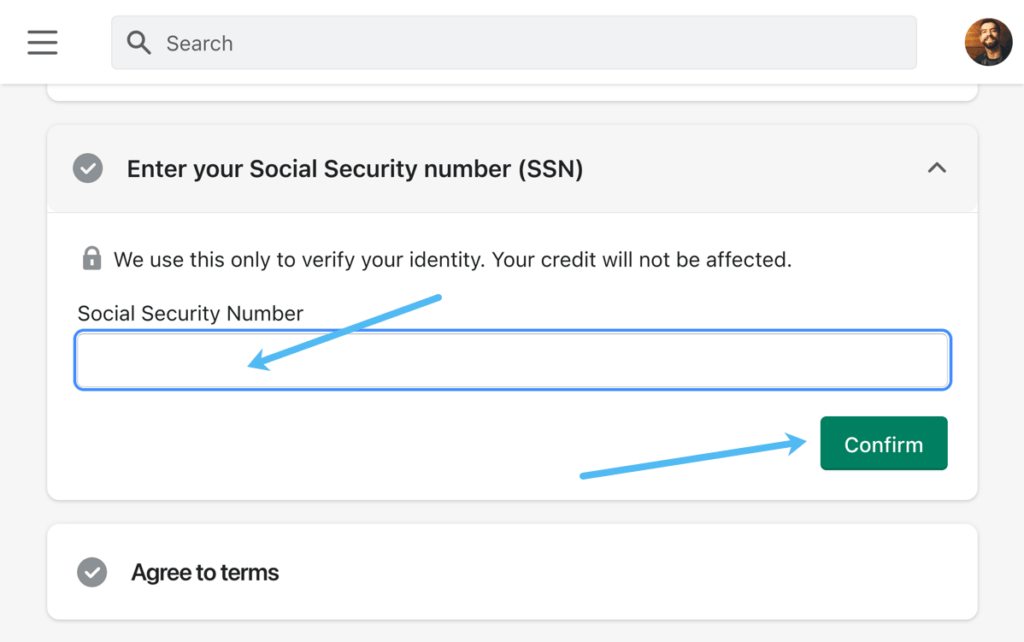
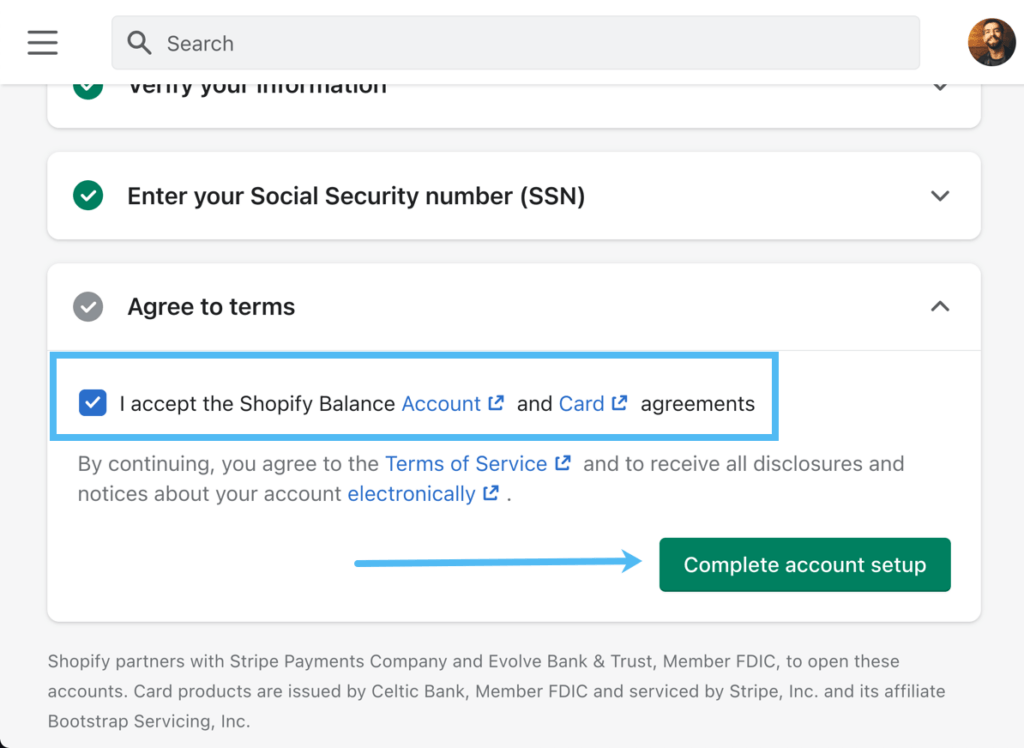
Finally, in the Agree To Terms section, check the box to accept all Shopify Balance Account and Card agreements.
Click the Complete Account Setup button to finish the process.
Click the Complete Account Setup button.
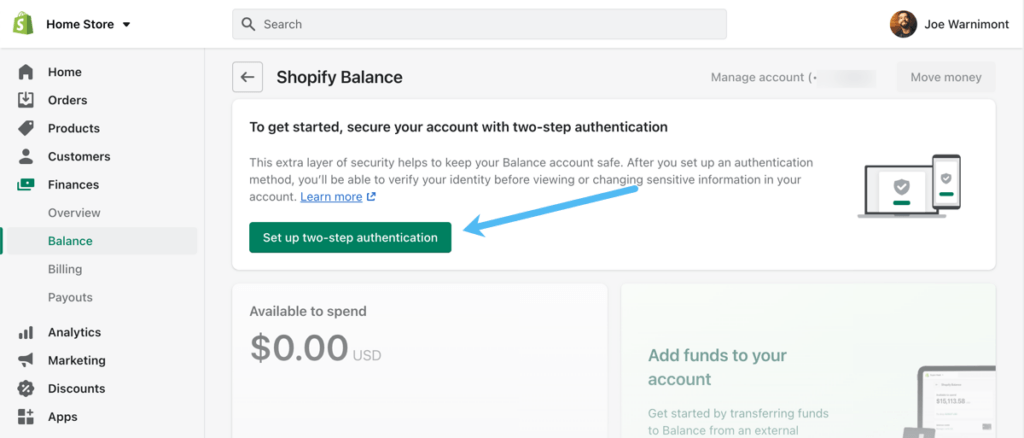
You now have a Shopify Balance management module within the Shopify dashboard. There's one more step required to really do anything on this page (otherwise they blur out the buttons and insights). You must configure two-step authentication for security purposes. Click the Set Up Two-Step Authentication button to make that happen.
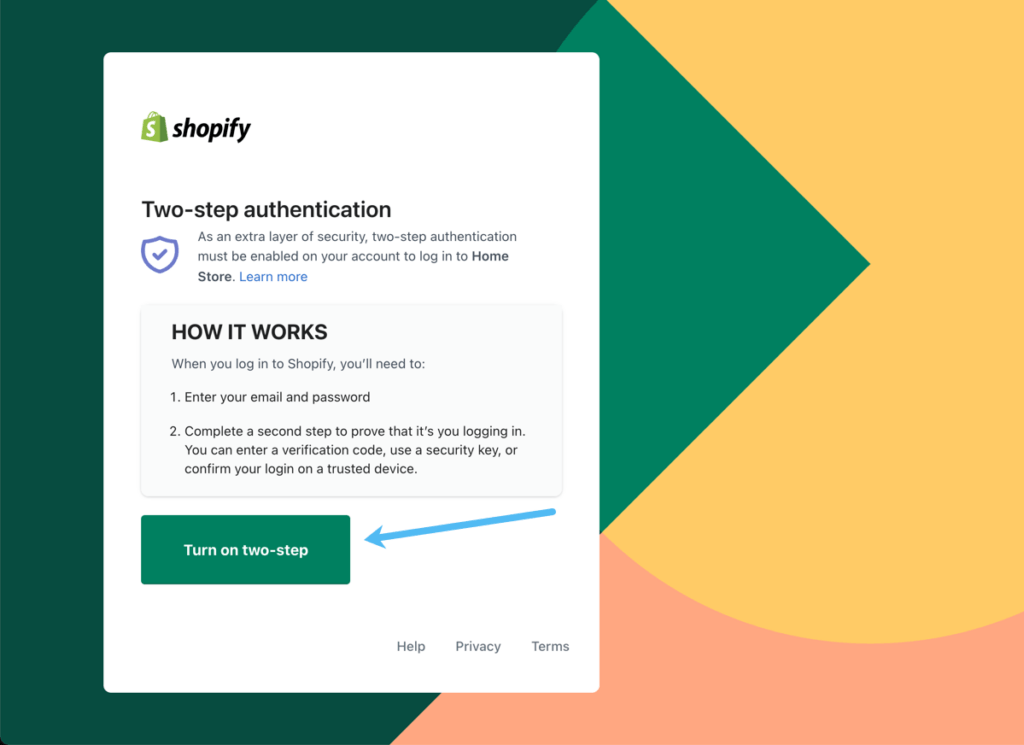
Shopify makes you log into your account one more time, after which you can click the Turn On Two-Step button.
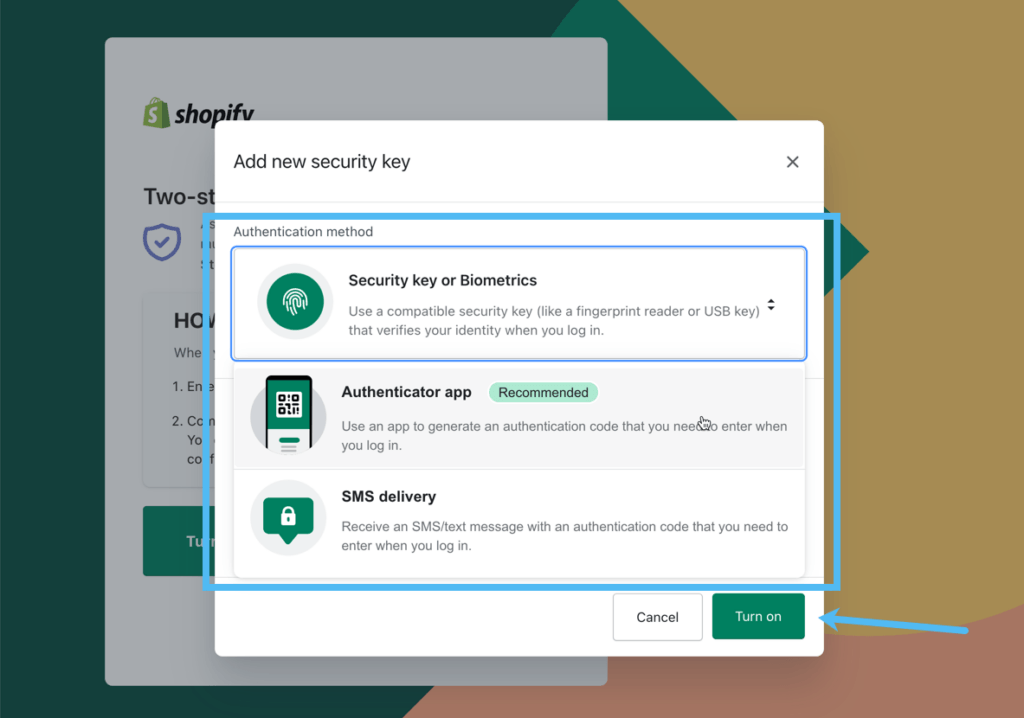
Two-step authentication options include:
- Using a security key or biometrics
- Using an authenticator app like Google Authenticator (we recommend this the most since biometrics are too complicated for the average user and it's more secure than a text SMS authentication)
- Using SMS delivery if you're not fond of authenticator apps or don't know how to use them (although it's not difficult to learn, which we suggest)
Pick the desired authentication method, and click the Turn On button.
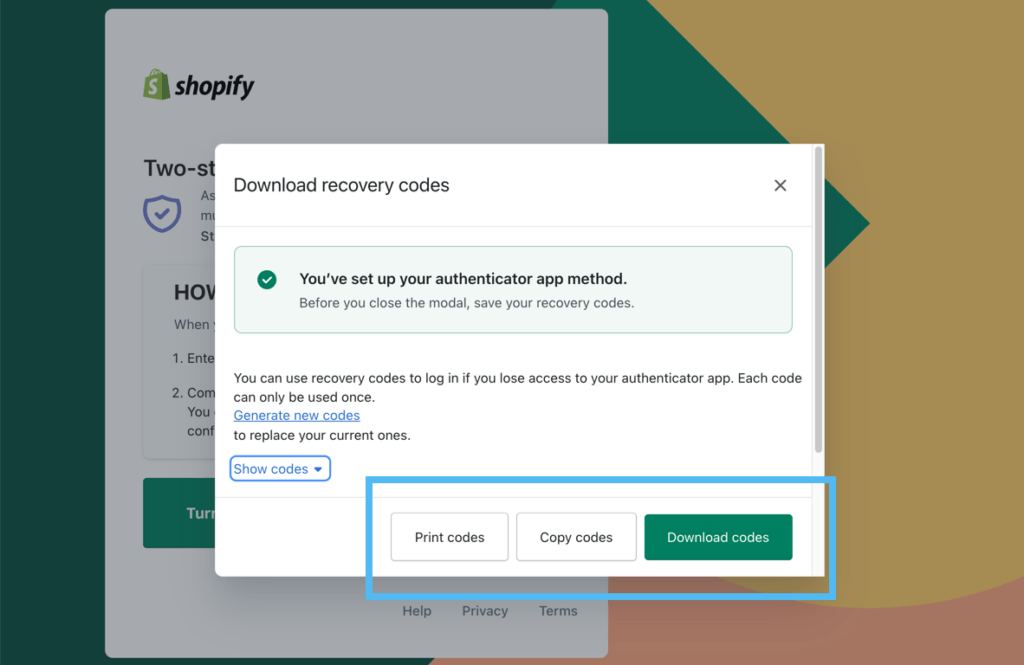
Authentication apps generally store their login codes on one of your devices, so losing access to that device could lock you out of your account. Shopify provides additional recovery codes to unlock your account if you happen to lose access to the authentication app. Feel free to print, copy, or download these codes just in case.
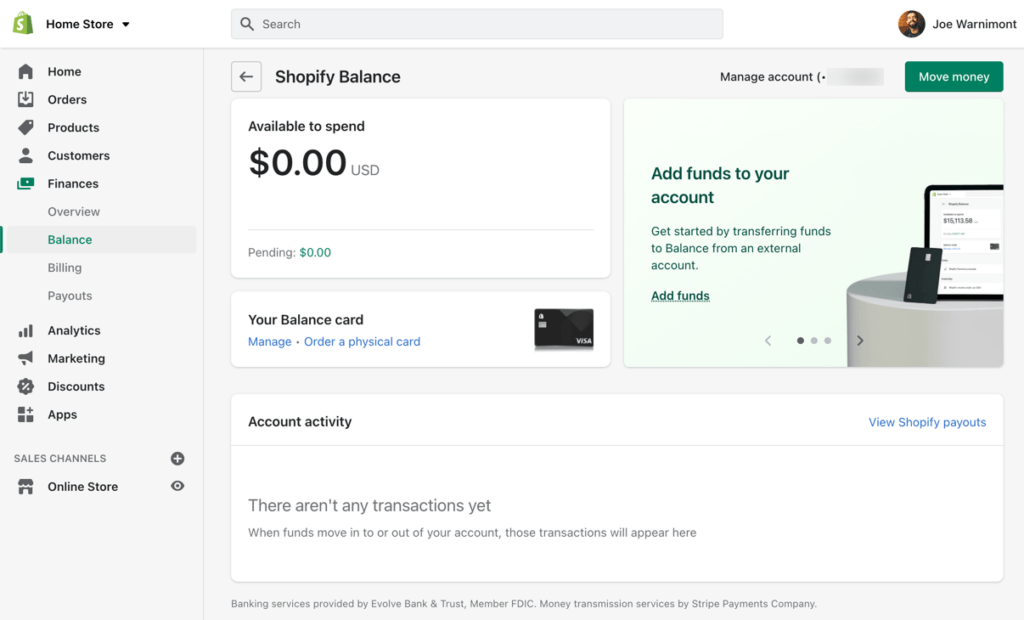
And that's all there is to it! Move forward to the dashboard to see the Shopify Balance section with access to your available spending cash, account management tools, and account activity. You now have a fully functional Shopify Balance account.
How to Manage Your Account
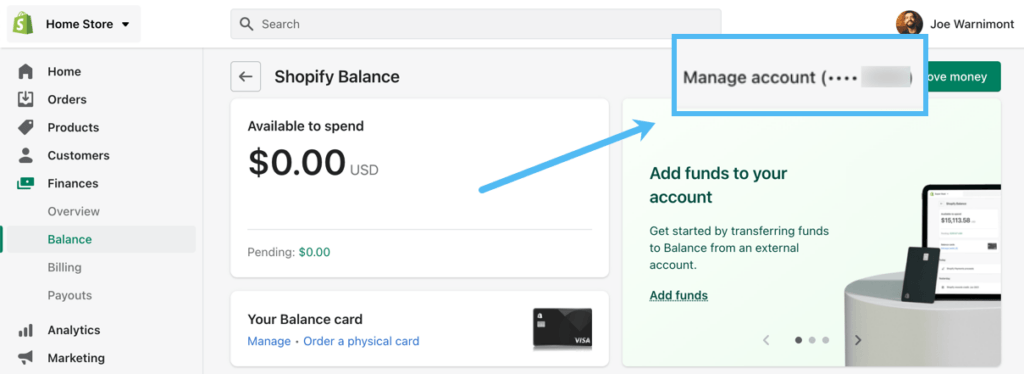
You can manage every aspect of your account by going to Finances > Balance.
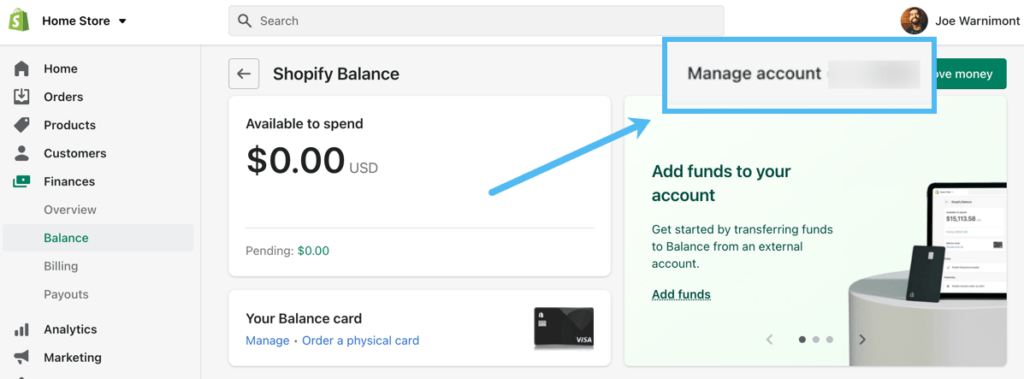
Click Manage Account.
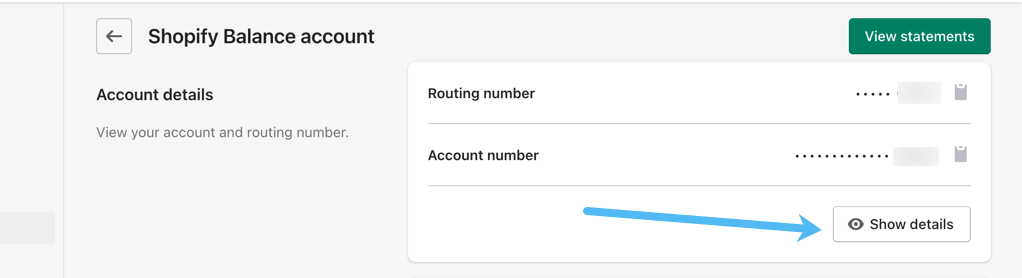
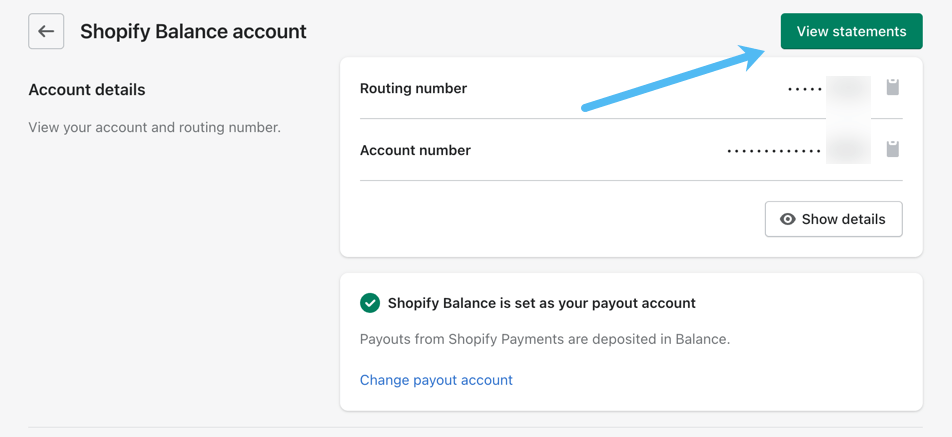
The Shopify Balance Account page displays your routing number and account number, both of which are hidden until you click the Show Details button. You can manage your account here by copying and pasting those details for other purposes such as transferring money. The page also provides little Copy icon buttons next to each number for you to copy each one to your clipboard.
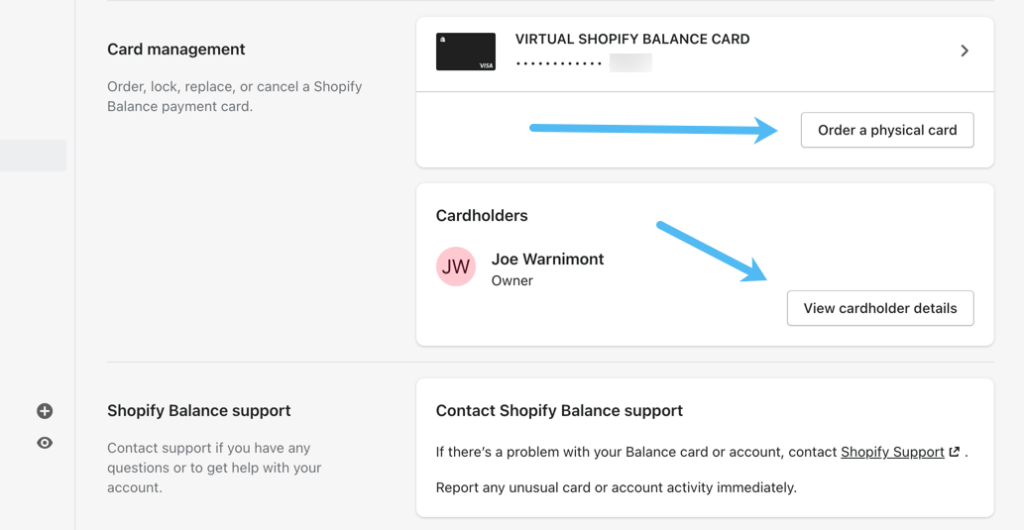
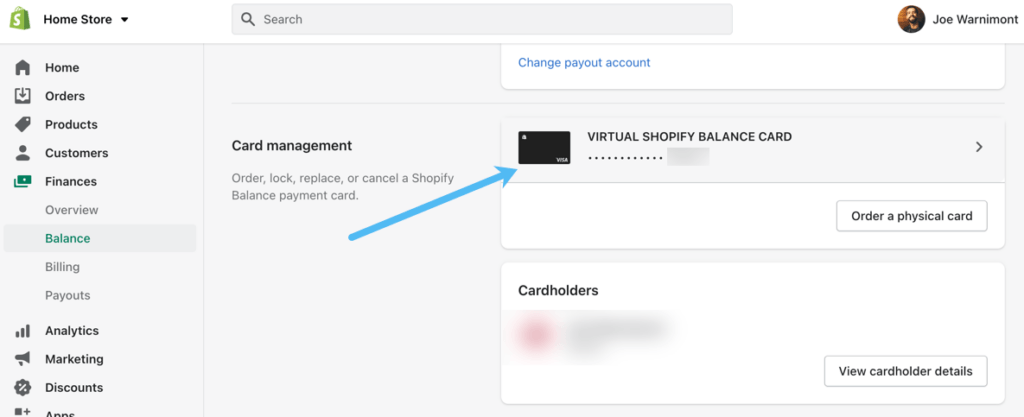
Scrolling down on the page, the Card Management section offers information about your virtual Shopify Balance card. A virtual card comes with every Shopify Balance account, but you can click on the Order A Physical Card button to get one to put in your wallet and use at brick-and-mortar locations.
Finally, the Card Management section also provides information about the cardholder, where you can click on the View Cardholder Details button to either adjust account information or use it for transfer purposes.
How to View All Account Statements
To view account statements, navigate to Finances > Balance in the dashboard, then click the Manage Account link that shows the last four numbers of your account.

Select the View Statements button. That brings you to a list of recent transactions to review on the Shopify dashboard. The page also provides ways to download multiple statements to your computer.
How to View Transaction and Transfer Limits
Transactions and transfer limits apply for your Shopify Balance account and card, and they may change depending on your needed transaction volume.

To check your transaction limit, go to Finances > Balance in the dashboard. Click the Manage Account link that also shows the last four digits of your account number.
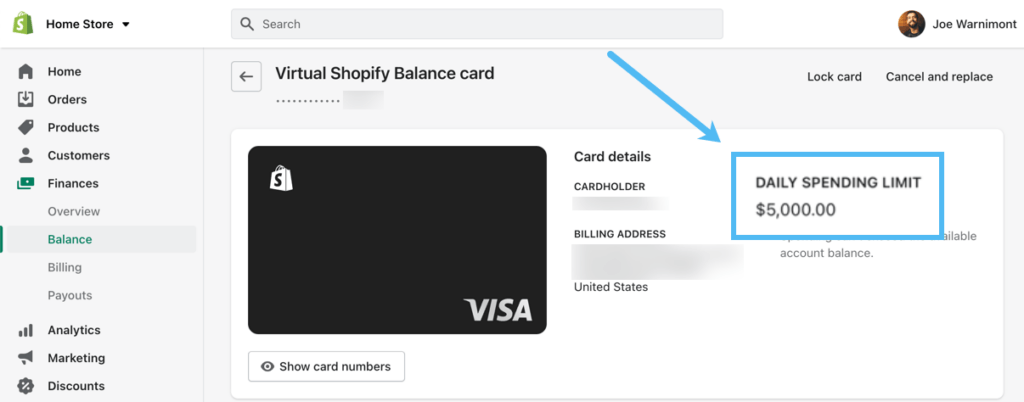
Scroll down to the Card Management section. Choose the card you wish to check for its Transaction Limit (you may have multiple in the list if you order a physical card as well or run multiple ecommerce businesses).
This page displays information like cardholder name, billing address, and card numbers. It's also where you find the Daily Spending Limit.
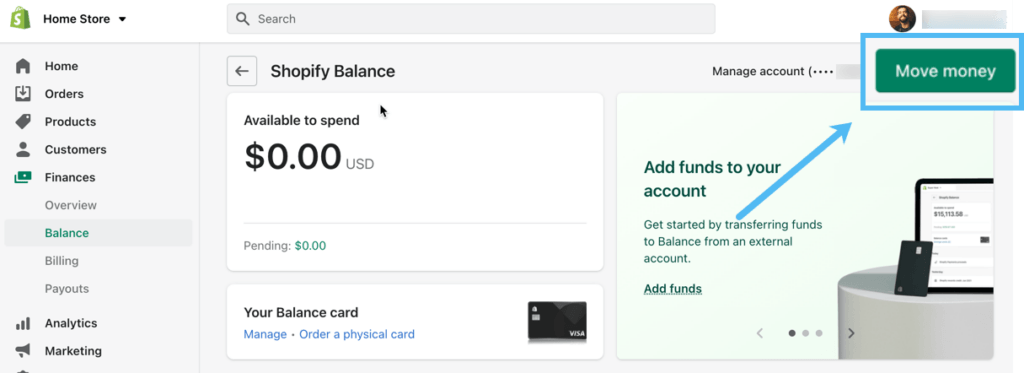
Transfer limits are a little different. You go to Finances > Balance, then click on the Move Money button in the top right corner.
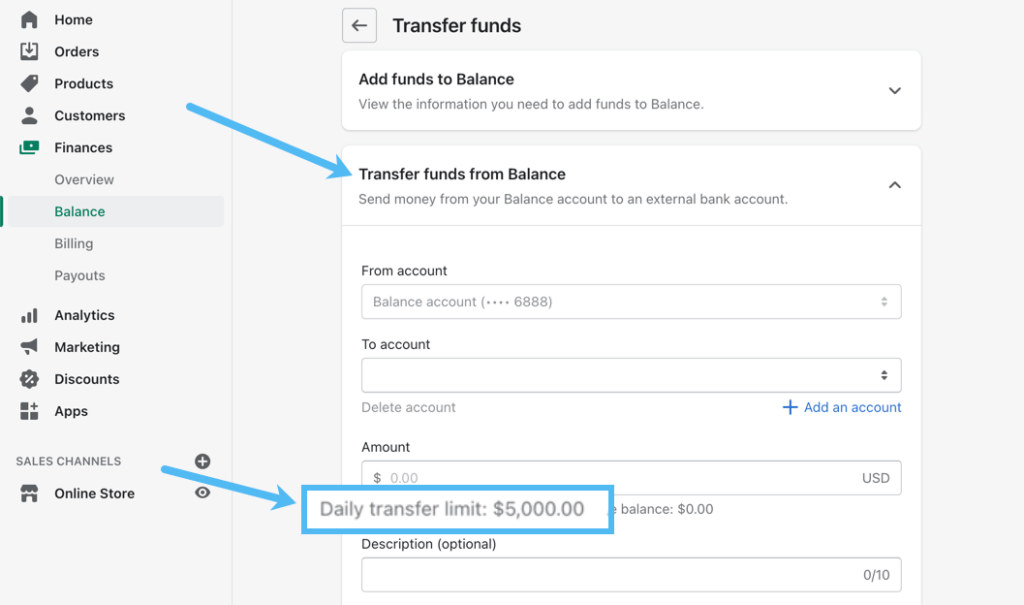
The Transfer Funds page offers a way to move money from your Balance account to another bank, but it also displays your daily transfer limit.
To find the limit, click on the Transfer Funds From Balance tab. Your Daily Transfer Limit appears under the Amount field.
How to Send Funds to or From Your Shopify Balance Account
To move funds to or from your Balance account, go to Finances > Balance. Click Move Money.

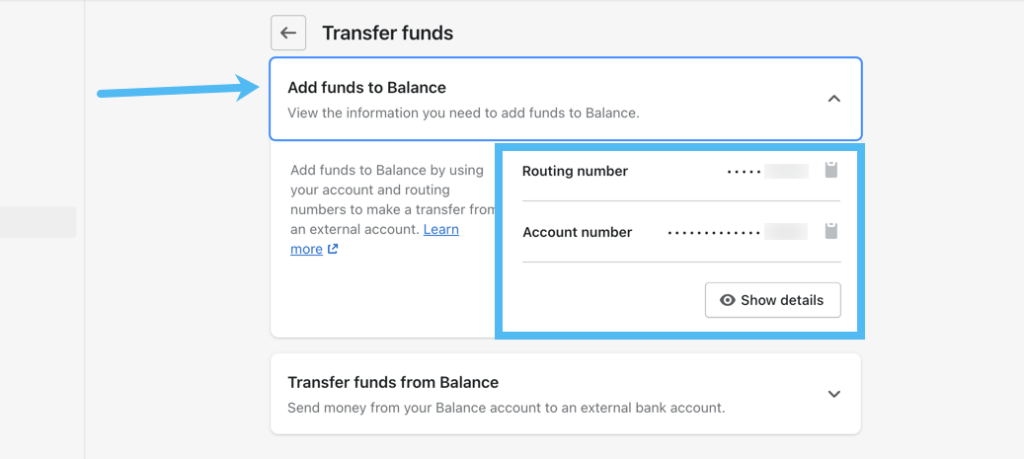
To transfer money from another account into the Balance account, open the Add Funds To Balance tab. Here, you'll see the routing and account numbers. You can click the Show Details button to reveal the full numbers and copy each number.
To move money to the account, you must go to the dashboard of whatever account you plan on sending money from. For instance, you could open your Chase or Bank of America account to start the transfer.
Using your bank's transfer tools, paste in the routing and account numbers from your Shopify Balance account, then complete the transfer.
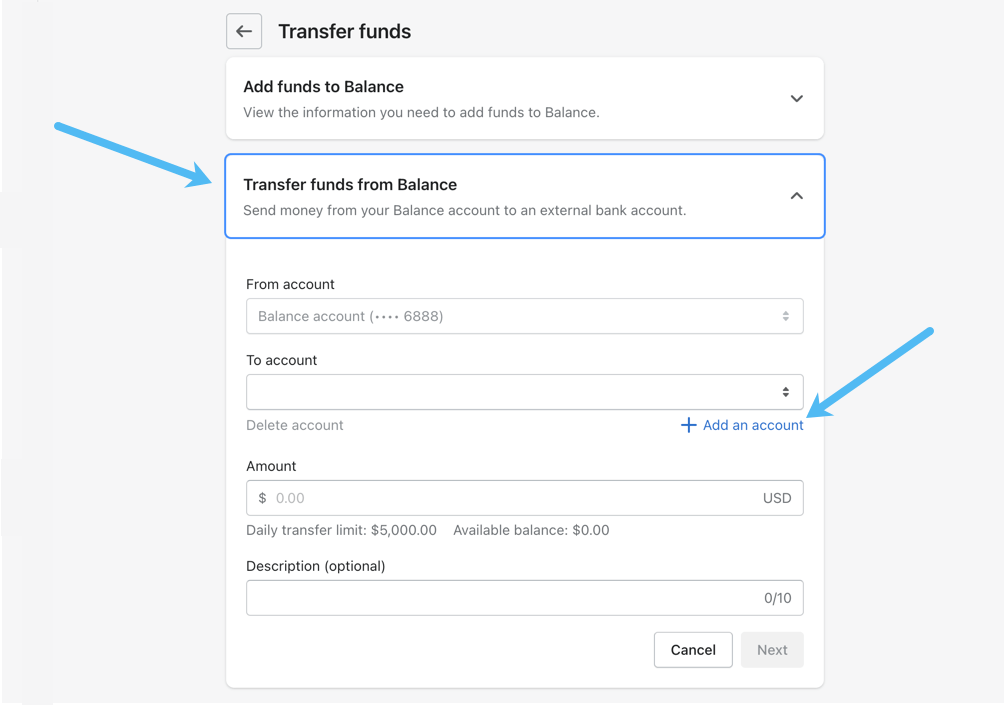
On the other hand, you have the option to transfer funds from your Shopify Balance account, sending it elsewhere, like a third-party savings or checking account. To make that happen, open the Transfer Funds From Balance tab.
Choose your From Account (the Shopify Balance account). Click the Add An Account link to properly fill in the To Account field with routing and account details from your third-party bank. Then, type how much you want to transfer in the Amount field. You can also fill in an optional description for your own reference. Choose the Next button after that to walk through the final transfer steps.
How to Receive Online Store Payouts to the Shopify Balance Account
The main reason many merchants opt for Shopify Balance is to take advantage of quick online store payouts (and to have one money management account located within the online store dashboard).
Luckily, there's no process to configure Shopify to automatically transfer payouts to the new Shopify Balance account. You already need Shopify Payments to run Shopify Balance, so Shopify instantly sets Shopify Balance as your default payout account. These payouts land in the account as quickly as one business day, after which you can access the money, move it to another account, or spend it using the Shopify Balance card.
Warning: There's one exception to the 1-day payout: Shop Pay installment transactions (where customers pay later as a payment plan) take up to three business days. This only goes into effect if you activate Shop Pay on your store and the customer actually uses it.
How to Change the Payout Account to Something Else
You must use Shopify Payments in order to have a Shopify Balance account, but not the other way around. Therefore, it's possible to still have the Shopify Payments gateway and decide to send payouts to a different account besides Shopify Balance.
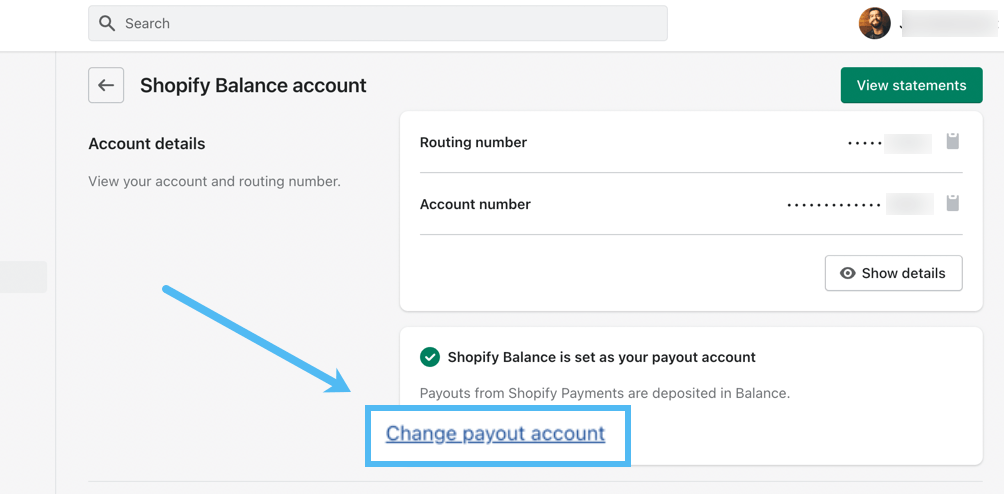
To change the payout account away from Shopify Balance, go to Finances > Balance. Click on the Manage Account link.

Click the Change Payout Account link under your Account Details.
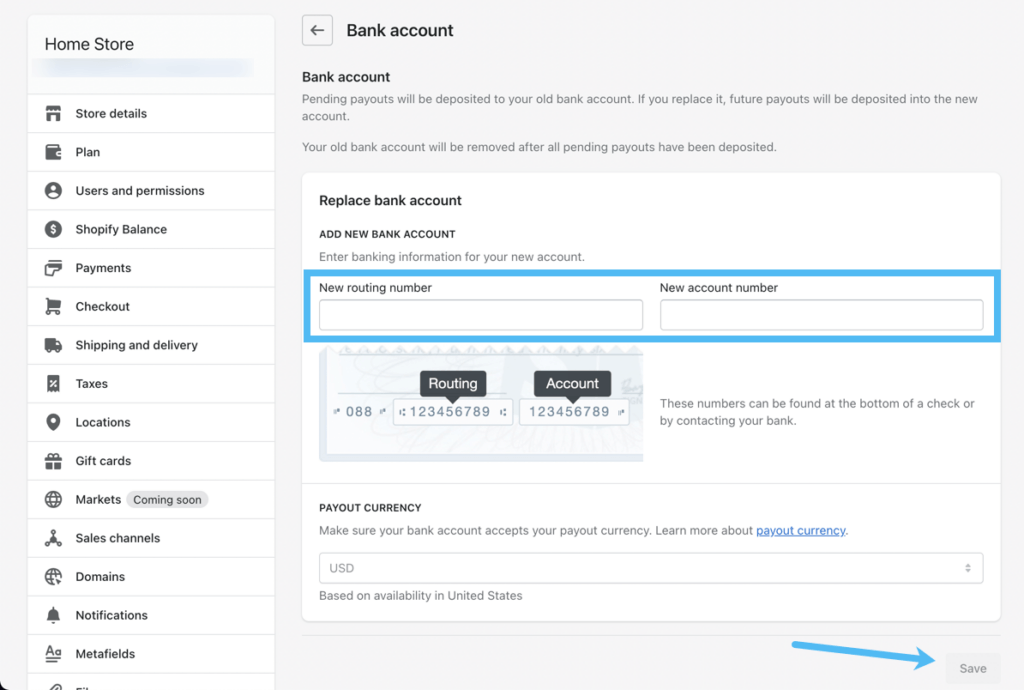
Find the Replace Bank Account section. Fill in the New Routing Number and New Account Number fields by typing in that information from another bank account. You can also select the payout currency, then click Save.
How to View Shopify Balance Insights
Shopify Balance offers several insights to view your account balance, activity, and payout details.
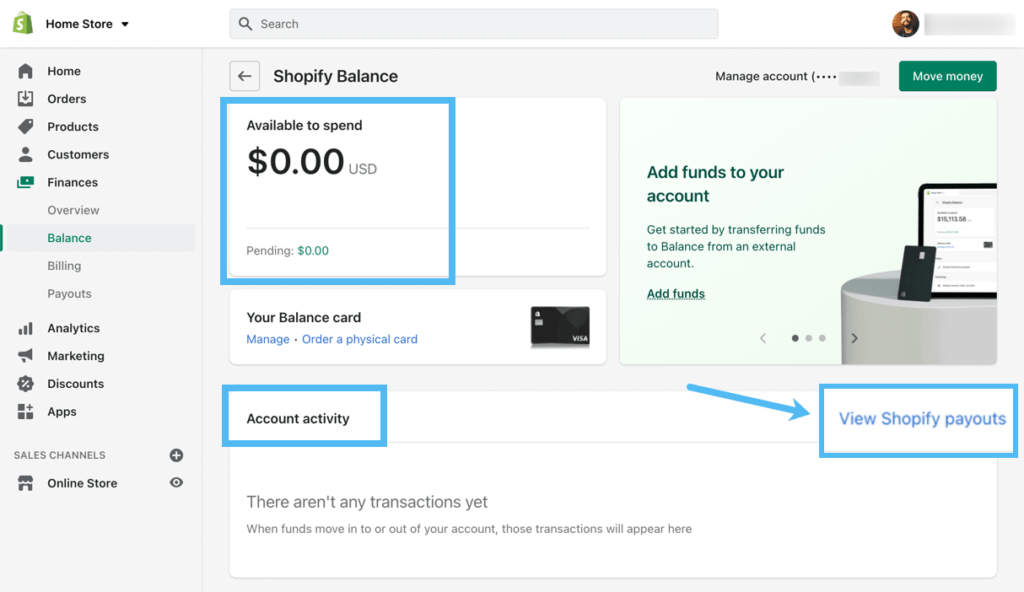
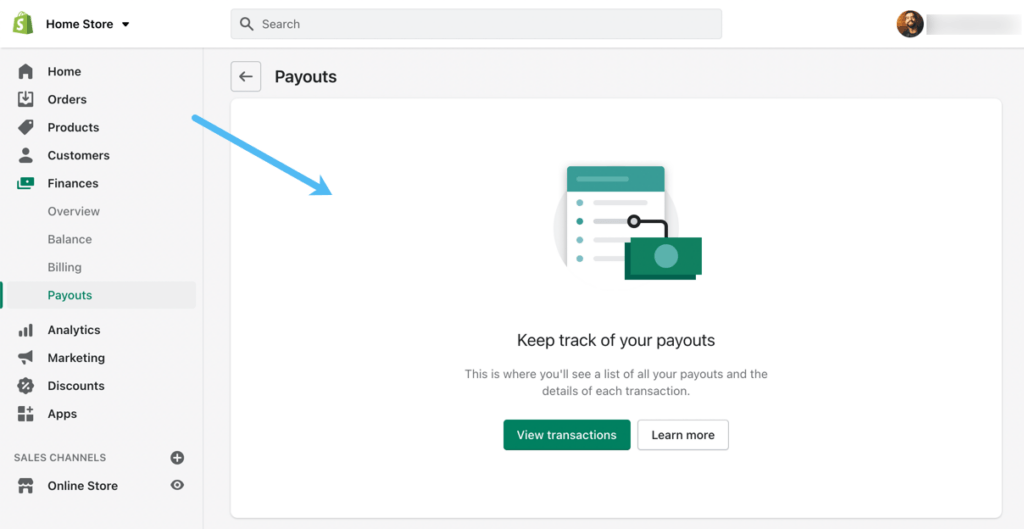
The vast majority of insights appear in the main Shopify Balance page by going to Finances > Balance. As you can see, the page offers a quick module to view the amount of money available to spend from your Shopify Balance account, along with a dollar amount indicating how much is pending.
The Account Activity section will begin to populate whatever transactions come in through your store, along with the money that has processed into your Shopify Balance account from those payouts. For further details, click on the View Shopify Payouts link.
This will present a complete list of the most recent payouts. It's also possible to click View Transactions to look at the actual transaction details from those payouts.
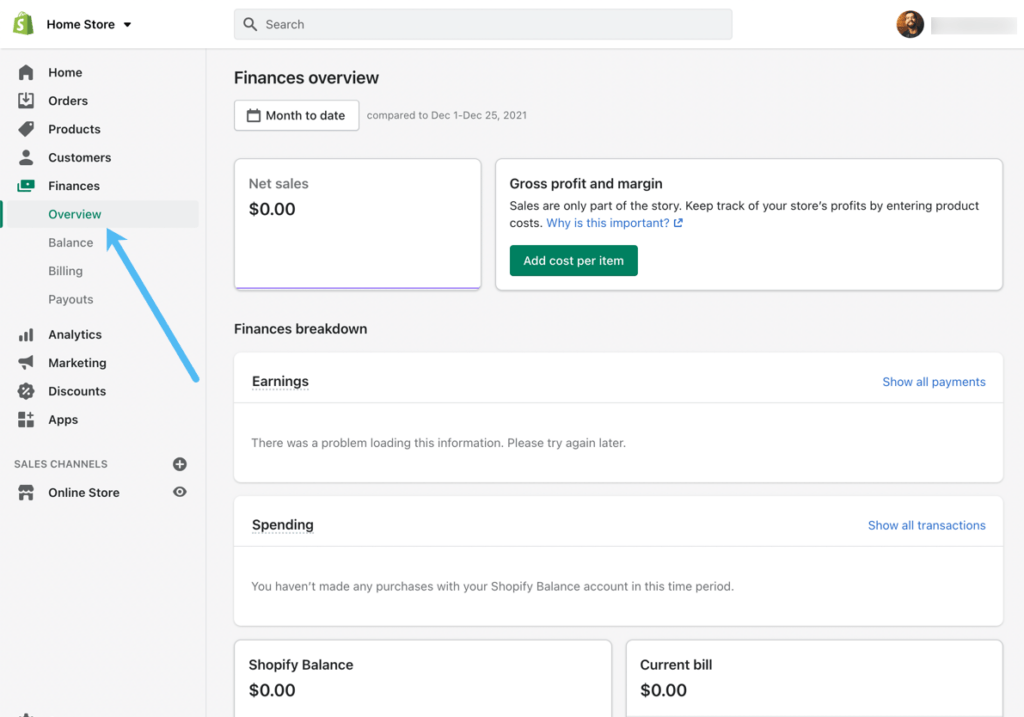
Finally, the Overview tab under Finances presents the most comprehensive collection of insights for your Shopify Balance account and all finances, like if you received a loan from Shopify Capital. The page shows net sales, gross profits, margins, earnings, spending, your Shopify Balance money, and the current bill. Filter based on date and use the more detailed information links to open extended insights, like by clicking Show All Transactions in the Spending module.
Feature Highlights from Shopify Balance

With most business bank accounts, you're required to manage your money and online business in multiple places. Not to mention, you're often stuck paying monthly fees and having to wait around for an approval letter. Furthermore, we tend to see slow payouts (up to 4 days), minimum account balances, and limited rewards benefits when working with business bank accounts.
The good part about having a business account from a bank is that you receive FDIC insurance for up to $250,000, which online businesses should always have.
Shopify Balance is a little different from a traditional bank account, but it still provides FDIC insurance for up to $250k. We also found that Shopify Balance cuts out the long wait times, eliminates all fees, and allows you to sign up for a rewards program, opening up the option for $2,000 cashback every year.
Here are the features to expect from Shopify Balance:
Combining Access to Your Online Store and Business Finances
What is Shopify Balance in relation to your online business? Well, typically, business owners must constantly switch between a business bank account and their online store. That financial institution puts a bit of a roadblock between your daily workflow, so Shopify Balance reunites your finances with the store, allowing you to access all payouts, spend that money, and also manage your online store from the Shopify Admin.
Whether you're a startup or a thriving business, this consolidation of dashboards ensures you're working efficiently, managing all aspects of your business from one screen, and don't have to wait around for payout transfers.
This also means that Shopify merchants have access to all Shopify tools in one area, including your standard Shopify plans for ecommerce, the Shopify Fulfillment Network, storefront themes, and a POS (point of sale) if you have one.
Fewer Limits, Restrictions, and Fees Than Traditional Business Banking
You don't need to sign up for an early access list with Shopify Balance. There's no need to wait in a physical line at a bank. There's no account minimum or hidden fees, unlike many of the business accounts you'd find with standard banking.
Shopify Balance tries to eliminate roadblocks to getting a money management account by having no monthly or hidden fees, along with no minimum account balance requirements.
There are some restrictions, like how you must have a business in the US, have a mobile phone, and have a SSN. Other than that, merchants can get set up with an account within minutes.
Faster Payments Than Regular Business Banking
Receiving payouts from an online store to a business account often takes up to four business days, so Shopify Balance cuts that time by quite a bit. In fact, most payouts hit your Shopify Balance account in one business day, allowing you to spend the money to reinvest in your business, take out cash at ATMs, or pay employees.
A Business Card to Use at Stores and ATMs
To continually fill your store with new products, ecommerce professionals must reinvest in their businesses, and that's just what the virtual and physical business cards from Shopify Balance allow you to do. In short, all Shopify Balance members get a virtual money card once they sign up for an account. That allows you to make payments with the card number, whether that's online or by telling someone the number over the phone. Shopify lets you order a physical card as well.
Combined, these Shopify Balance cards help you take profits from sales and reinvest in anything from office furniture to product development and advertising to charitable contributions.
Cashback Ranging from 2% to 10%
The cashback program is perhaps the most exciting part of Shopify Balance. Every purchase you make of Shopify products receives 2% cashback. This includes purchases on apps, themes, shipping, and ecommerce marketing you run on social media sites and search engines.
The cashback gets capped at $2,000 per year.
What's more is that all hires on Shopify Experts generate 10% cashback, and Apple Store purchases get 3% back. Last, you receive exclusive discounts and offers from a wide variety of Shopify partners, like cheaper shipping, printing, and supplies from UPS.
All of these rewards get placed right back into your Shopify Balance account to spend on your business.
Top-notch Security with FDIC Insurance and Card Control Features
Security was one of the biggest questions we had with this type of account.
Luckily, our concerns were addressed when we saw that all Balance account members receive FDIC insurance for up to $250,000, protecting store owners from fraudulent activity on their cards and money management accounts.
This comes as a welcome relief, since that's one of the main reasons businesses tend to opt for traditional financial institutions when conducting their business banking. However, this money management account from Shopify offers the same protection.
Another way to protect your account comes in the form of a card control section of the dashboard, where you can lock the Shopify Balance card in case it's stolen or lost.
After that, you order a replacement card from the same area and go on with your business.
Who Should Consider Shopify Balance?
The answer to this question, we start with the basic requirements: we recommend Shopify Balance for businesses in the United States, where the owners are willing to provide their SSN and mobile phone number. In addition, you must use the Shopify Payments processing solution in order to make a Balance account.
So, if you check those boxes, and already use or will sign up for Shopify Payments, we don't see any reason not to take advantage of Balance to improve your small business or large business finances.
We like it most for merchants disgruntled with traditional business banking practices and want faster payouts, no minimums, no fees, and a rewards program for spending your money on business items/services.
Everyone who meets the requirements can sign up (even brand new stores), so we encourage you to check it out!
Let us know in the comments below if you're still asking “what is Shopify Balance?” Also, share any thoughts you may have if you've already taken your money management account for a test drive.


Seems cool but you only get 2% cash back and get capped at 2K per year?
Chase business awards Credit card has unlimited MILES/CASH Back. If you run all expenses thru it any small business would get far more rewards value.