
Do you always have to pay to build an online store? Most information online, and conventional wisdom, says yes: an ecommerce shop is a complicated piece of software with many moving pieces; it's also often essential to use high-powered, sometimes pricey hosting in order to support a scaling store and seasonal bursts in traffic.
But what if all you need is something simple, like a few Buy buttons on your current blog which lead to a shopping cart? We're here to say that it's not required to pay any money when constructing an ecommerce store, especially for simple product galleries and quick online store elements like a checkout module.
In this article, we'll explain how to create an online store for free and talk about the platforms that help you do just that.
What components do you need to create an online store for free?
- A website
- A checkout module
- Payment processing software
- A domain name (optional but highly recommended)
And we have excellent news: although not that common, all of these elements are available for free!
Check out our guide below to learn how to make an online store for free.
How to create an online store for free
In this tutorial, we'll explain how to launch a store, design everything, add products, and accept payments.
Here's how to create an online store for free:
- Step 1: Launch a website
- Step 2: Design the Website
- Step 3: Add Products to Your Square Online Store
- Step 4: Set Up a Domain
- Step 5: Activate Online Payment Processing by Verifying Your Identity
- Step 6: Configure Shipping Rates
- Step 7: Collecting Taxes
- Step 8: Publish Your Free Website
Step 1: Launch a website
You may have heard of the top ecommerce platform for constructing a website along with showing an online store and ecommerce features for payment processing, email marketing, search engine optimization, receipts, and more. We're talking about the Shopifys, Bigcommerces, and Squarespaces of the world. They're all excellent tools, but none of them offer free plans.
However, several other well-known brands have ways to build a website for free and sell products as well.
To make a free online store with a shopping cart and payment processing, we recommend using one of these:
It's best to try out Square Online before any of the others since it's the only truly free online store creator, seeing as how Ecwid and Sellfy offer free plans, but they have stipulations or limitations. We still love them, and you may end up opting for Sellfy or Ecwid based on features, but Square Online is free with a full feature set. For instance, the Free plan from Sellfy limits you to 10 physical products; you must upgrade to sell more than that and to sell digital and subscription products. Ecwid limits you to 10 physical products as well, unless you upgrade.
Square Online provides a free plan with unlimited products, a complete online storefront builder, and shopping cart tools, along with selling on social media and SEO tools.
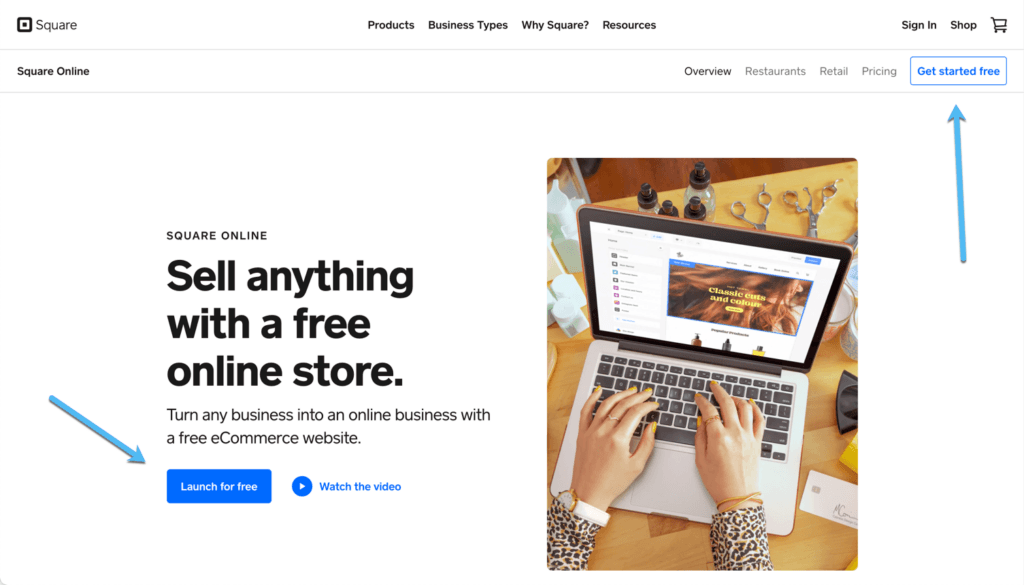
So, start the process by going to the Square Online website. Click on one of the Launch or Get Started For Free buttons. This sends you to the sign-up process, which doesn't require any type of payment method to generate a store.
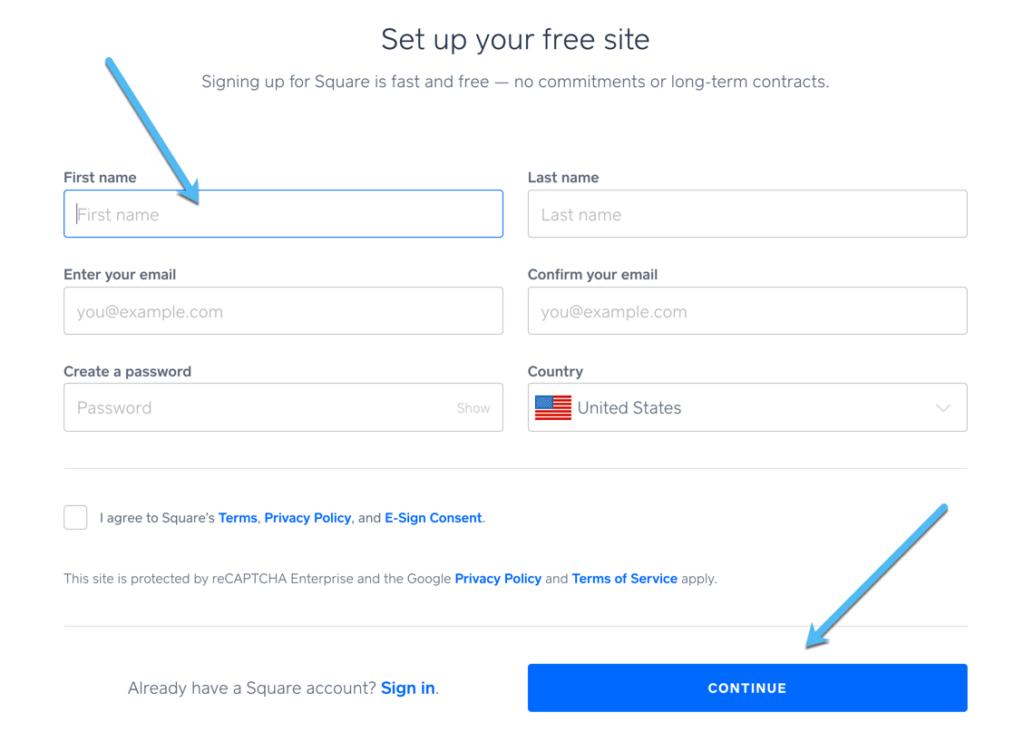
The initial setup procedure asks you for information about your yourself, your ecommerce business, and more.
On the first page, fill in details like your name, email address, and the password you want to use to log into your Square Online store. Click Continue to proceed.
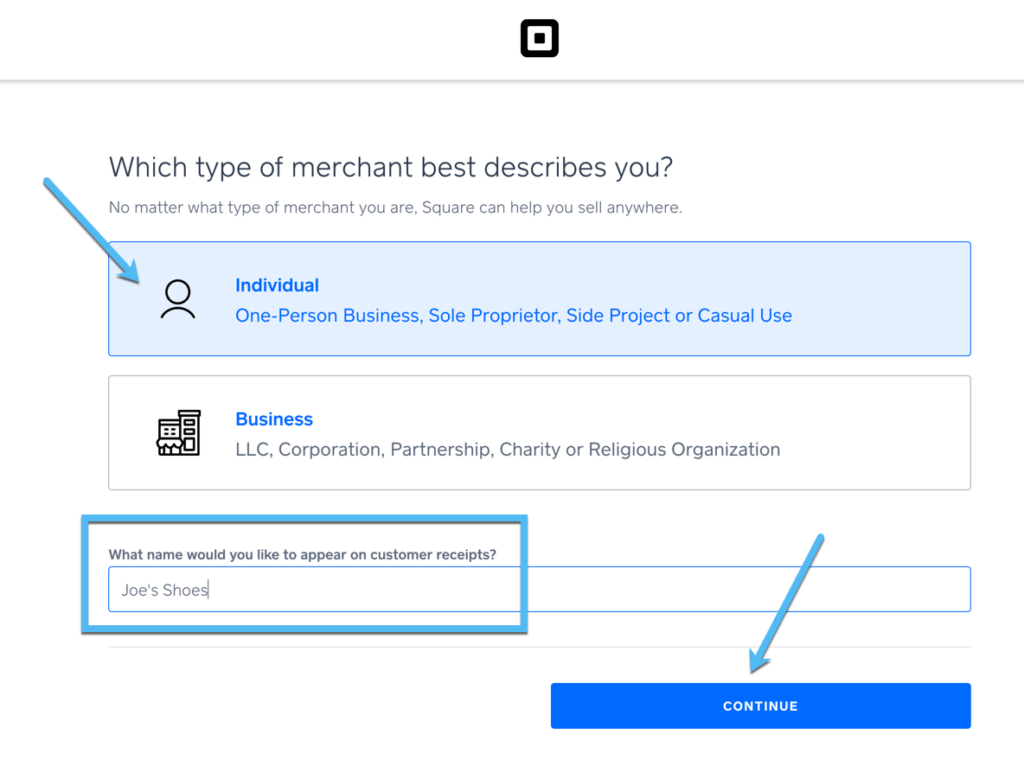
Mark which type of merchant you are: Individual or Business. Then type in the name you want to show on customer receipts.
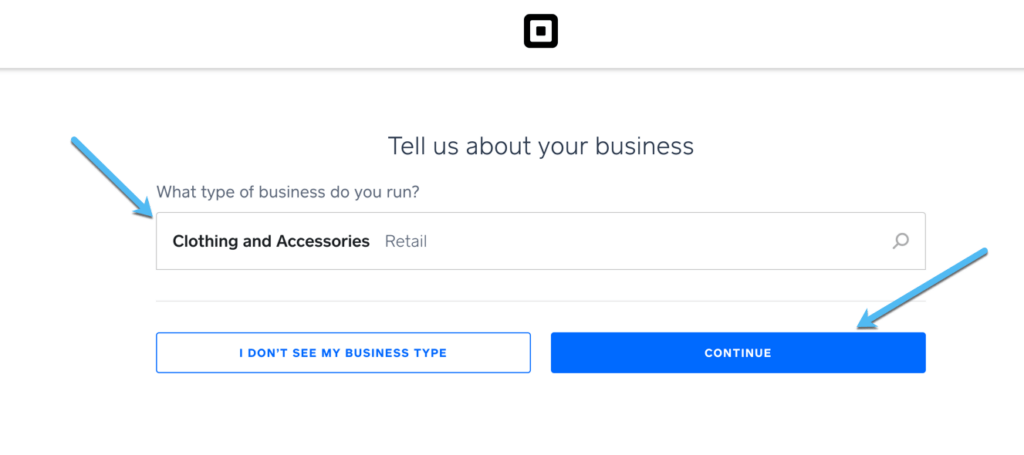
Next up, choose the type of online business you run or plan to run. For this example, we'll go with Clothing and Accessories, but Square has dozens of industries listed.
Choose the Continue button to move on.
Type in the address of your business, then specify if it's also your home address. After that, click the Continue button.
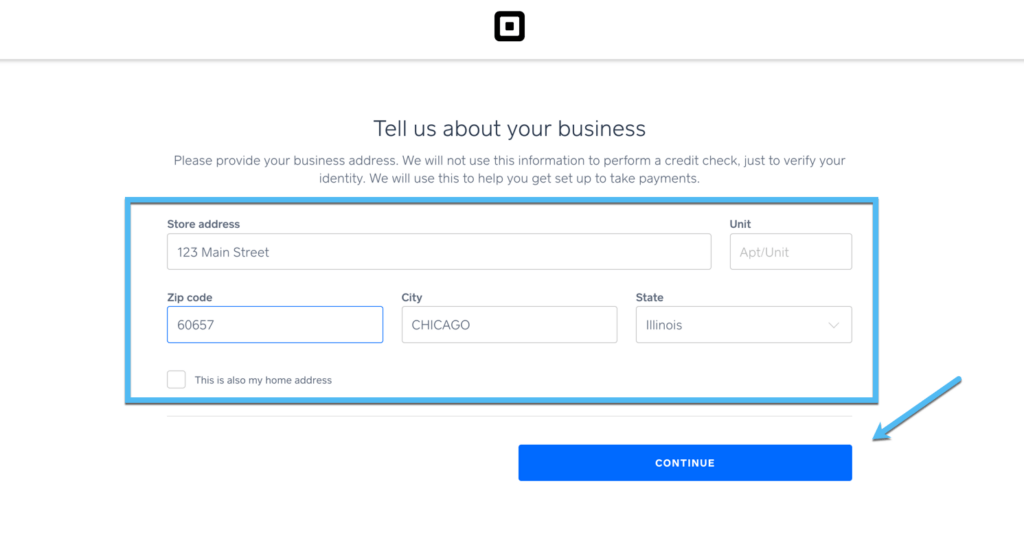
The next page asks if you have a mobile business or if your business address is different from your home address, both of which ask for additional information to ensure the payment processing works properly.
Click the Continue button to move forward.

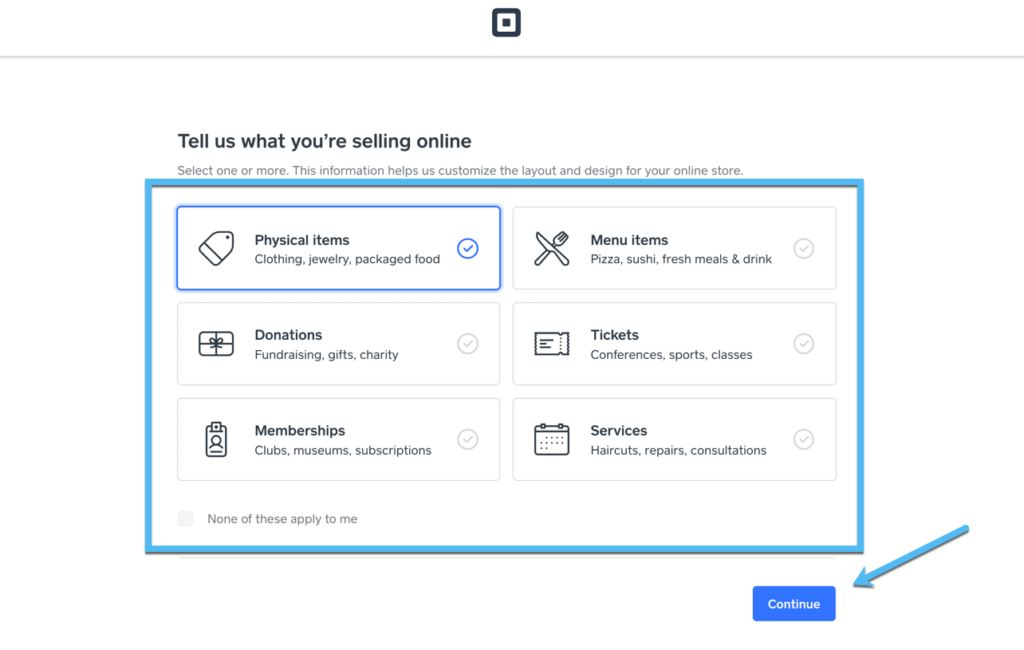
It's also important to specify what you plan on selling online. This way, the Square Online store offers certain product page options for you to use.
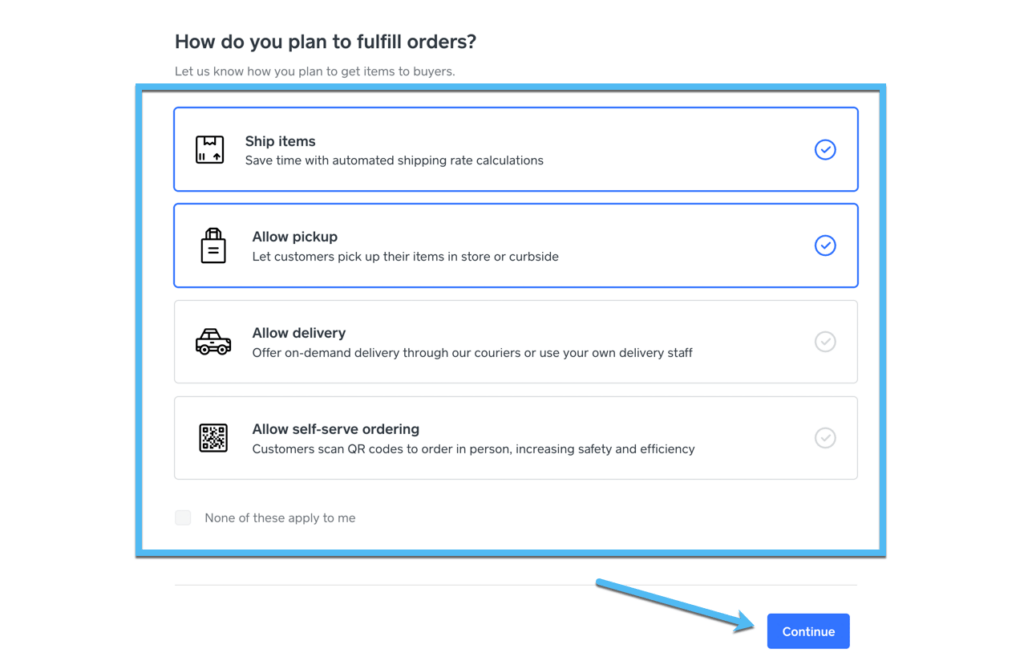
After that, mark how you plan on fulfilling orders, choosing from these options:
- Ship items
- Allow pickup
- Allow delivery
- Allow self-serve ordering
You can choose multiple fulfillment options, then click Continue.
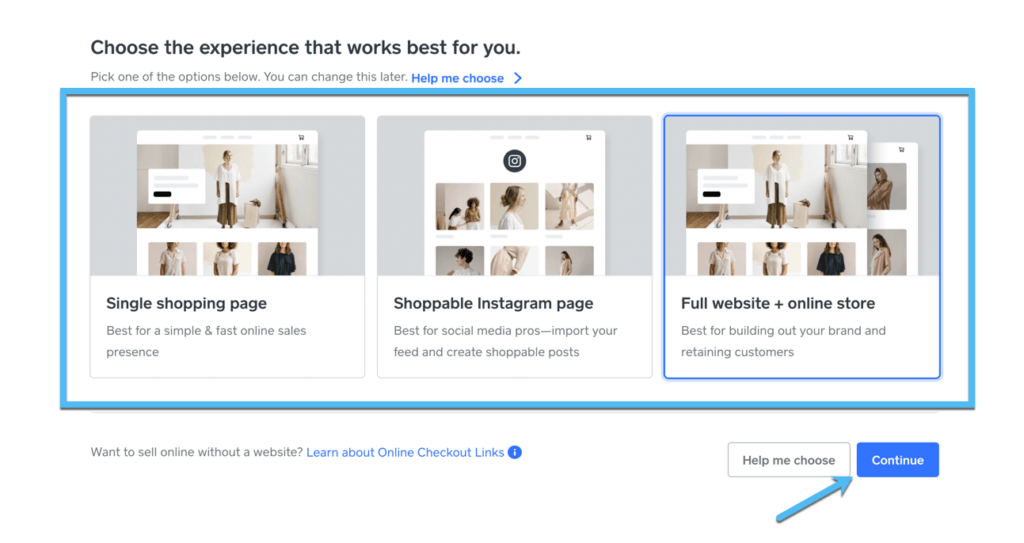
To finish out the process of creating your free online store with Square Online, pick the website experience that works best for you. You can go with:
- A single shop page: to offer a one page website for simple stores.
- A Shoppable Instagram page: which allows you to link from your Instagram bio and posts and send people to a one page online store.
- A full website and online store: the most complete ecommerce solution, which gives you multiple pages on a website, your own online store, menu functionality, and a website designer.
Click on the Continue button to finish.
Note: Square doesn't provide a large collection of templates; instead, it generates a beautiful, modern, high-quality template that tends to work for most businesses.
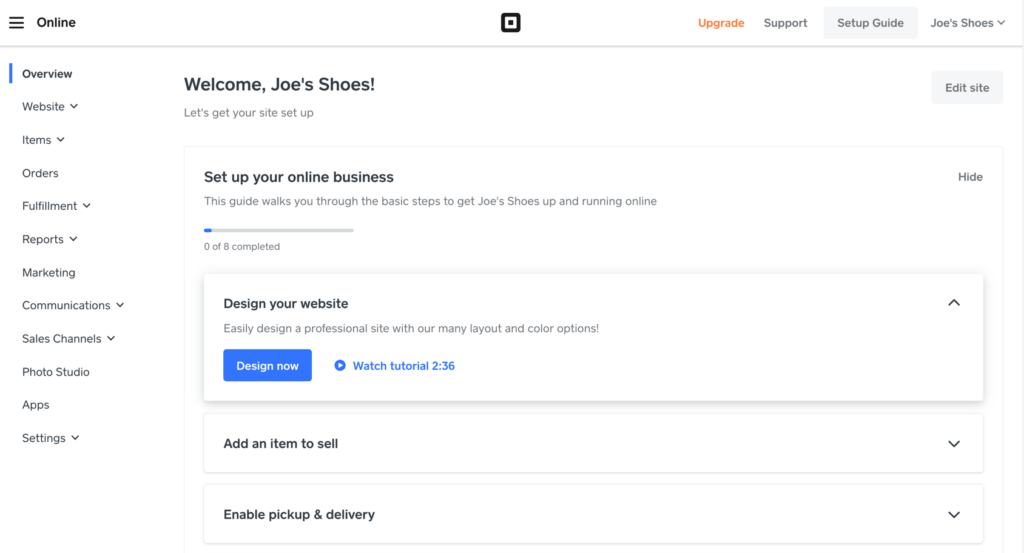
You're then sent to the Square Online dashboard, which serves as your control center for adding items, customizing the look of your website, setting up shipping, marketing products, fulfilling orders, and much more.
Step 2: Design the Website
Now that you have a Square Online account and a dashboard filled with website-building tools, it's time to design the site to look pretty.
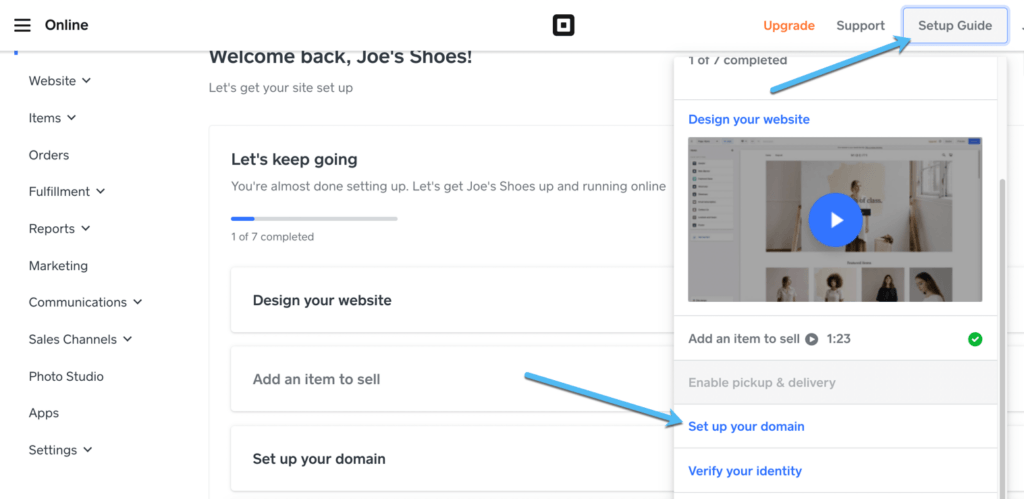
You have various options for designing your online store. The Website > Edit site menu brings you to the site builder, but we recommend working with the provided dashboard Setup Guide to ensure you check all the boxes for running your site.
You can find this guide by clicking on Setup Guide in the upper right corner of your dashboard.
There's also a button in the middle of the dashboard where you can click on the Design Now button.
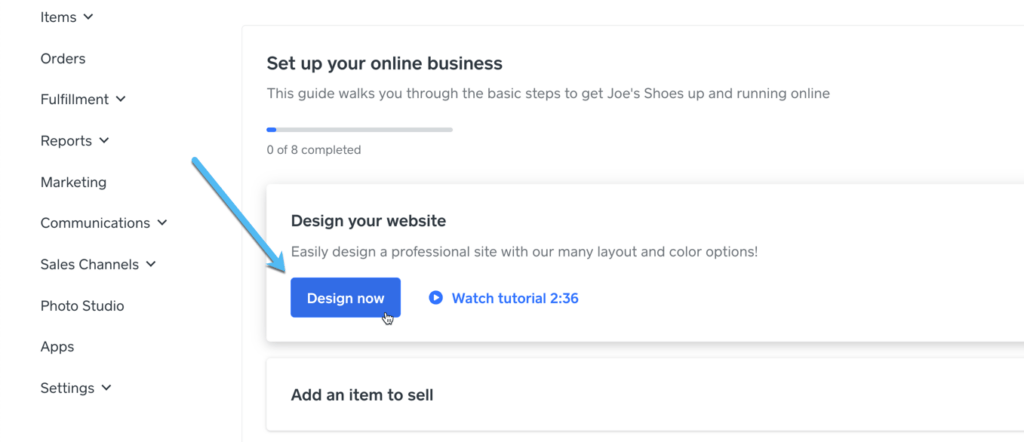
Regardless of how you get there, Square Online sends you to its ecommerce website builder, which is essentially an integrated version of Weebly since Square bought the Weebly website builder for this exact purpose.
On the site builder, you'll see an online store preview to the right, along with tabs to edit certain elements of the site on the left.
For instance, you can click on the Logo button to upload an image as your logo.
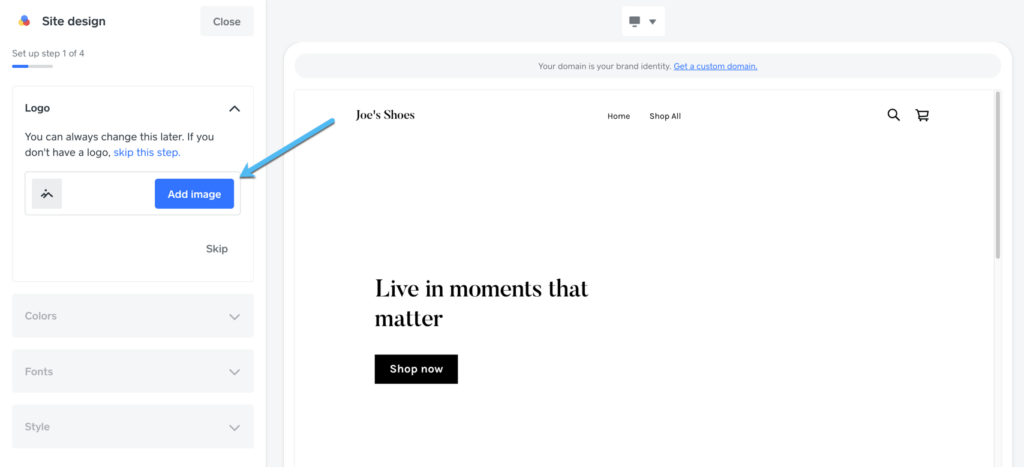
Square also provides tabs to adjust Colors, Fonts, and Styles. As you can see from this step-by-step tutorial, we added a logo and changed some button styles, both of which appear in the preview to the right.
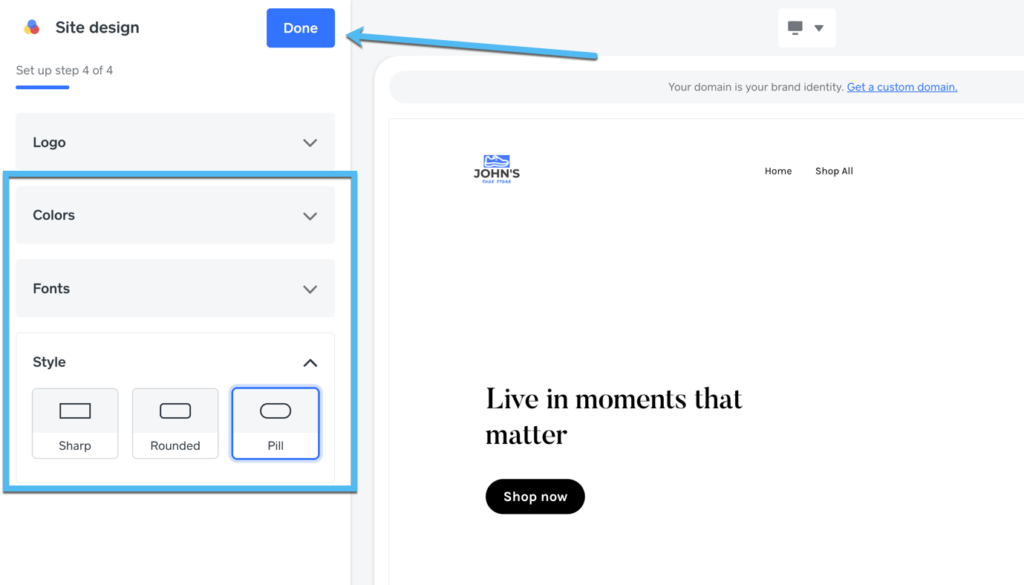
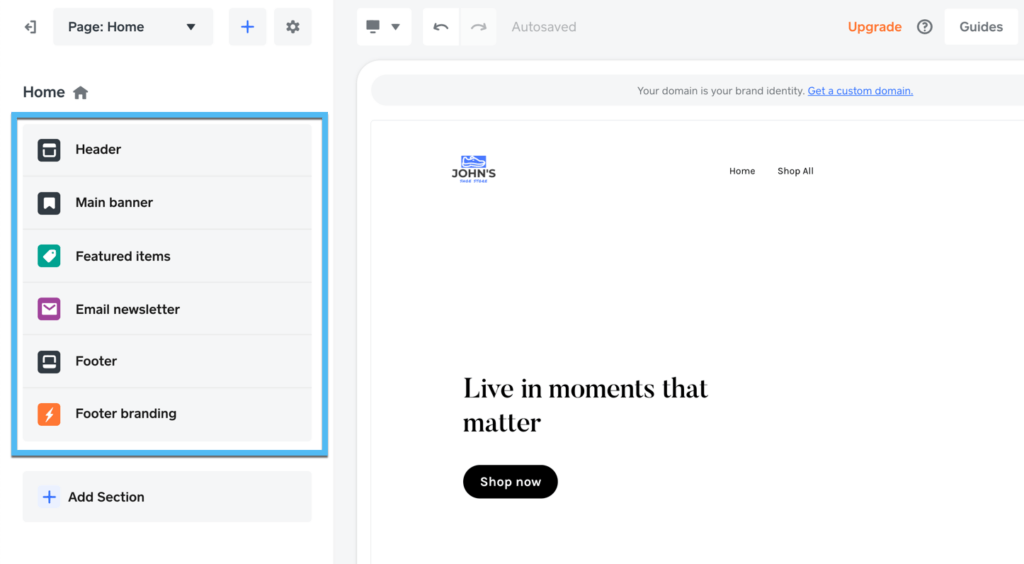
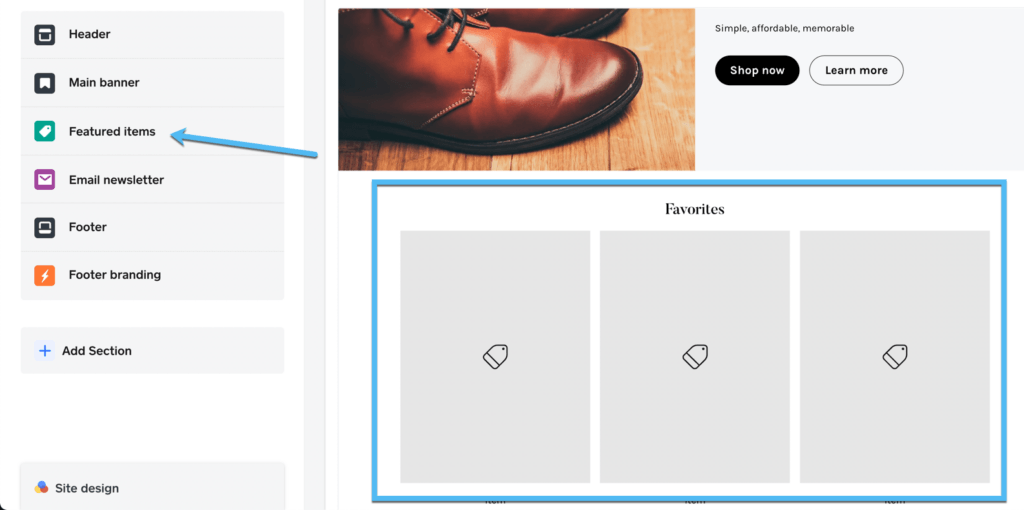
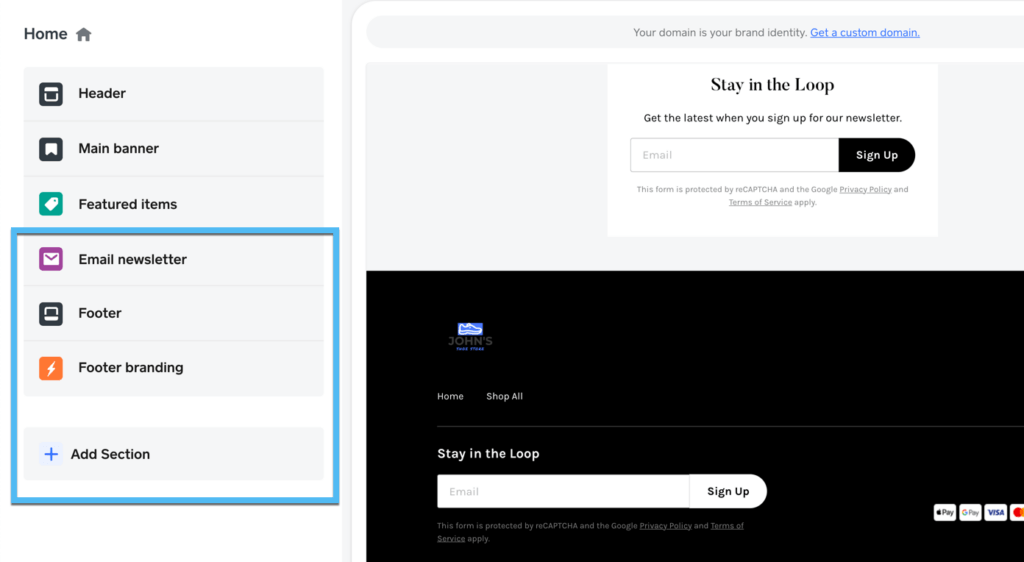
After clicking the Done button, Square sends you back to the main menu for the website builder, and it features menu items for customizing:
- The Header
- Main Banner
- Featured Items
- Email Newsletter
- Footer
- Footer Branding
And these are only the default sections added to get started; Square has an Add Section button to further customize the look and functionality of your website with more content blocks. You can also integrate with a wide range of apps and add-ons to expand functionality on your store and activate everything from dropshipping to a link with Amazon, eBay, or even WordPress.
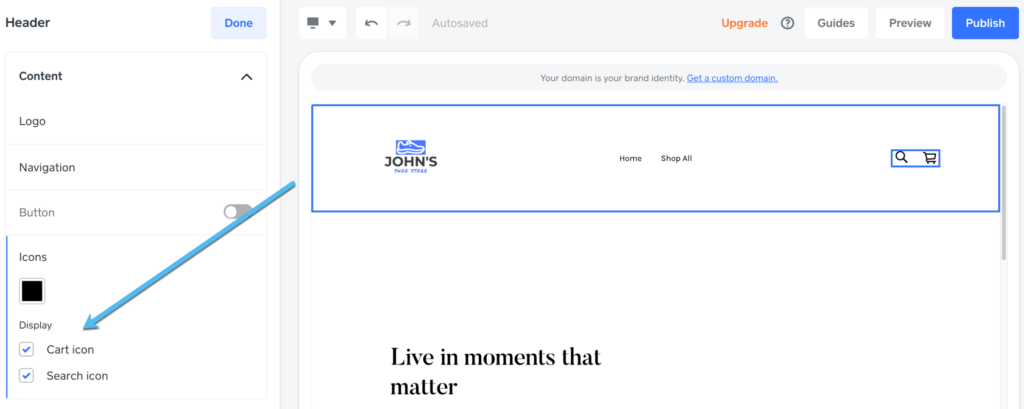
We encourage you to open each of these editing tabs to ensure the site looks the way you want. As an example, we can choose the Header tab to add or remove cart and search icons, change the navigation, and even insert a button.
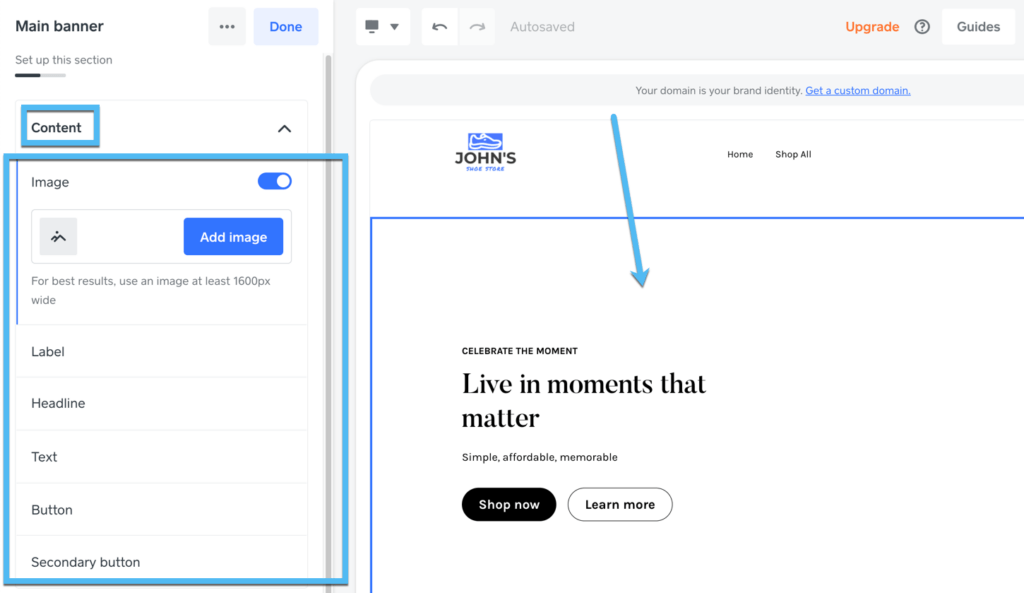
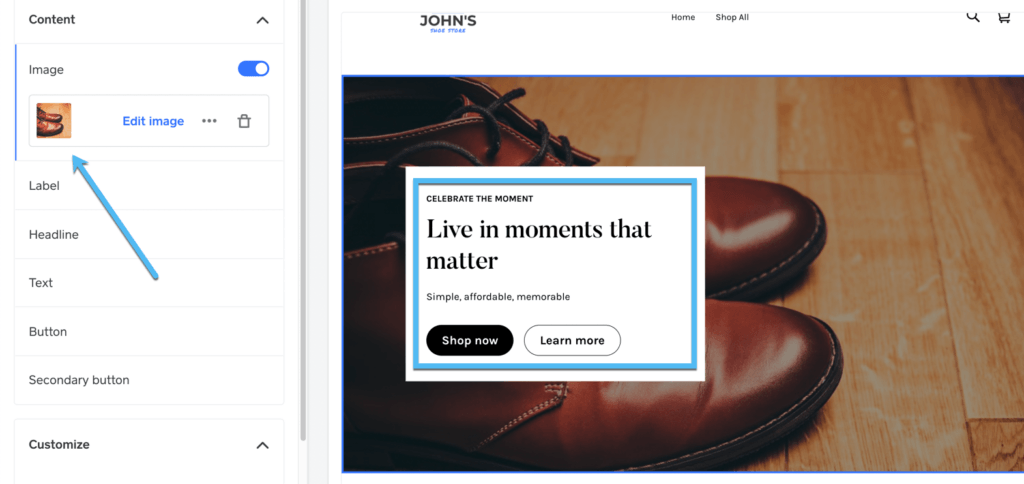
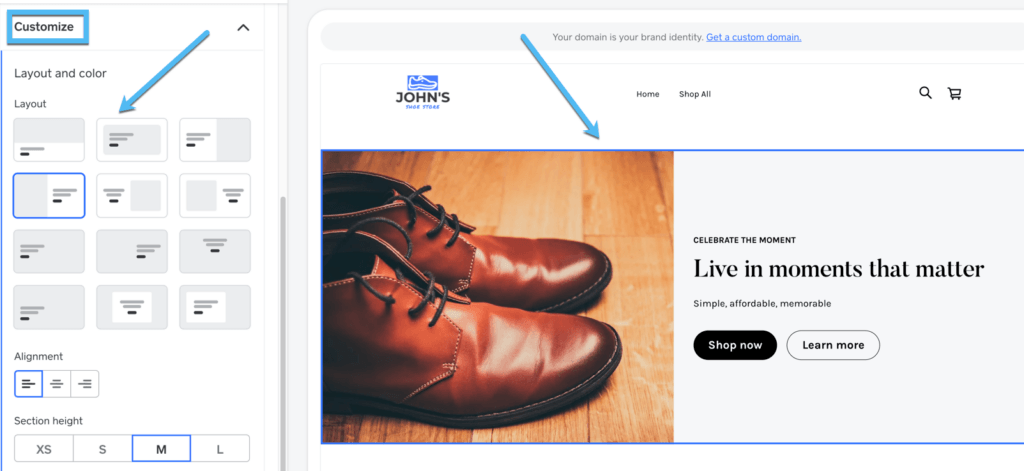
The Main Banner tab also includes helpful tools for adding an image to the banner area, incorporating buttons, changing up the text, and more. The preview to the right also functions as a drag-and-drop visual editor (perfect for beginners) if you'd rather click on an element and change things like text or drag an item somewhere else.
It's also worth mentioning that Square Online includes a direct link to free Unsplash photos for filling your ecommerce website with images. Otherwise, you can upload photos from your computer or Instagram.
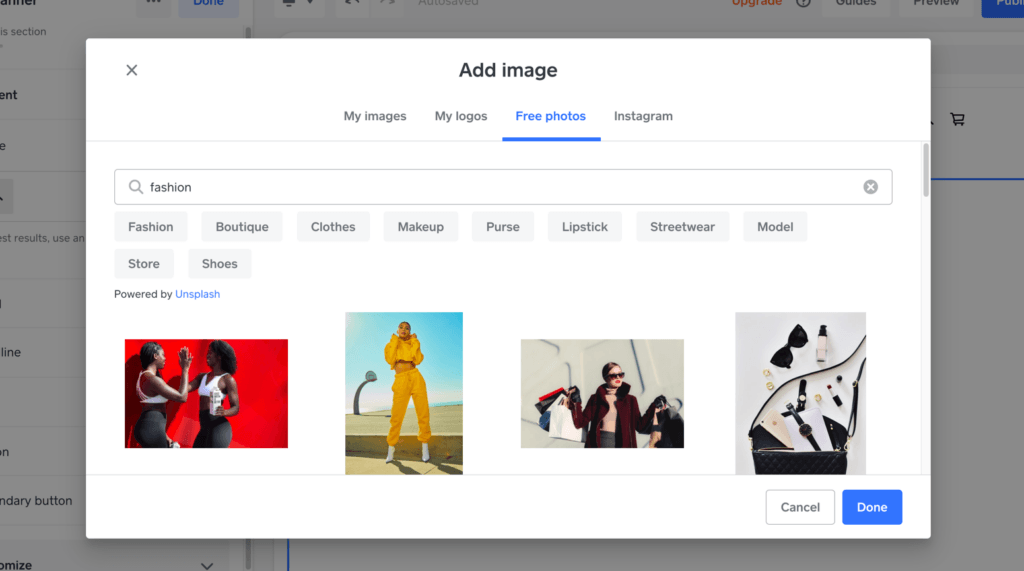
Once you choose an image, it uploads and appears on your ecommerce website banner. As always, you can edit all content shown, like if you wanted to change the welcome text, buttons, or headers.
Each content section provides unique customization options, like how the main banner lets you adjust layouts, colors, alignments, and section height.
Step 3: Add Products to Your Square Online Store
Learning how to create an online store for free wouldn't be complete without adding products!
Luckily, Square Online makes that easy with multiple options.
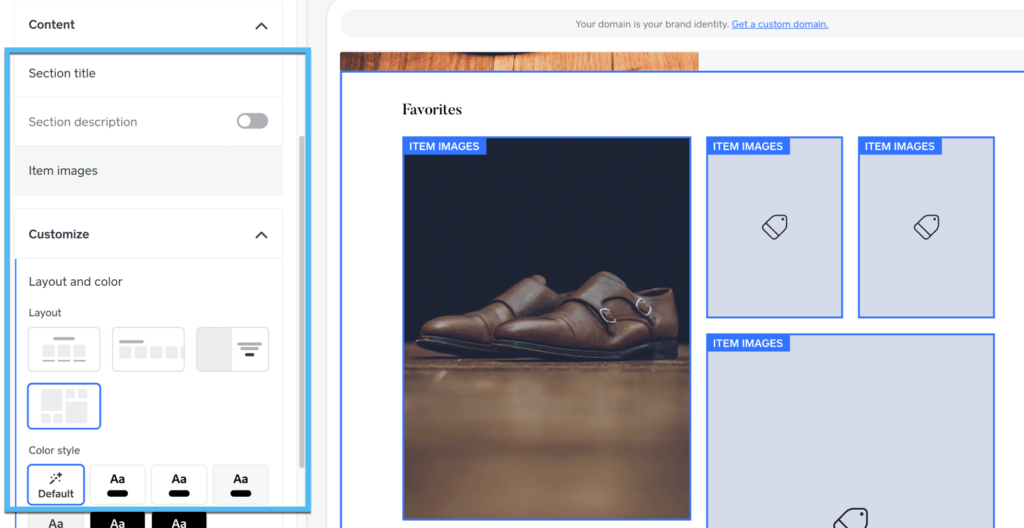
One method is to remain in the website builder and click the Featured Items section tab. By default, your site has a gallery of featured items on the homepage, so this allows you to complete two tasks in one by adding products to the store and displaying them on your website.
As an alternative, you can add products by going to the main Square Online dashboard and clicking on Items > Site Items > Create New Item.
For the Featured Items method, open the Featured Items tab, then click on the Create An Item button.
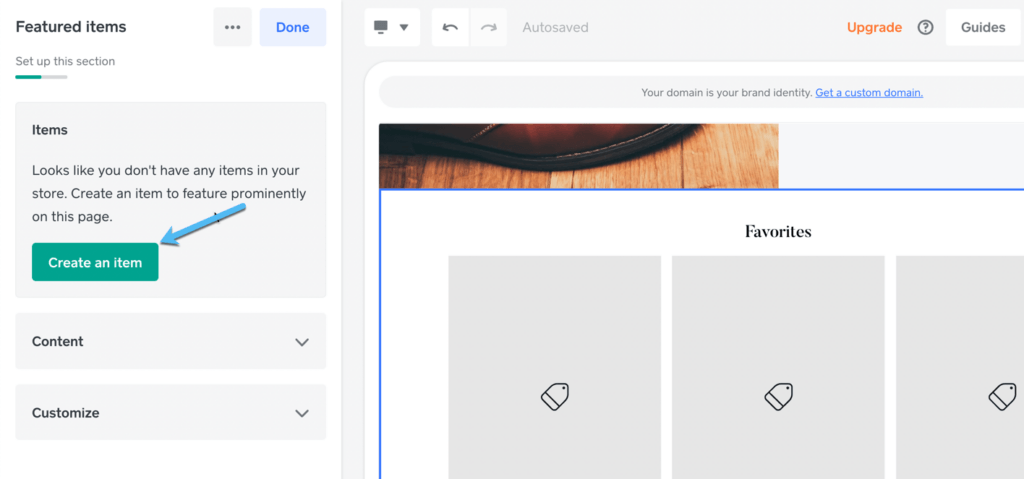
An Add Item pop-up window appears for you to quickly fill in information about the product and add it to your website.
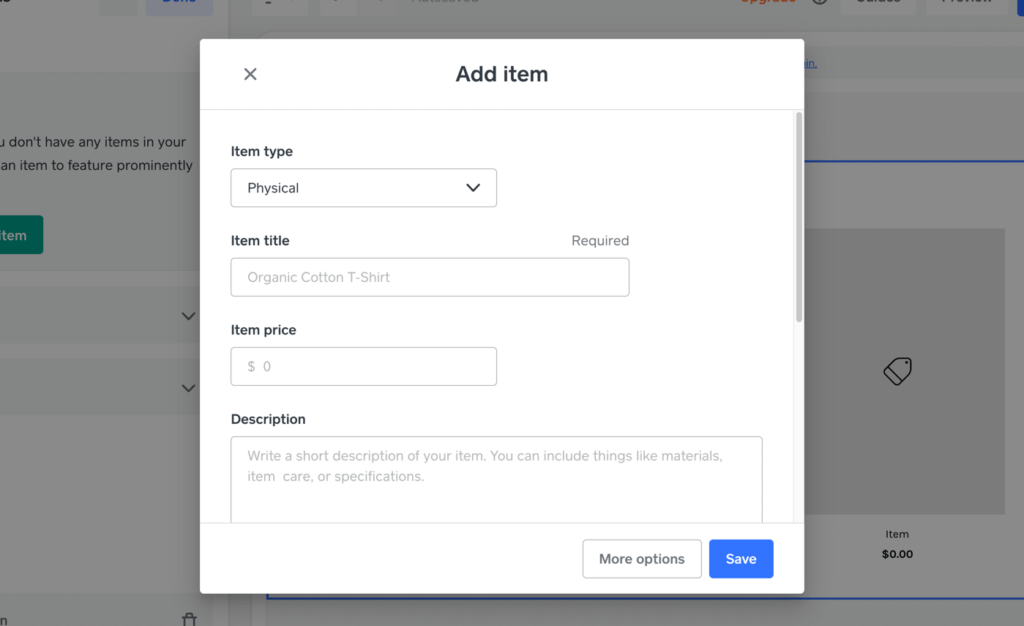
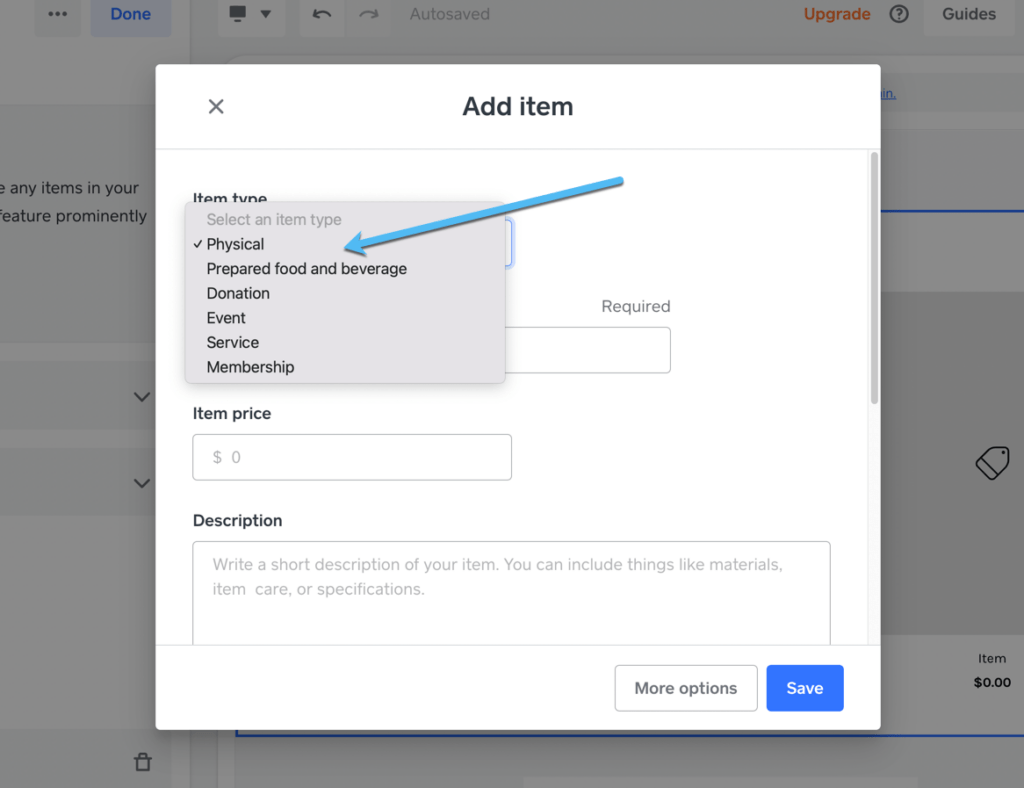
The first field asks you to select an Item Type. Options include Physical, Prepared Food, Donations, Events, and more. There's even a way to make it a Digital Product by going to the more comprehensive Site Items section in the main dashboard.
Note: Square lets you sell digital items for free, but the fulfillment method currently requires you to send a manual email with the digital files. Apparently, Square plans to add more automated fulfillment functionality in the future, which is great for those learning how to create an online store for free but want digital products.
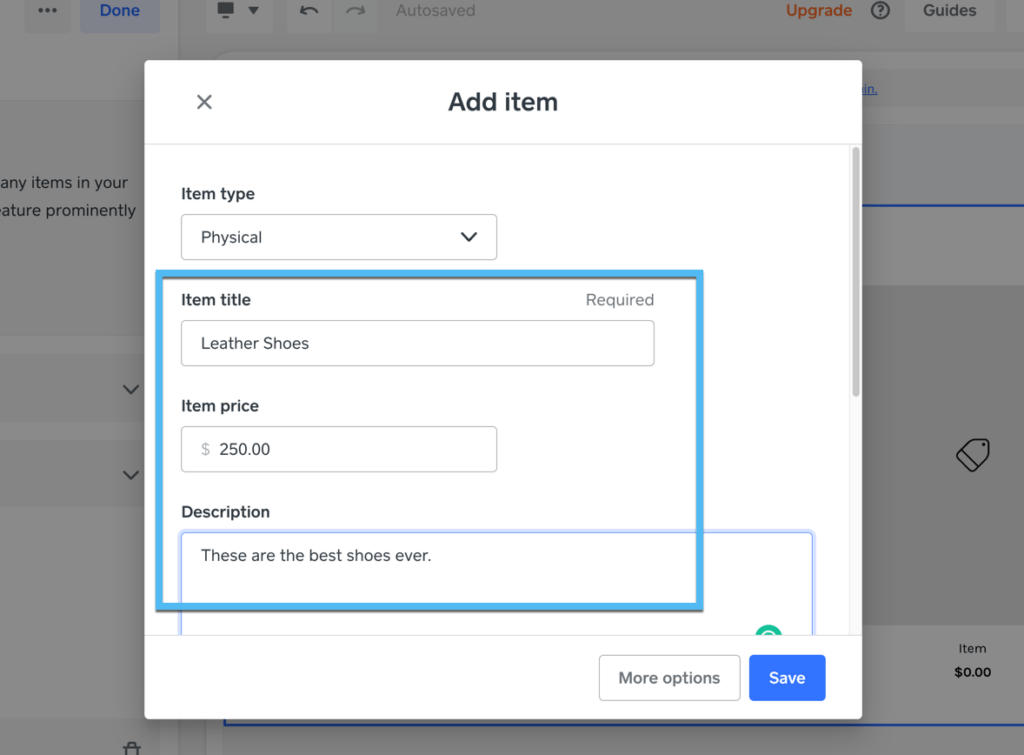
Fill in product fields for Item Title, Item Price, and Description.
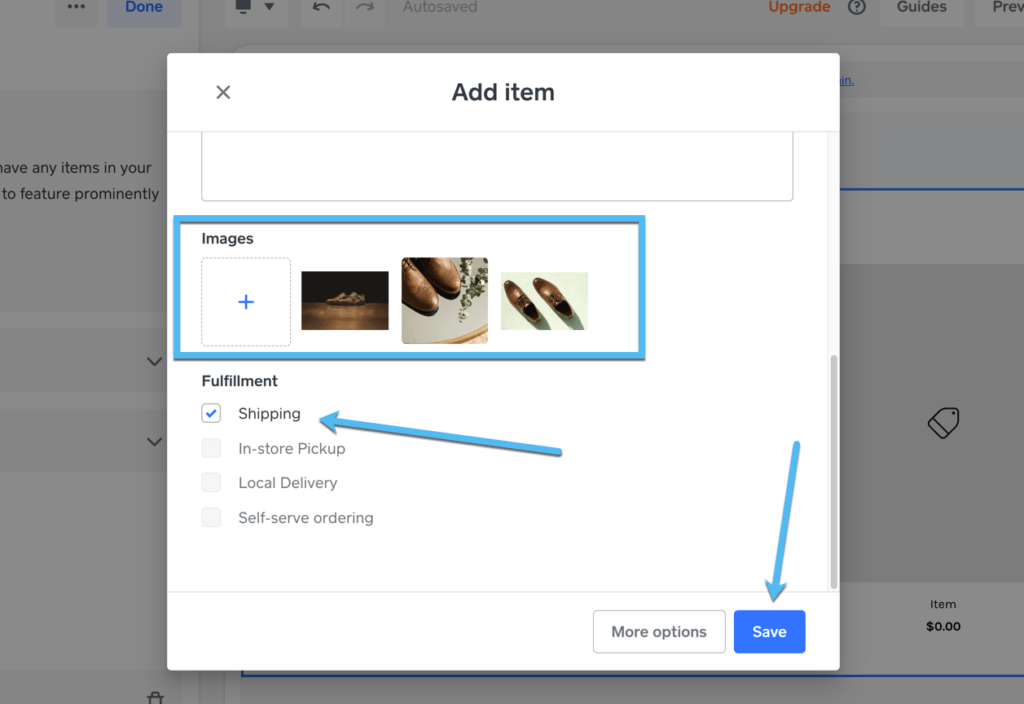
Upload images and mark the Fulfillment field with something like Shipping or Local Delivery (these are store-wide settings that may be blurred out if you didn't activate them during the setup process).
Make sure you hit the Save button to add the product to your store.
The saved product now appears in your store's inventory list, and it shows up in the Featured Items section of your homepage.
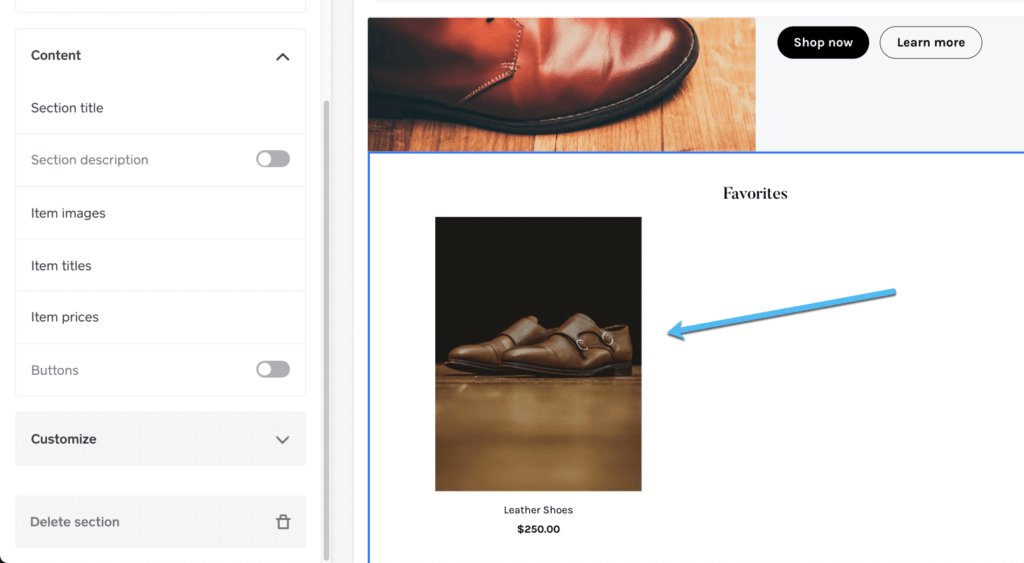
Feel free to customize the Layout and Color of that section to present your products the best way possible.

Although the Header, Main Banner, and Featured Items sections are the most important parts of designing your site, we also encourage you to customize sections like the Email Newsletter, Footer, and Footer Branding; or simply remove them if you don't plan on using them.
Once you add several products, they all appear on the Featured Items section in a beautiful gallery!
Step 4: Set Up a Domain
Is it possible to add a free domain to your free online store? Yes and no.
Square Online does in fact provide a free Square sub-domain, making it the closest thing to a free online store builder you can find. And you can also add a custom domain, but you must upgrade to a premium account in order to do so.
Therefore, your options are either to:
- Use a free website builder like Square Online and pair it with a free sub-domain.
- Sign up for a premium Square Online account and transfer a free domain you got from elsewhere.
- Find a website builder that offers free domain names when you sign up for a premium account (Square Online, Shopify, and many others offer this).
As you can see, getting a completely free online store isn't perfect. You eventually must pay for a domain name or a premium account. Having said that, we feel that Square Online is the closest thing to free since you can run an online store on a free Square sub-domain, then upgrade when you're ready to add a custom domain.
In order to add a domain to your Square Online store, click on Setup Guide > Set Up Your Domain.
Choose from the three options:
- Find a Custom Domain: you search for a domain and purchase it through Square.
- Use a Domain I Own Elsewhere: more technical to transfer over, but this allows you to find a free domain somewhere else.
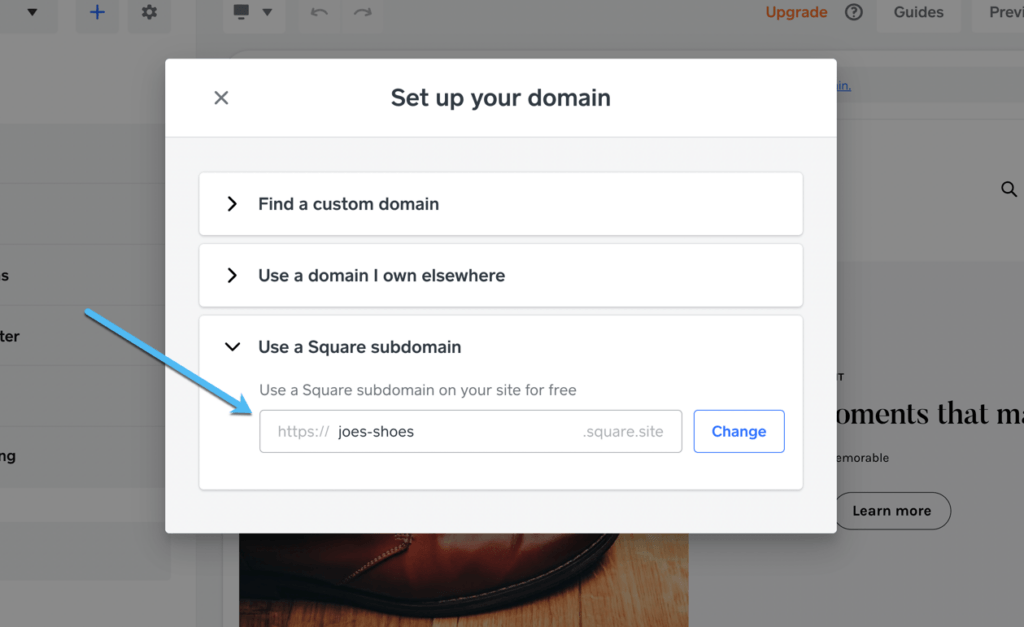
- Use a Square Subdomain: actually free!
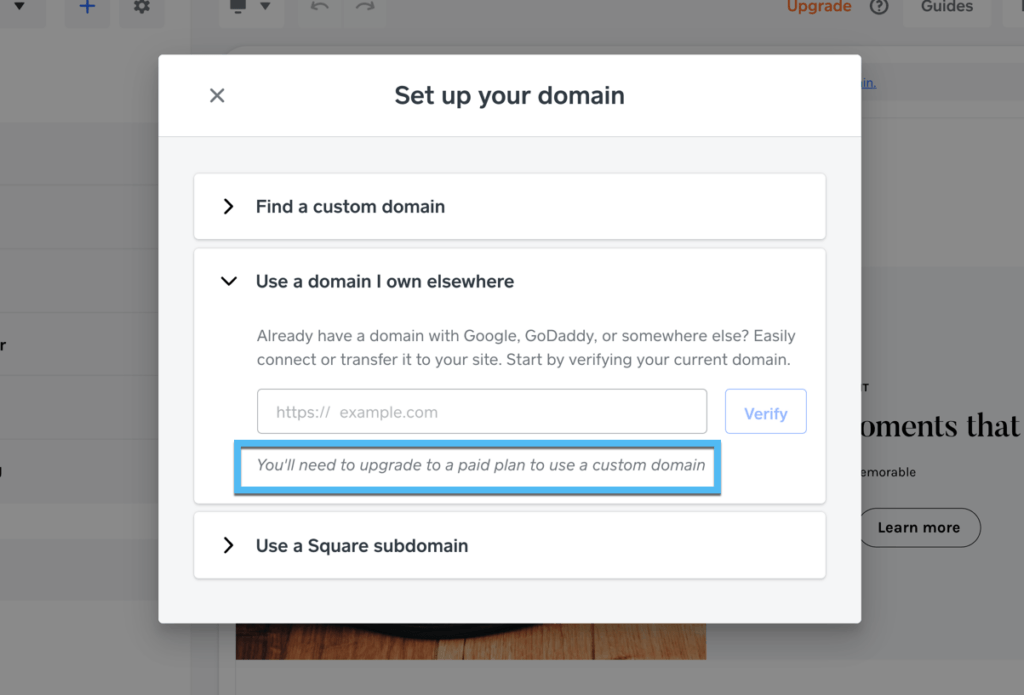
Considering we're trying to learn how to create an online store for free, this tutorial sticks to the free Square sub-domain. Simply type in the sub-domain you want and click on Change.
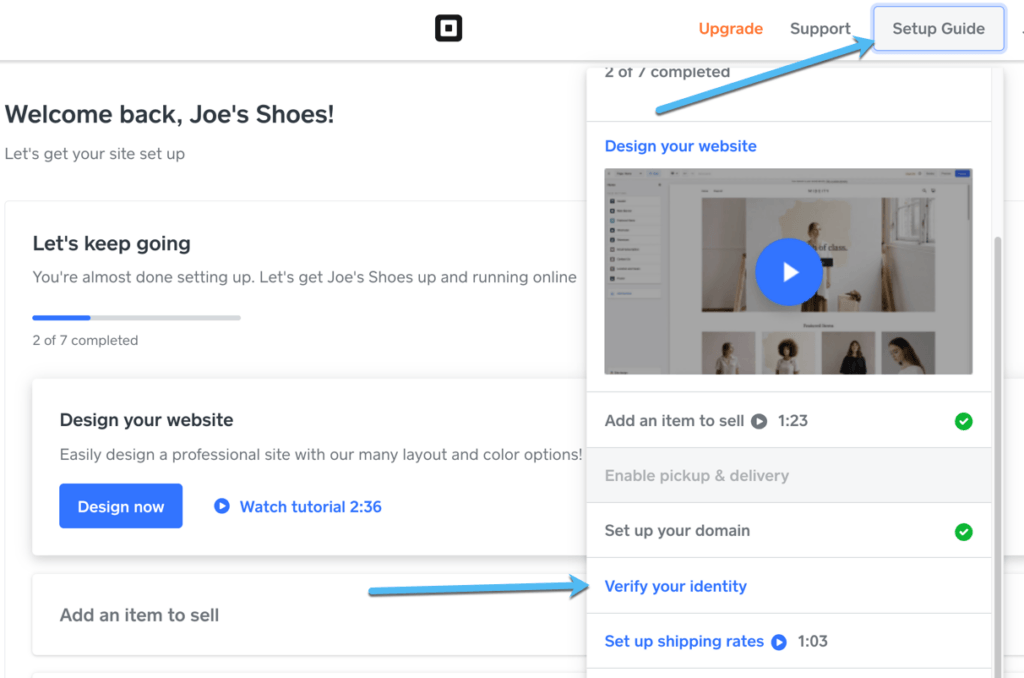
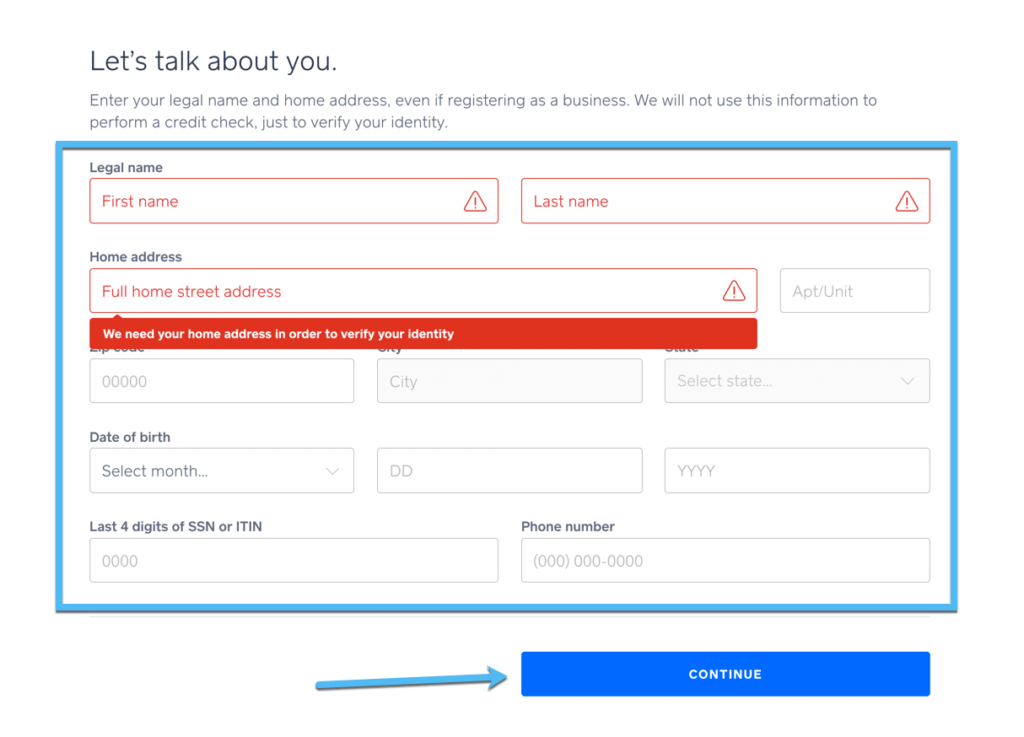
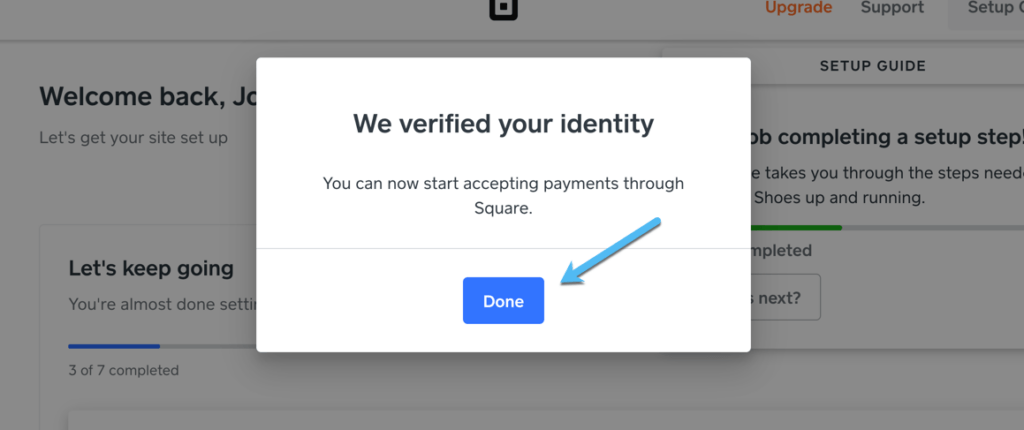
Step 5: Activate Online Payment Processing by Verifying Your Identity
As you may have assumed, Square's main business is its payment processing, so it integrates directly to the Square payment option for accepting payments through your store. As with all Square accounts, they run a quick identity verification to activate your account.
To complete this process, click on Setup Guide > Verify Your Identity.
Note: Seeing as how Square is selling its own payment processor, you can't integrate with options like Stripe or Authorize.net.
Fill in fields for your Legal Name, Home Address, Date Of Birth, and more.
Click Continue.
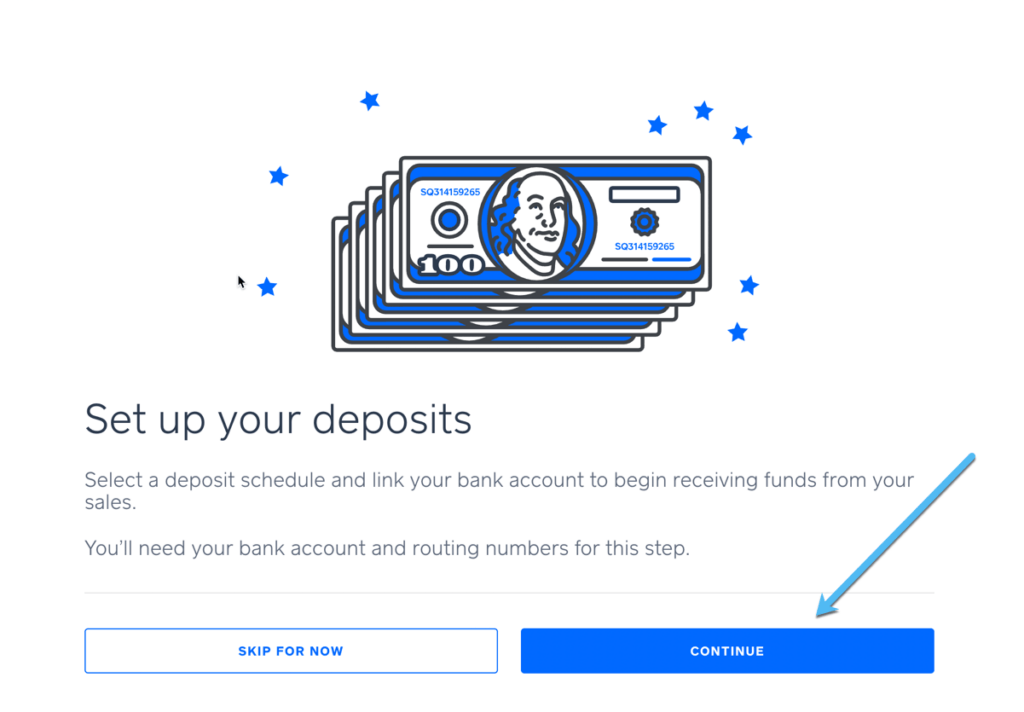
The next steps walk you through the process of linking a bank account for deposits. Choose the Continue button.
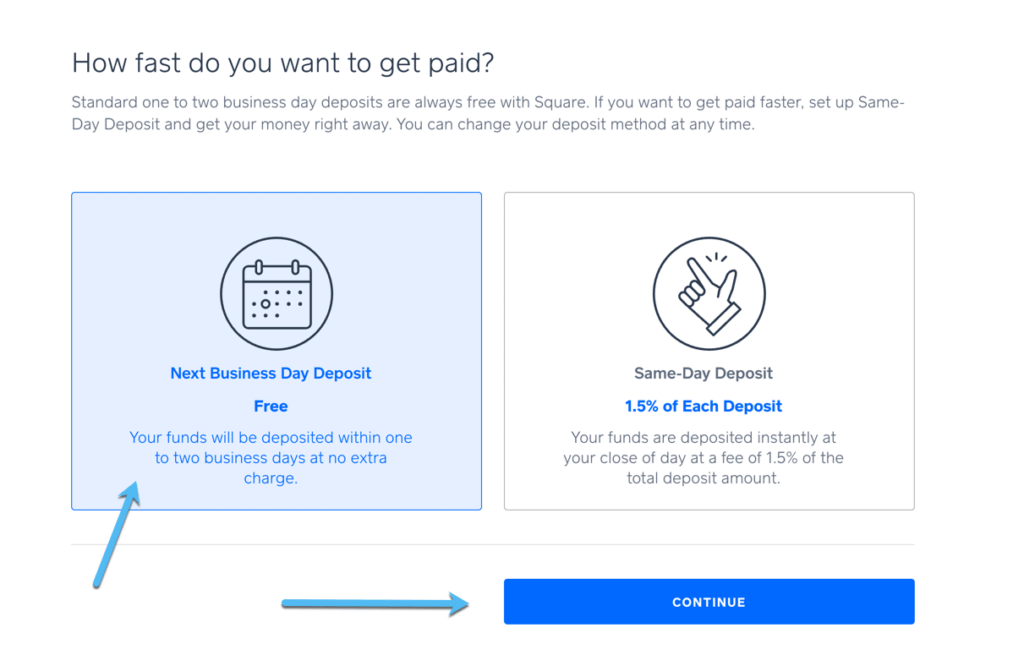
Pick whether you want to get paid the day after a transaction occurs or on the same day. The faster deposits take a 1.5% fee. We recommend the Next Business Day option since that's not long to wait, and because that 1.5% fee gets added to the 2.9% +$0.30 transaction fee, making all of your transactions more expensive.
Click Continue.
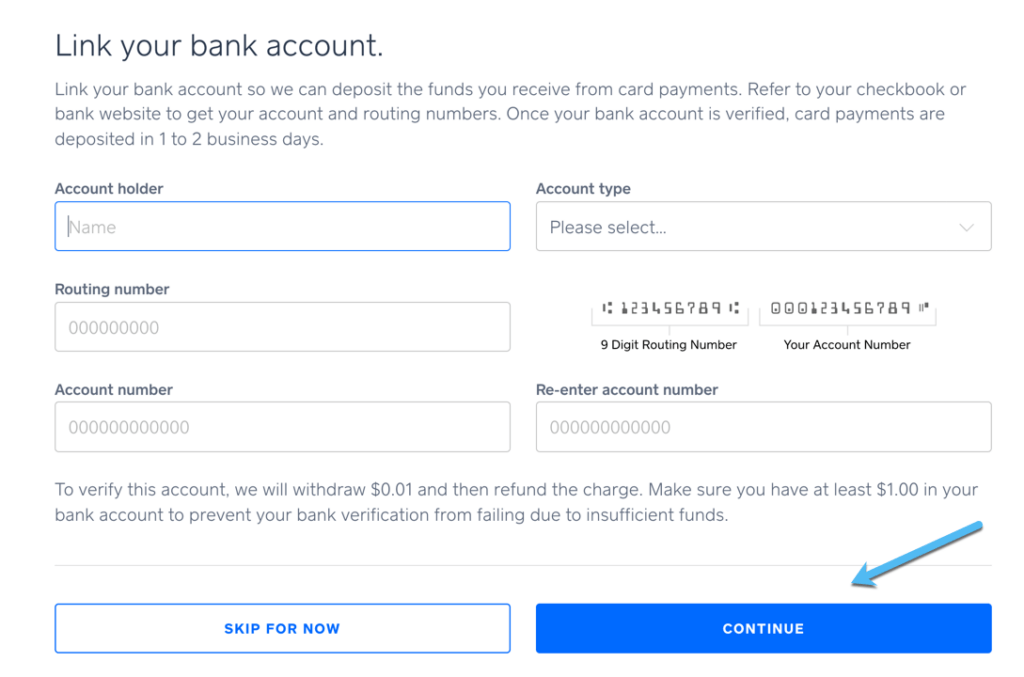
Now it's time to link to your bank account. Type in information like the account holder, routing number, and account number. Click Continue when you're done.
After all that, Square tells you if your identity was verified. If so, you've successfully configured payment processing for your online store.
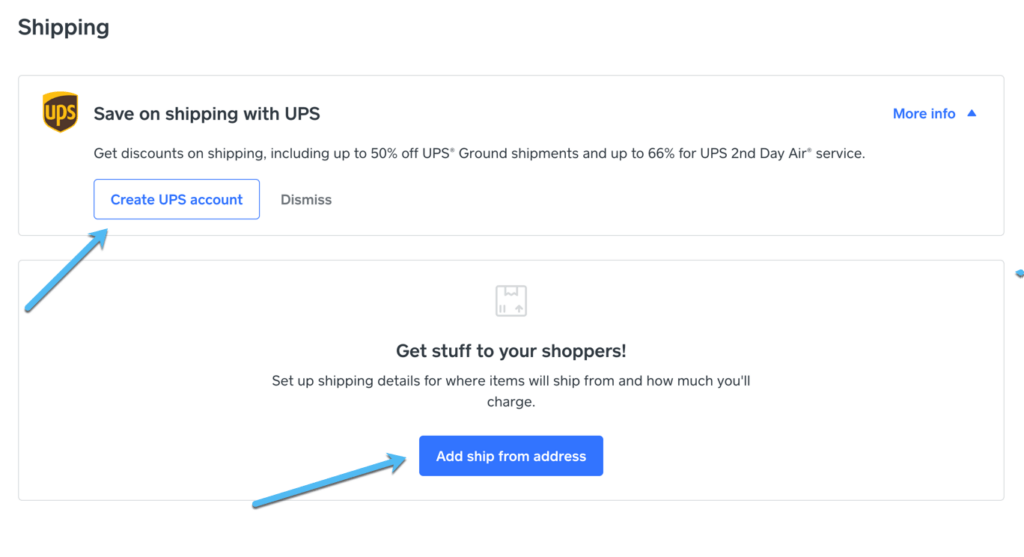
Step 6: Configure Shipping Rates
You'll need to set up shipping rates in order for the Square store to operate properly. Go to Setup Guide > Set Up Shipping Rates.
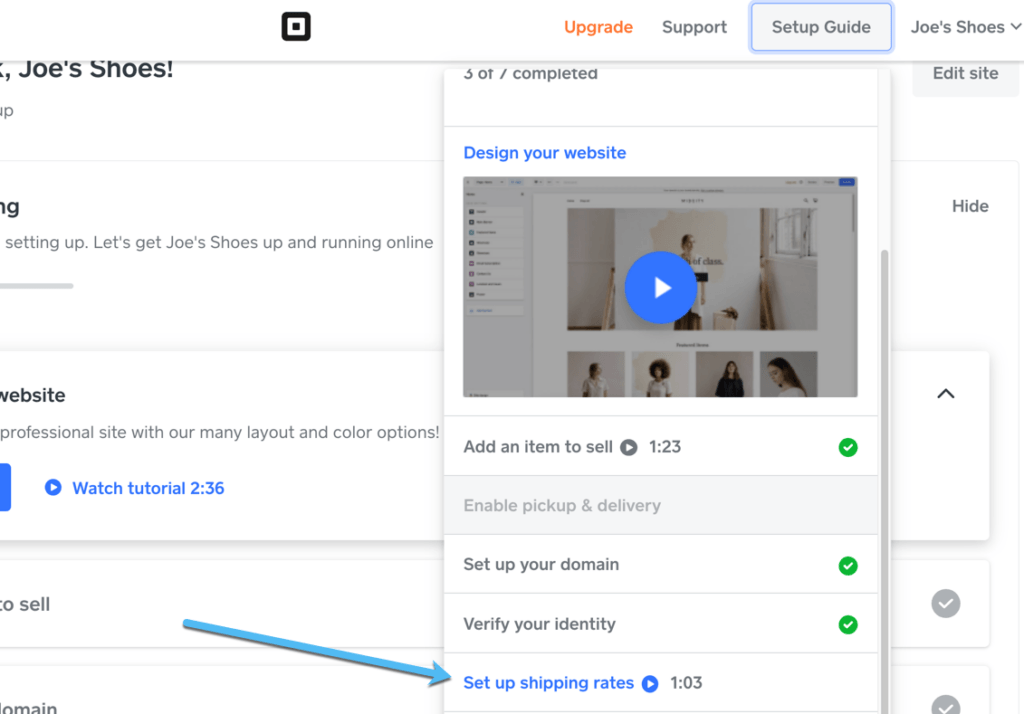
In this module, you can either create a UPS account for live shipping rates or add shipping rates based on the address from which you're shipping.
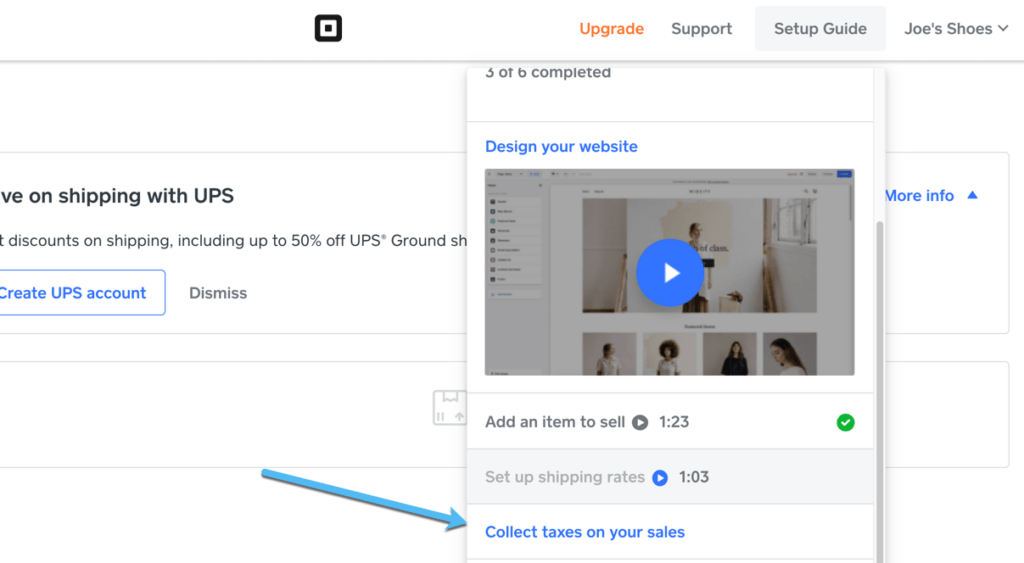
Step 7: Collecting Taxes
Most online transactions require you to collect taxes, so Square makes that part of the configuration process from the start.
It's one of the last tasks you must complete before publishing your site, and you can access the settings by going to Setup Guide > Collect Taxes On Your Sales.
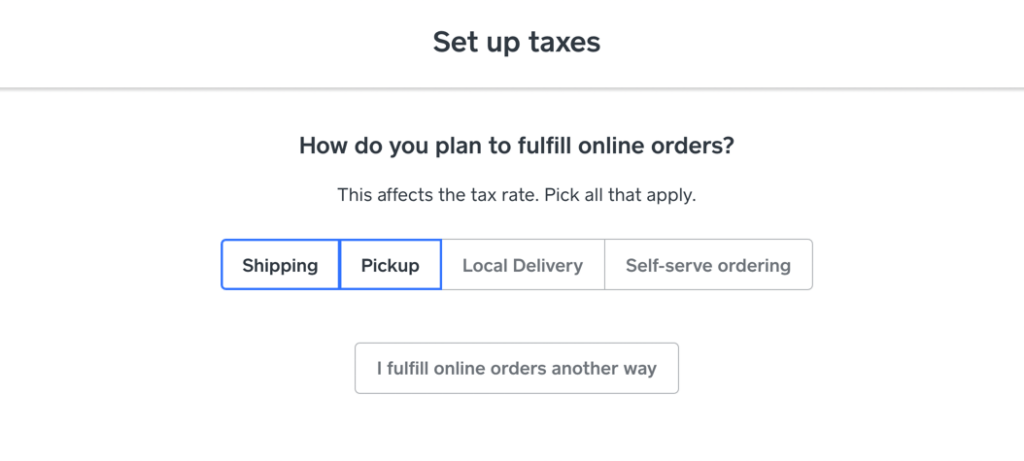
Mark how you plan on fulfilling orders, as this selection may vary the way in which you collect taxes from customers.
You can choose Shipping, Pickup, Local Delivery, Self-serve Ordering, or Other.
Click the Next button when you're done.
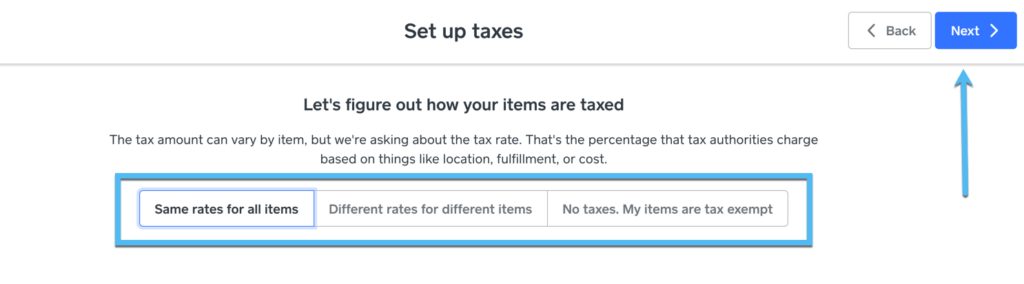
You can then specify how your items get taxed. Options include:
- Same rates for all items
- Different rates for different items
- No taxes – my items are exempt
After picking one of those, click on the Next button.
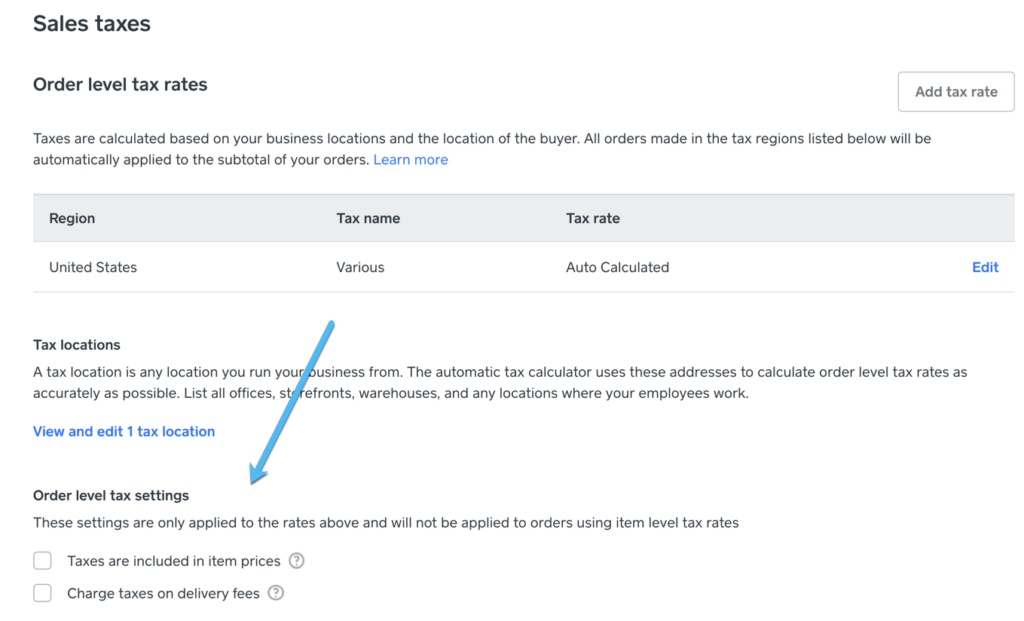
Square Online does a pretty good job of automating the taxation process, seeing as how it pulls live data for specific states and municipalities. You can then activate the different tax rates presented or turn them off. Click Save to finish.
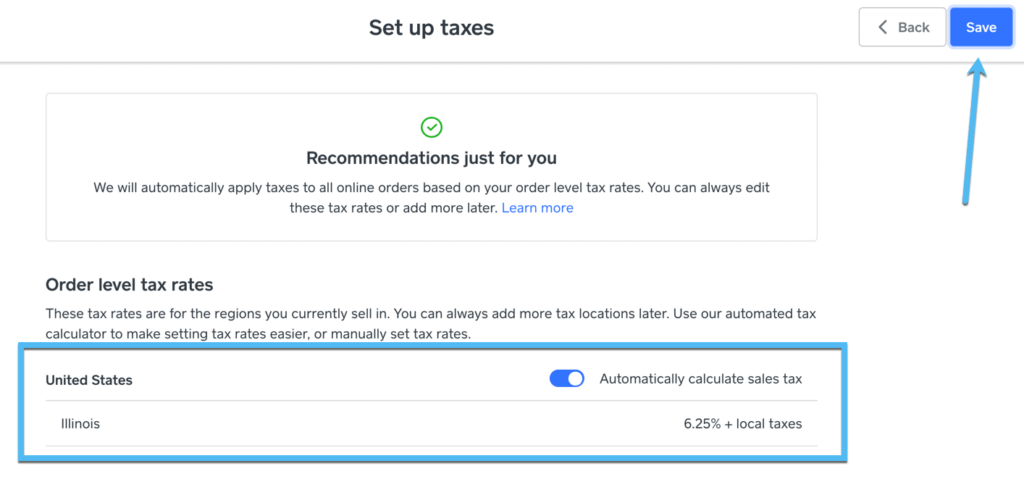
Square provides several other optional tax settings as well, just in case you want to include taxes in your item prices, charge taxes on delivery fees, or something similar.
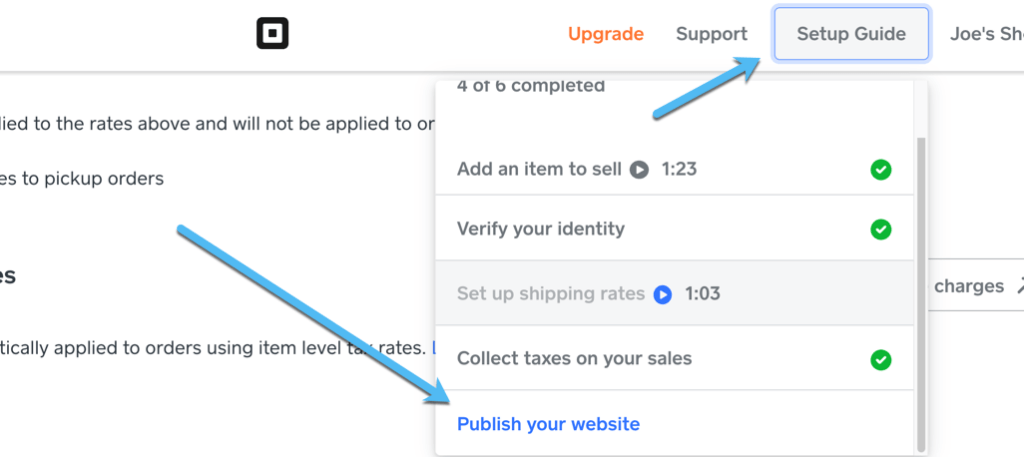
Step 8: Publish Your Free Website
You've configured every part of your website, so now it's time to publish. To do so, go to Setup Guide > Publish Your Website.
You'll see a confirmation popup, along with a URL to visit the frontend of your site.
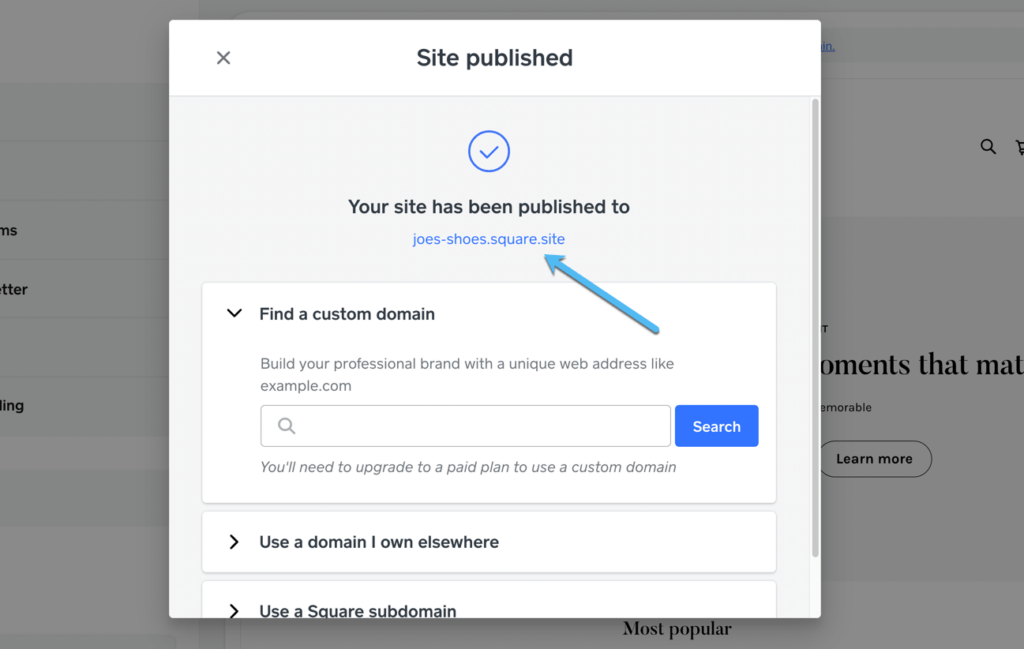
The main dashboard also provides a link to your website at all times.
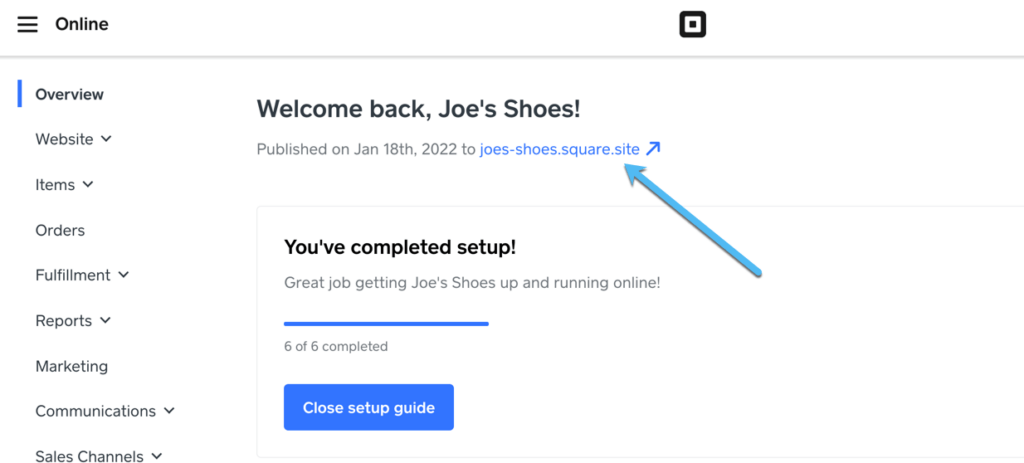
We encourage you to visit the frontend, test out buttons, see what you still need to change, and process some test payments. This way, you know the site works properly and customers aren't left with a questionable user experience.
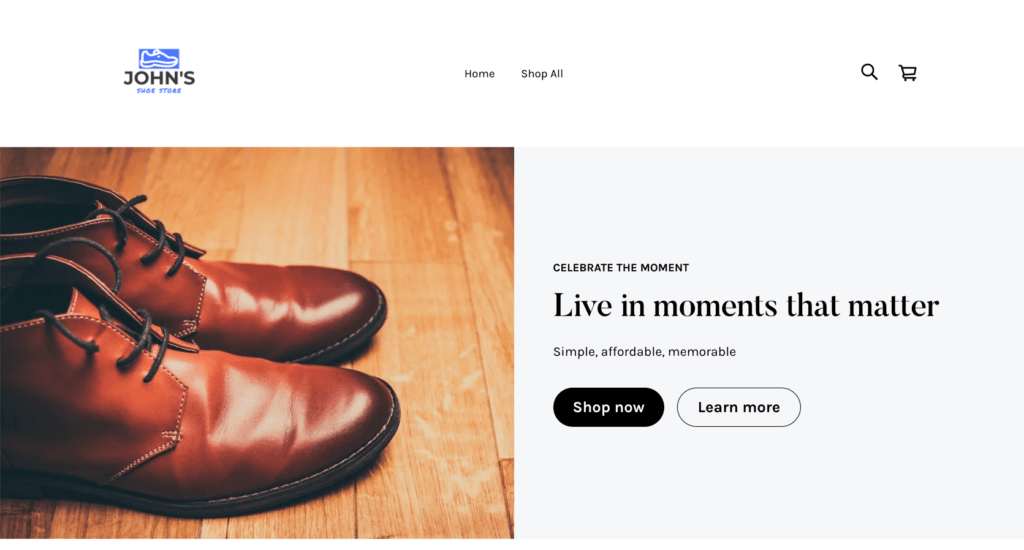
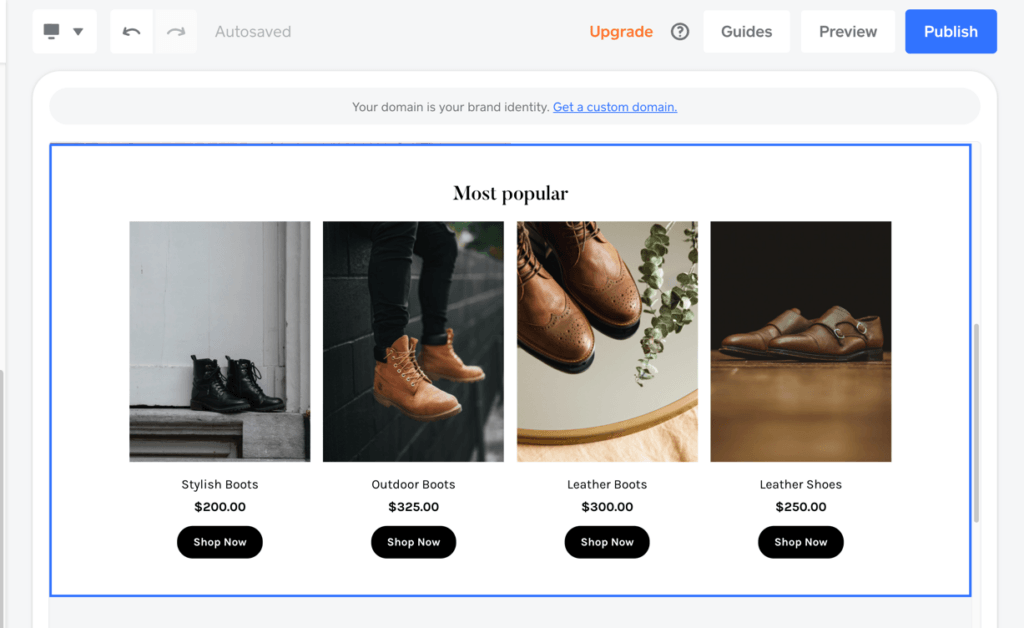
As you can see, all Square Online websites have a complete Shop page with filters, sorting, and a gallery of your products.
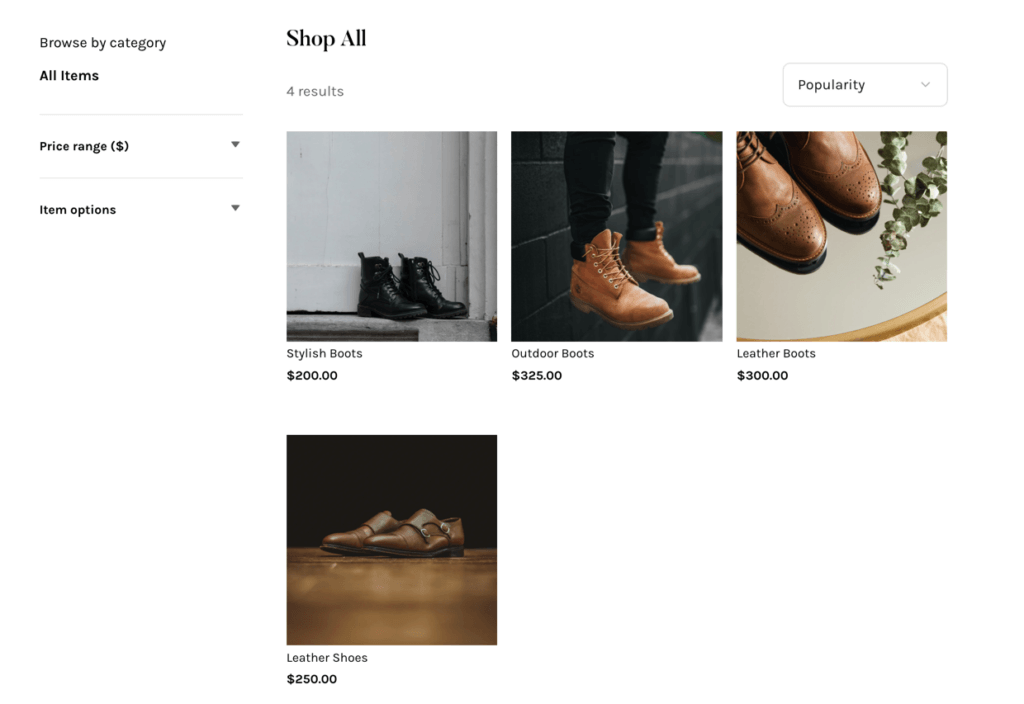
And the product pages highlight everything from product titles to pricing and Buy buttons to the product descriptions.
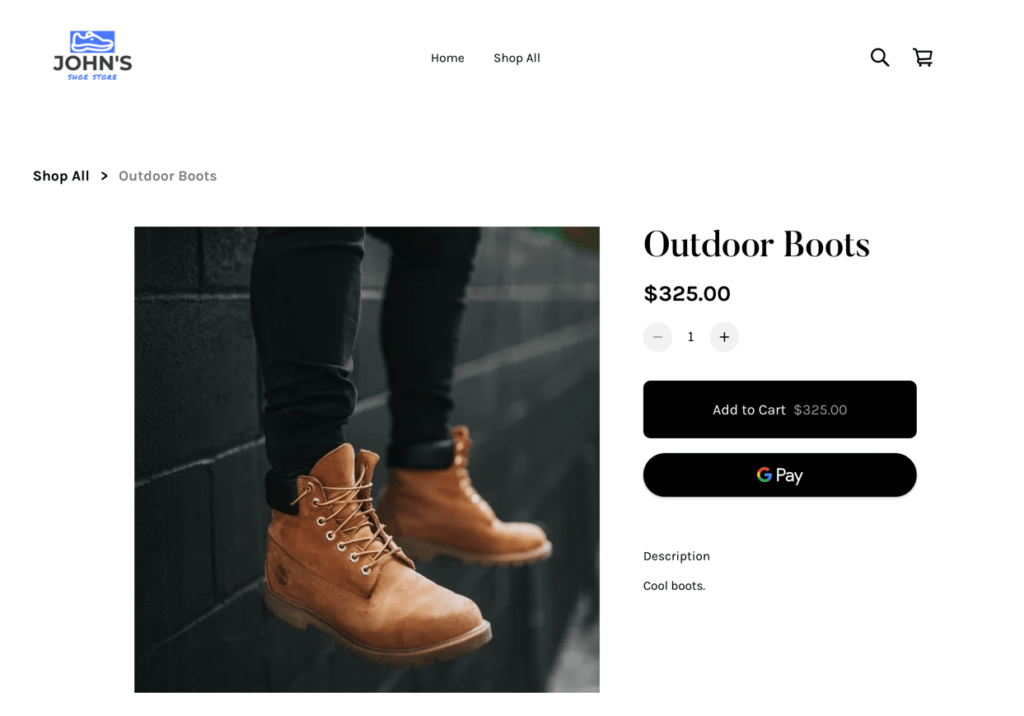
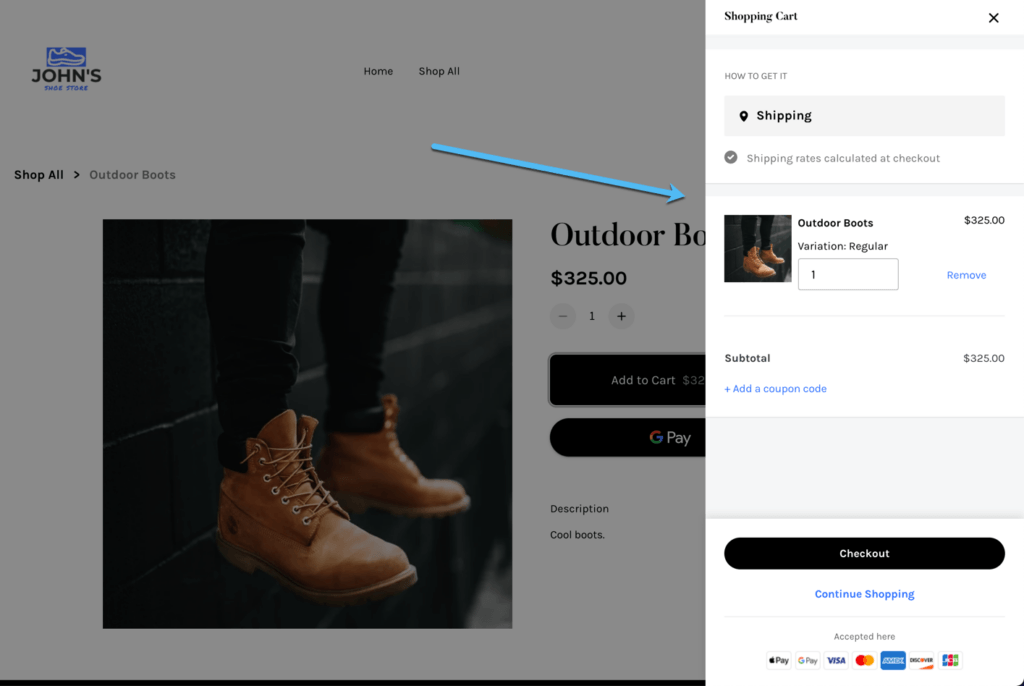
Finally, free Square Online sites include shopping carts that slide into view, allowing for a seamless, user-friendly environment. The customer eventually clicks on the Checkout button, where they can type in their payment information to make the purchase. Other payment methods, like Google Pay and PayPal, are possible as well.
A Note About Transaction and Credit Card Fees
You'll notice that some ecommerce platforms charge transaction fees ranging from 1% to 10% when using their systems for free. So the platforms are technically free in terms of upfront costs, but there is an ongoing charge when you sell. Luckily, options like Square Online and Sellfy don't have these transaction fees.
However, there's no escaping credit card processing fees. Every payment processor collects fees when customers used credit cards, essentially paying the card providers for the pleasure of using their services. The standard is 2.9 + $0.30 per transaction. Don't use anything higher than that.
Additional Platforms to Make an Online Store for Free (Or Almost Free)
As mentioned earlier, it's uncommon to find an entirely free ecommerce platform. Square Online is the closest thing to free, but you're still left with a Square sub-domain, or you must upgrade to a paid plan in order to import a free domain from somewhere else.
Here are some other platforms to help you make an online store for free, or at least close to it:
- Sellfy: They offer a truly free plan with support for unlimited sales and no transaction fees. However, you're limited to 10 products, and you can only sell physical items. You get a Sellfy sub-domain; custom domains only work in the premium plans.
- Ecwid: You get a free plan with no transaction fees and the ability to sell physical (but not digital) products. You're limited to 10 products and receive a free Ecwid sub-domain. Custom domains require an upgrade.
- Shopify: They have a 14-day free trial to build a complete online store until you're ready to launch.
- Wix: This platform actually has a free personal website plan, but online stores will need one of the affordable ecommerce plans. They also have a 14-day free trial period and free domain names with most premium plans.
- BigCommerce: Use the 15-day free trial for building a site before launching.
Places to Get Free Domains
The following sites provide free domain names:
Those are all fine sites to save a few bucks on personal domain names, but they're generally not recommended if you want to make your online store look professional. Not to mention, transferring that free domain over to an ecommerce platform (which is eventually going to happen) means you'll need to pay for the platform's premium plan, anyway. So, you're probably not saving much money there.
We suggest using NameCheap when learning how to create an online store for free and get a cheap domain, since it's by far the most reputable, inexpensive domain name registrar. Or, simply purchase a domain through your host or website builder, since that's definitely easier than transferring over DNS information from another registrar.
Summary
In this article you learned that:
- It's not easy to find a platform that lets you make an online store for free. However, there are some options that either get close to free or allow you to make a free ecommerce shop on a subdomain.
- Square Online is your best bet when learning how to create an online store for free. Mainly because it has the fewest restrictions on selling products with the free plan.
- Sellfy and Ecwid are also great, but they limited you to 10 products in their free plans.
- You're stuck with a subdomain from the platform if you want to keep everything completely free. All platforms we've tested require a premium plan if you want to use a custom domain.
- There are some ways to get free domains, but they're mainly for personal branding or a hassle to obtain. Go with NameCheap for the lowest price possible.
- You should factor transaction and credit card fees into your expenses, even though they're not upfront fees.
- Apps, plugins, and other extensions may end up costing something, depending on what you pick.
- Shopify, Wix, and Bigcommerce all offer extended free trials, and some of them provide free domains for a period of time.
Share your thoughts in the comments if you have any experience on how to create an online store for free!


Comments 0 Responses