
Printify and Shopify: What do these have in common? They're both platforms for helping you sell products online, and they each work together to provide a print-on-demand fulfillment process for selling those items.
Essentially, running a print-on-demand store – where designs are only printed on products like shirts and canvases once a customer orders them – requires two major elements: an ecommerce platform for building an online store and a product design and fulfillment platform.
The ecommerce platform is Shopify, allowing you to make an online shop; the product design/fulfillment platform is Printify. In this article, we'll show you how to use Printify with Shopify to establish an efficient product creation and sales process.
We'll talk about everything from the basics of both Printify and Shopify, as well as how to walk through all of the steps of making the integration.
There are plenty of other ecommerce platforms–like Bigcommerce and WooCommerce–and other print-on-demand tools–such as Printful and TeeLaunch–but we're focusing on using Printify with Shopify because they both have some of the strongest reputations in the business, offer affordable pricing (it's completely free for Printify), and provide simple tools for anyone to get into the print-on-demand game.
With that said, keep reading to learn all about how to use Printify with Shopify for print-on-demand fulfillment.
What is Printify?
Printify is a standalone print-on-demand service that offers the following solutions and tools:
- An online designer to create your own product designs, make mockups, and send them to your online store.
- Over 300 quality products ranging from t-shirts to leggings, and phone cases to hoodies, all of which are blank and ready for you to print your designs on them.
- A large print network for getting products designed in different countries and shipped to the right customers.
- A print-on-demand fulfillment process that links to your store and sends the orders to the right fulfillment centers for printing.
- A Shopify app for an instant integration with your store.
- A pricing and product page module, which helps you generate everything from product mockups to profit margins and send them to your ecommerce website.
- Integrations with a wide variety of marketplaces like Etsy and eBay, allowing you to not only sell on your ecommerce site but anywhere on the internet.
- The ability to order product samples before selling them to customers, at a discounted price.
Overall, Printify empowers online merchants to generate product designs then have them printed on products. However, you don't need to purchase in wholesale bulk quantities since Printify offers a network of printing and fulfillment centers that only complete a print and ship it out to the customer as every individual order comes through.
Not only that, but Printify offers a powerful product designer, a mockup generator, and an app that makes for a quick integration with your Shopify store (covered below).
But what does Printify cost? That's what makes it even better. You don't have to pay anything until you make a sale. Printify has a free plan that supports five stores per account, along with unlimited product designs. That also gets you the mockup generator, an integration with Shopify, marketplace connections to Etsy and eBay, and full customer support. You do, however, have the chance to upgrade to the Premium plan, which starts at $24.99 per month and provides some intriguing benefits like a custom order import and up to 20% off discounts on all regular product costs.
What is Shopify?
Shopify, on the other hand, serves as one of the most popular ecommerce platforms on the market.
It includes features like:
- A complete website designer.
- Templates to launch a site design based on your own branding needs.
- A drag and drop builder for the homepage.
- A world-class ecommerce shopping cart built into the system.
- Tools for creating product pages and listing them on the website.
- A wide variety of payment gateway integrations, most of which only require the click of a button and an account sign up. The payment gateways are how you collect money for all of your sales.
- Store management tools for customer profiles, dropshipping, refunds, and customer groups.
- Marketing and SEO features for things like discounts, selling on Facebook, and creating online ads. You can also run full email marketing campaigns from the convenience of your Shopify dashboard.
- Support for unlimited products, along with more unique items like digital products or those where you're charging a subscription.
- Web hosting and domain names so that you don't have to go out and find your own.
- A mobile app for managing your inventory and orders.
- 24/7 customer support and a robust online knowledgebase.
- An analytics center for checking on your sales.
- An app marketplace for expanding upon the functionality of your store with apps for social media, marketing, accounting, and more.
That last point about the app marketplace is an important one since Printify integrates with your Shopify ecommerce store using a third-party app.
Therefore, Shopify works as your primary website, ecommerce hub, and the place you manage everything from marketing to discounts, and analytics to SEO.
So, what's the pricing for Shopify? You can sign up for a 14-day free trial to get an idea of whether or not you like Shopify. This means you can integrate Printify with Shopify for a full two weeks, build out your store, and see if a print-on-demand company is right for you – all for no cost or commitment.
After that, you'll be prompted to sign up for a Shopify account. You can read our guide on Shopify pricing, but we generally recommend the $79 per month Shopify plan as the best value, especially when it comes to a print-on-demand business. There are other options as well, including the Basic Shopify plan ($29 per month), Advanced Shopify ($299 per month), and Shopify Plus (starting at $2,000 per month for enterprise-level businesses). There's a $9 Shopify Lite plan as well, but that's not really a viable solution if you're trying to run a print-on-demand business and integrate with Printify.
How Do They Work Together?
You can connect Printify with Shopify by using the Printify app, which is located in the Shopify App Store.
After that, Shopify handles tasks for web design, order management, payment processing, hosting, and product page creation. Printify serves as a trusty partner with Shopify, where you can design your products, make mockups and product pages, then sync those details with your Shopify website. Printify, however, is more than an online design tool. The company also has a physical network of printing providers and fulfillment centers.
Here's the step-by-step process:
- You upload a design to Printify and place it on a product, then configure details like pricing, product descriptions, and mockups.
- You sync all finished items with Shopify, as a result, creating product pages for each of them in your online store.
- A customer comes to your ecommerce business and buys one of the items.
- The transaction gets approved by your payment processor and the total list price of that item gets charged to the customer's card. The merchant receives the full payment (minus credit card fees) into their merchant business account.
- A notification of the sale gets sent to Shopify, which in turn delivers a notification to Printify for printing.
- Printify accepts the order and prints your design on the specified item.
- Printify packages the finished product and ships it out to your customer. You and the customer receive a shipment tracking code.
- Printify eventually charges you for the cost it took to make that item, leaving you with a certain profit depending on your sale price.
- The order gets marked as fulfilled in both Shopify and Printify, then the process starts all over again.
With this setup, the merchant doesn't have to handle any warehousing, printing, storage, or shipping. That makes for extremely low overhead costs, along with the benefits of not having to pay for wholesale merchandise. With print-on-demand, you're only paying for the items when a customer comes to your store and orders them.
There are plenty of advantages to running a business like this, but don't forget some of the downsides, such as higher per-unit product costs and the fact that you do lose a little print quality control (although this can be rectified by ordering product samples before sending anything out to customers).
How to Use Printify with Shopify – Video
In this exciting video, we dive into the world of Printify and Shopify to help you unlock the full potential of your online store. Discover how to use Printify with Shopify and witness a significant boost in your earnings.
Whether you're a beginner or a seasoned entrepreneur, this step-by-step guide will equip you with the knowledge and strategies you need to succeed.

How to Set Up Your Shopify Store
It's best to begin your print-on-demand journey by signing up for a Shopify account, seeing as how that's how you'll present products to customers and process payments. And you can see if it's the right ecommerce platform for you by testing out the 14-day free trial. After that, you'll add the Printify app and sync the two programs.
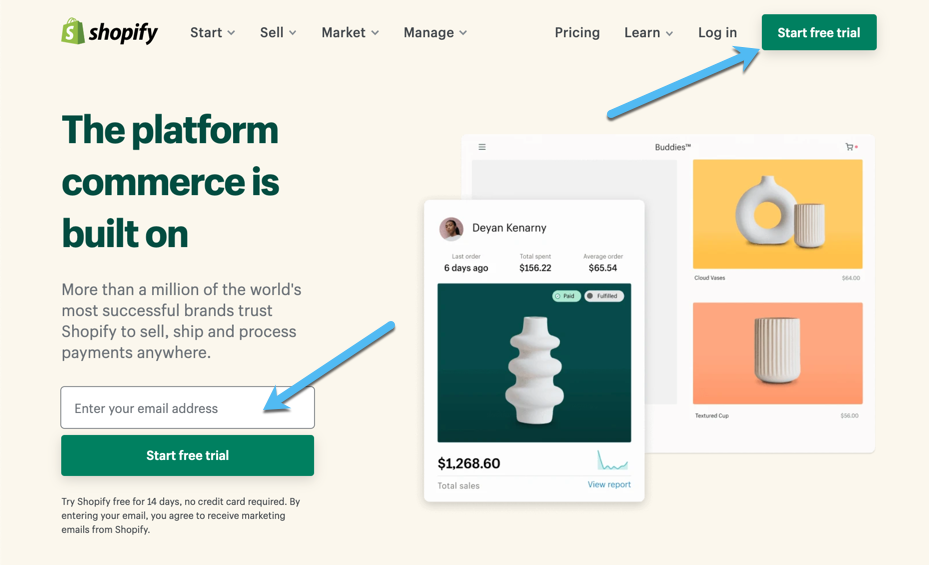
Therefore, go to the Shopify website and click on one of the Start Free Trial button.
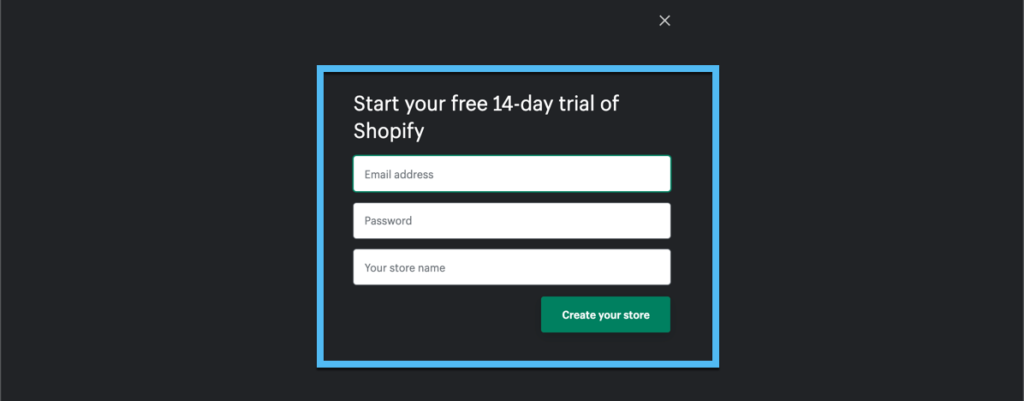
This brings up a page for you to fill in information like your email address, password, and store name (you can change this later).
Choose the Create Your Store button to move on through a series of questions regarding things like your contact information, type of store, and how many sales you plan on having each month. You can estimate the things you don't know or simply skip them.
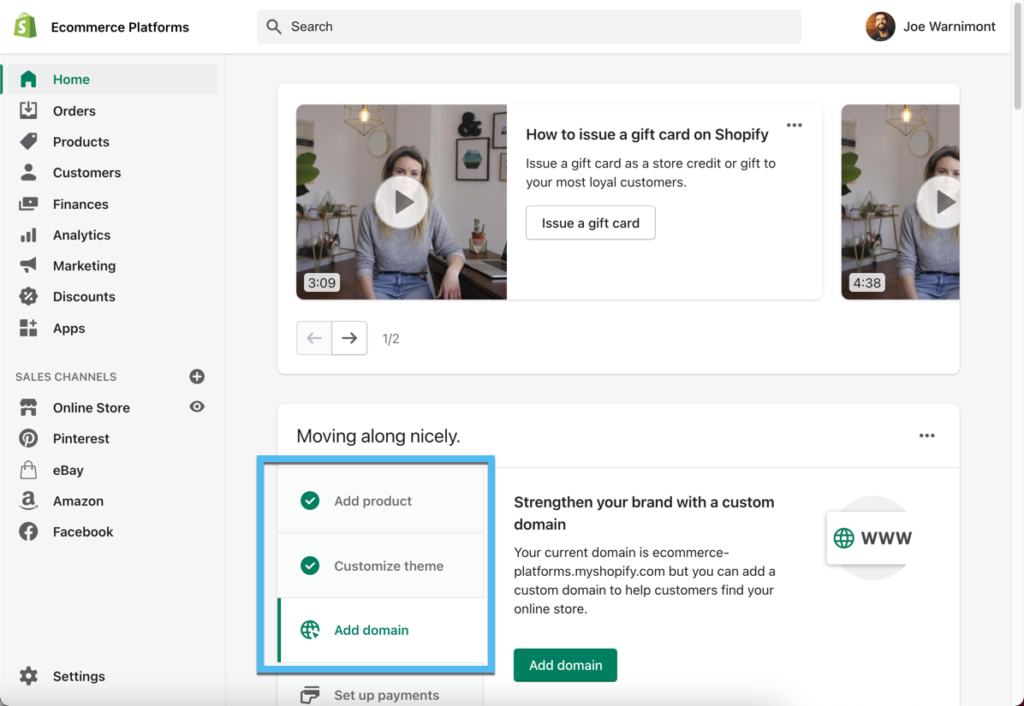
When you're done walking through the signup wizard, you're sent to the main Shopify dashboard.
This means you have a full trial account ready to go, with a menu on the left for managing elements like orders, products, and customers.
We highly recommend starting with the setup section, which outlines the most important steps to configure for your store. This includes:
- Adding a product.
- Customizing a theme.
- Adding a domain.
- Setting up payments.
- And much more.
When it comes to print-on-demand selling, you're combining two systems. Therefore, we want to ensure that the products being sent from Printify actually show up the right way on your Shopify ecommerce website.
In order to make that happen, you should focus much of your attention on the website layout, its overall design, and where your products will appear.
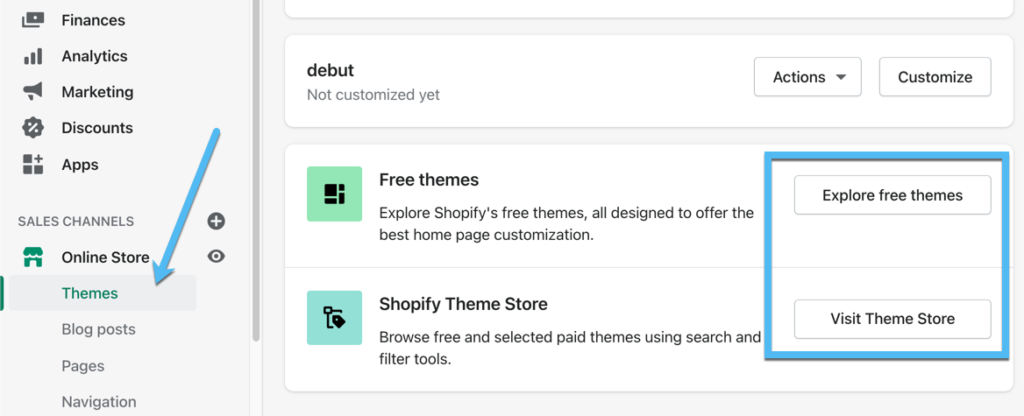
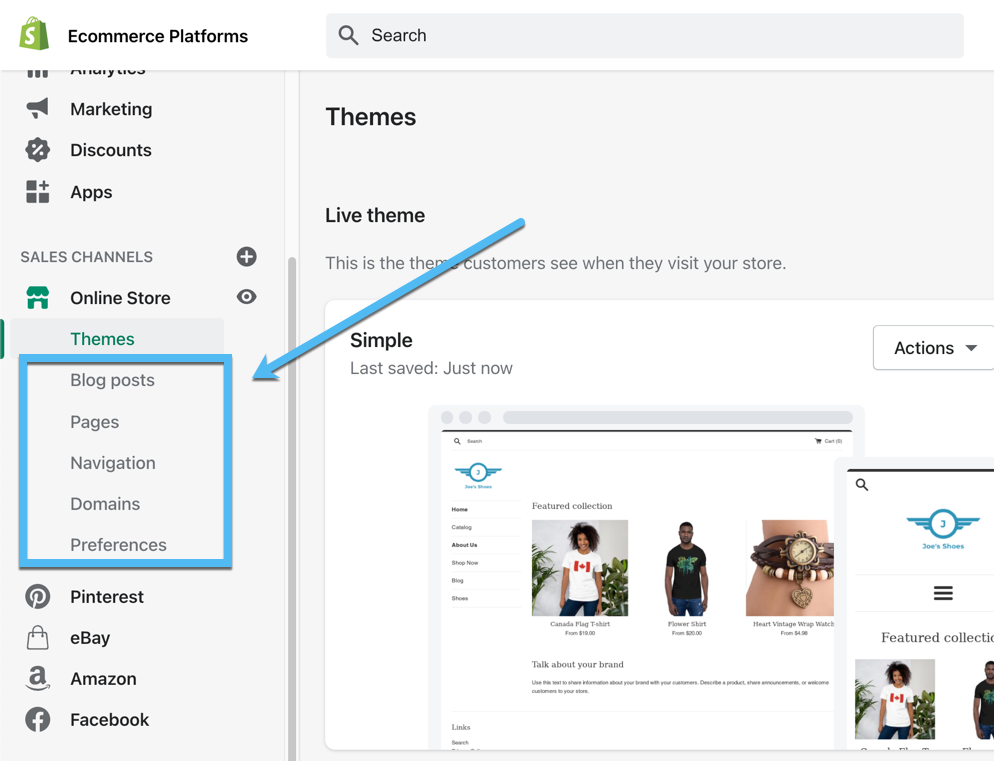
To begin customizing all of that, go to the Sales Channels section in Shopify, then click on Online Store > Themes.
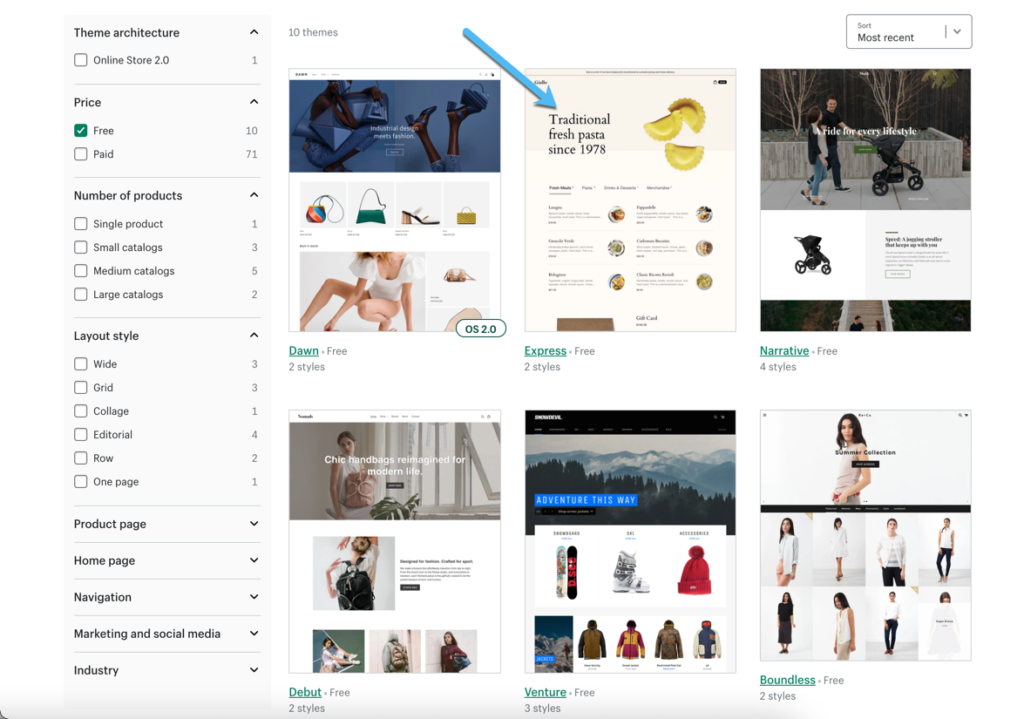
The Themes page presents a default, preinstalled theme that we usually recommend swapping out for something unique.
Navigate to the bottom of the Themes page to locate the Free Themes and Shopify Theme Store sections. You can install a free theme if you find one that fits your brand image, but more often than not we feel the premium theme store offers stronger options. Either way, click on the Explore Free Themes or Visit Theme Store button.
Spend time examining all of the themes to understand which features they include, what they look like in relation to your brand image, and for which industries they may work best.
For instance, it's possible to filter through the free and paid themes, along with options for single products, large catalogs, and those with different types of layouts. Be sure to select the themes in order to test out each one's demo. Also, most of the Shopify themes have multiple styles that are drastically different in format, coloring, and overall design when compared to the default thumbnail image you see.
Once you find a theme that fits your company's style, click on the theme and install it on your Shopify store.
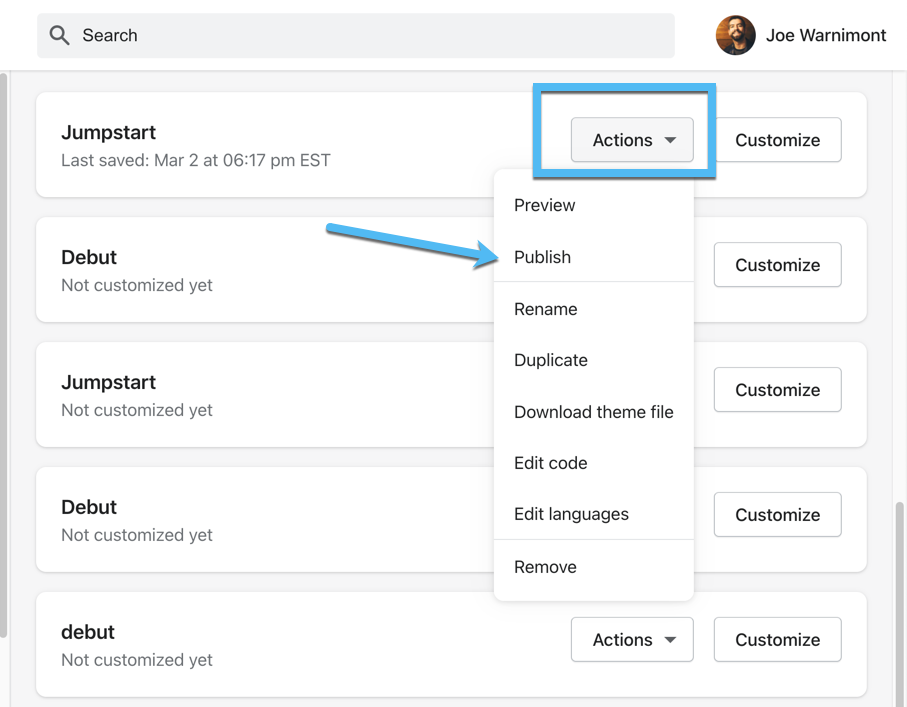
Keep in mind that installing a theme on Shopify doesn't mean it's published to the store. In order to complete the process, scroll down to the bottom of the Themes page, look through the list of installed themes, and locate the one you want to publish.
Click on the Actions button right next to that theme, then select the Publish button.
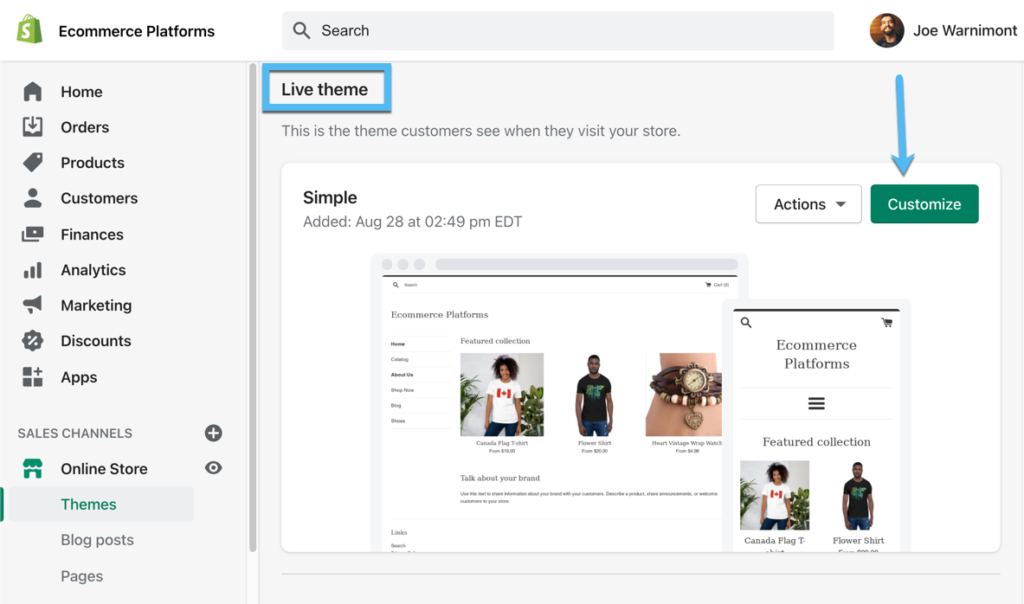
Go back to the top part of the Themes page to the Live Theme section. You should now see the name of your desired theme on that part of the page.
The themes, by default, look rather professional. However, you'll want to add elements like a logo and blog, and customize everything from your colors to fonts, and product pages to promotional banners.
To get started with that, click on the Customize button.
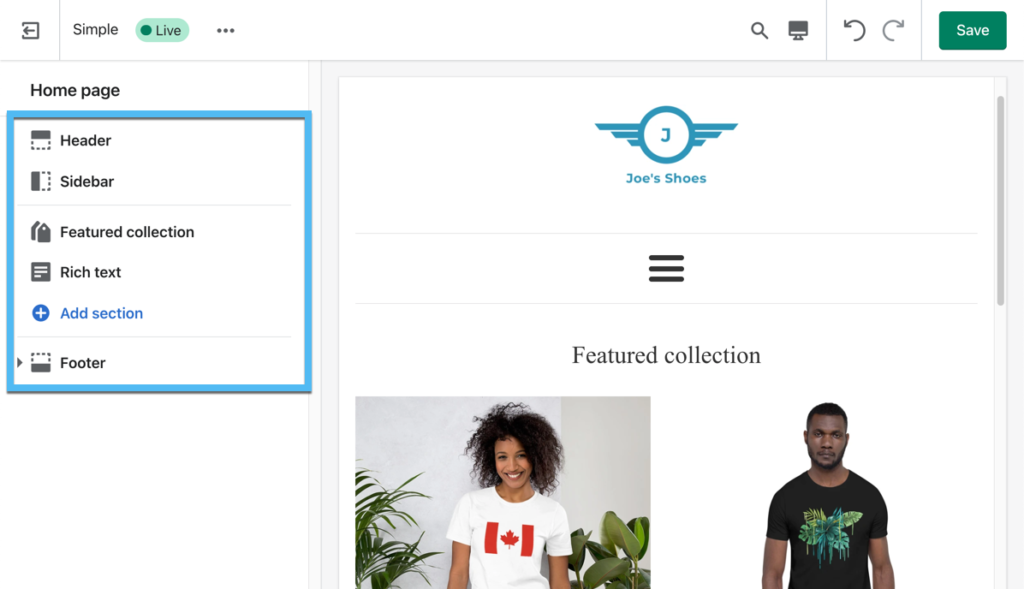
The Customize module reveals a drag-and-drop page builder for the homepage, allowing you to edit settings for the header, sidebar, featured collection, and more. All of these customizable sections vary depending on the theme you choose.
As for more unique customizations, you're able to click on the Add Section button (opening up a collection of modules to insert on your homepage and edit from scratch) or drag the modules on the lefthand side to rearrange their order. All completed edits go into effect in the preview to the right.
Just make sure you hit the Save button when you're done with the entire process.
As an example, clicking the Header module shows us a series of settings for uploading a logo image, editing its alt text, and changing the logo width.
In addition, our chosen theme offers options for an announcement bar and text, making it easy to list promotions or brand information at the top of your page.
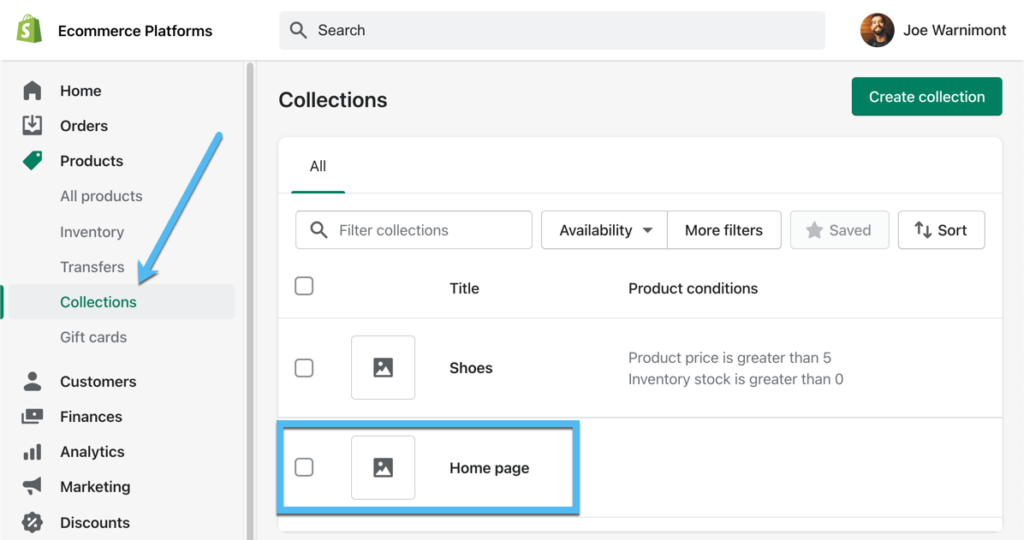
We also encourage you to make a collection that's featured on the homepage, seeing as how you'll want to at least have some of your products on the front page of your website, especially since you want to highlight whatever products you make from Printify.
Some themes already provide homepage collections, but you can also add your own. To complete that process, go to Products > Collections in the Shopify dashboard. Click the Create Collection button to generate a collection to which you can add products later.
Be sure to add that collection as a module on your homepage so that whatever products are on the list appear right when people come to your store.
Finally, Shopify boasts an incredible number of features that we can't cover entirely in this article. We do, however, encourage you to browse the ecommerce-platforms.com website, as we offer guides to many of the features inside Shopify. If all else fails, check out the Shopify support documentation to guide you along your way.
But once you launch your theme, get a domain, setup a payment gateway and checkout, and create some collections/products, you're technically ready to start selling on your site.
Just make sure you check out some of the many other features like for writing blog posts, setting up a navigational menu, and creating important pages like terms and conditions and return policies.
How to Connect Printify with Shopify
Linking Printify with Shopify only takes a few steps, as it's all handled through a Shopify app.
Since you already have a Shopify account, it's time to sign up for Printify. As mentioned before, you don't have to pay anything for Printify, unless you're interested in upgrading to the Premium version (which doesn't make any sense for a new store).
So, go to the Printify website and click on one of the Start Selling or Sign Up buttons.

Walk through the steps to make an account, like typing in an email and creating a password. They may ask you for some other simple personal information to ensure you have everything you need for your store.
Once you have an account configured, you'll see the Printify dashboard.
Navigate to the Stores dropdown menu and click on the Manage My Store button. If you don't have any stores added yet you should see a button to Add A Store.
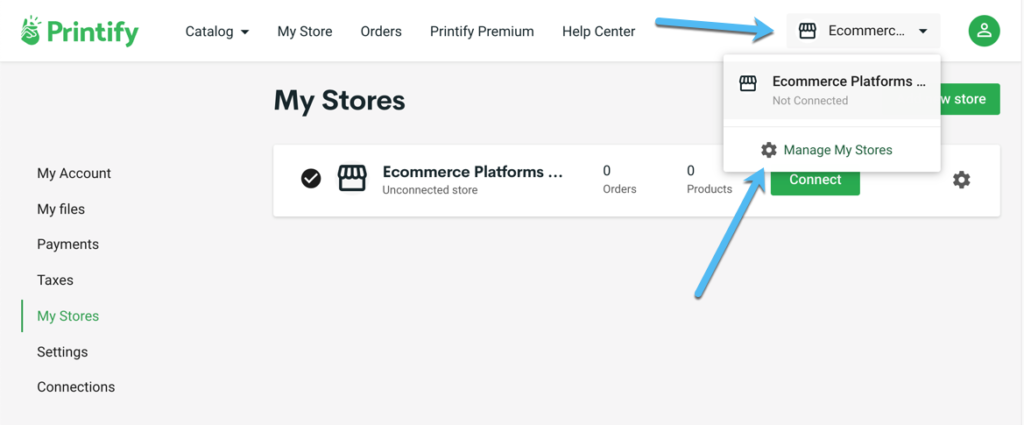
In the list of stores, you may either see some past stores you've created or a blank list. Regardless, we want to make a completely new store, so click on the Add New Store button.

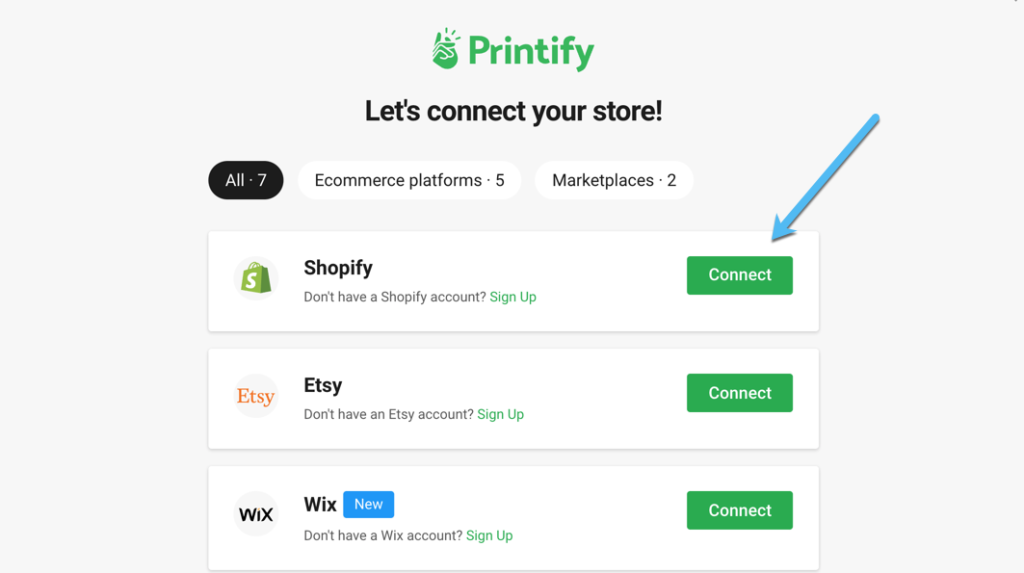
Printify integrates with several ecommerce platforms including Shopify, Wix, and WooCommerce. You can also connect Printify to marketplaces like Etsy.
So, just keep in mind that if you're not fond of Shopify for whatever reason, there are other platforms to try.
But we feel that Shopify has the best integration with Printify, along with the most powerful tools in the business for selling online and building an ecommerce business.
Therefore, click on the Connect button next to the Shopify section.
In the following window, Printify asks you to paste in the URL of your Shopify store. This can be found by visiting the frontend of your Shopify website. It's also listed in a few areas of the dashboard.
Paste in that URL and click the Connect button.

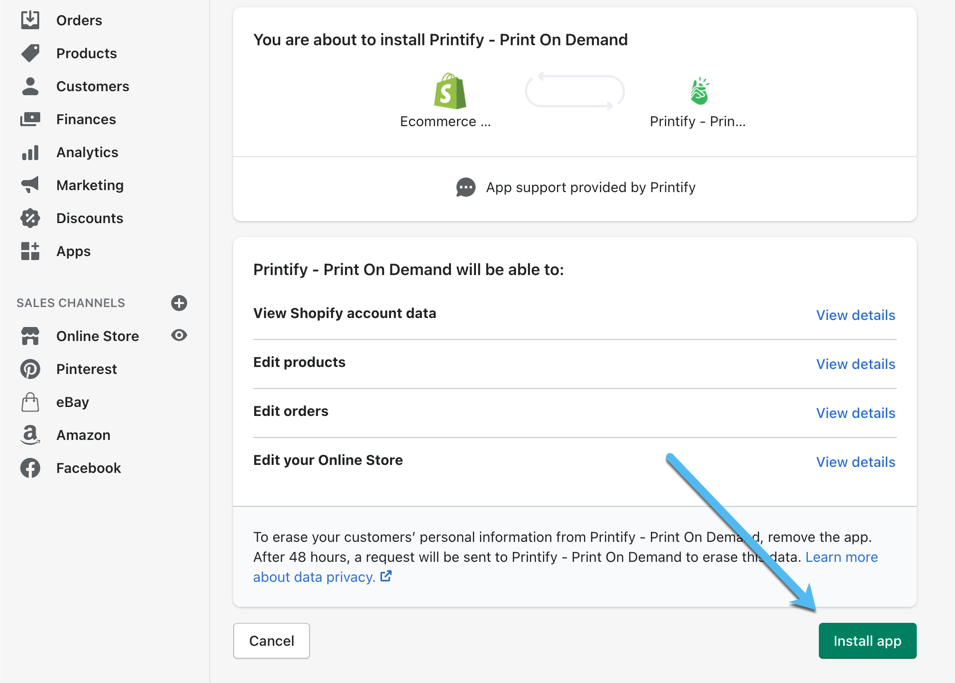
This navigates you back to your Shopify dashboard, since you should already be logged in.
The presented page tells you that you're about to install the Printify app on Shopify. It also explains that you're giving Printify access to things like your Shopify account data, product pages, and online store design. These are all essential for pushing items from Printify to Shopify after they're designed.

Select the Install App button to complete the process.
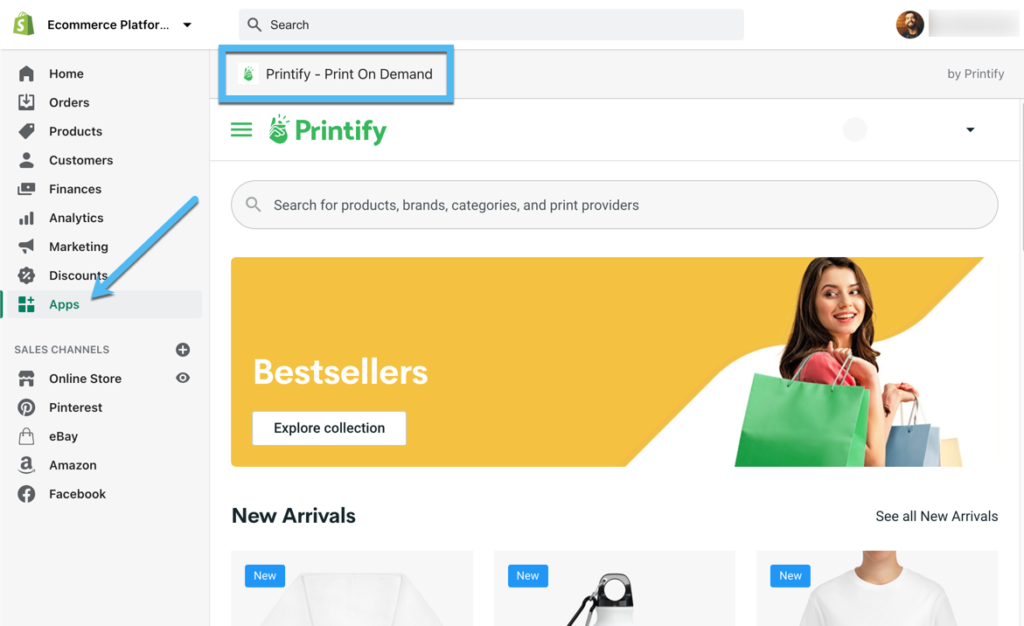
With the installation finished, Shopify sends you to the Printify dashboard. What's great about Printify is that you can either design products within Shopify or go back to the Printify dashboard to handle all of that.
As you can see in the screenshot, the Printify design center in Printify is simply an embedded version of the Printify site within Shopify.
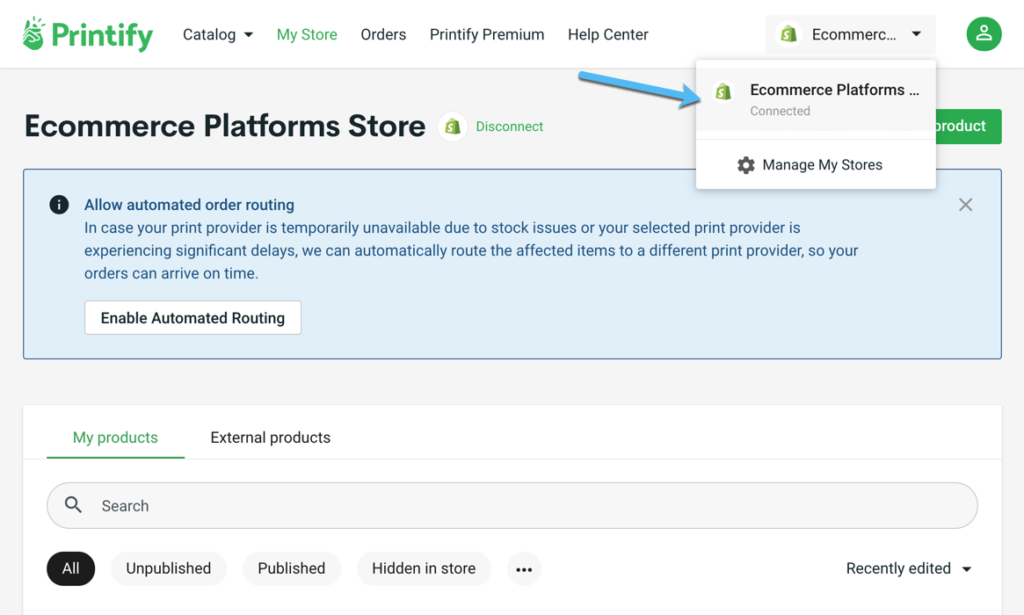
We also recommend going back to the actual Printify dashboard in a different browser window to see if that side of the connection has recognized the integration. For example, we can click on the Stores dropdown in the upper right hand corner to see that the new store says “Connected” below it.
You'll also see a list of My Products and External Products below that, which is where it's possible to add new products and manage them from the Printify website.
Select and Design a Product in Printify
Selecting and designing products can be done in Shopify or Printify.
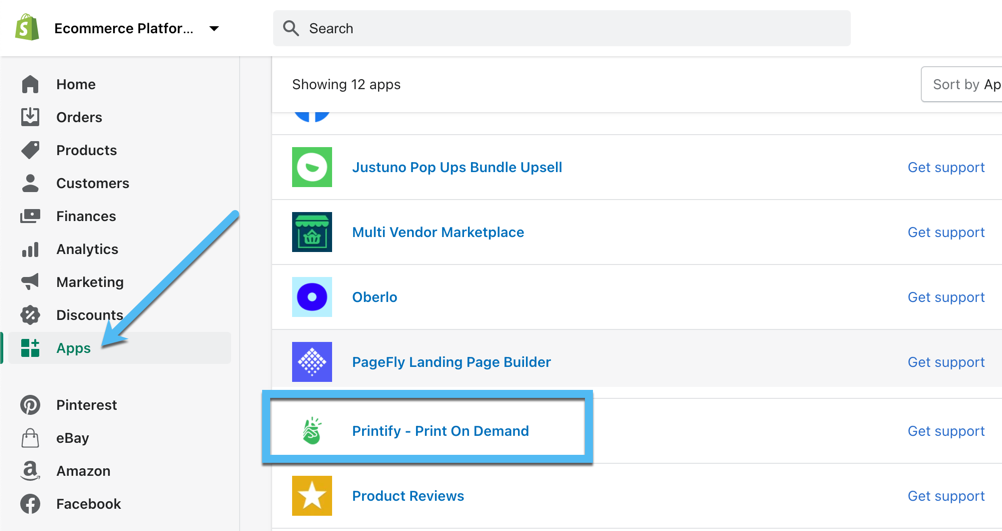
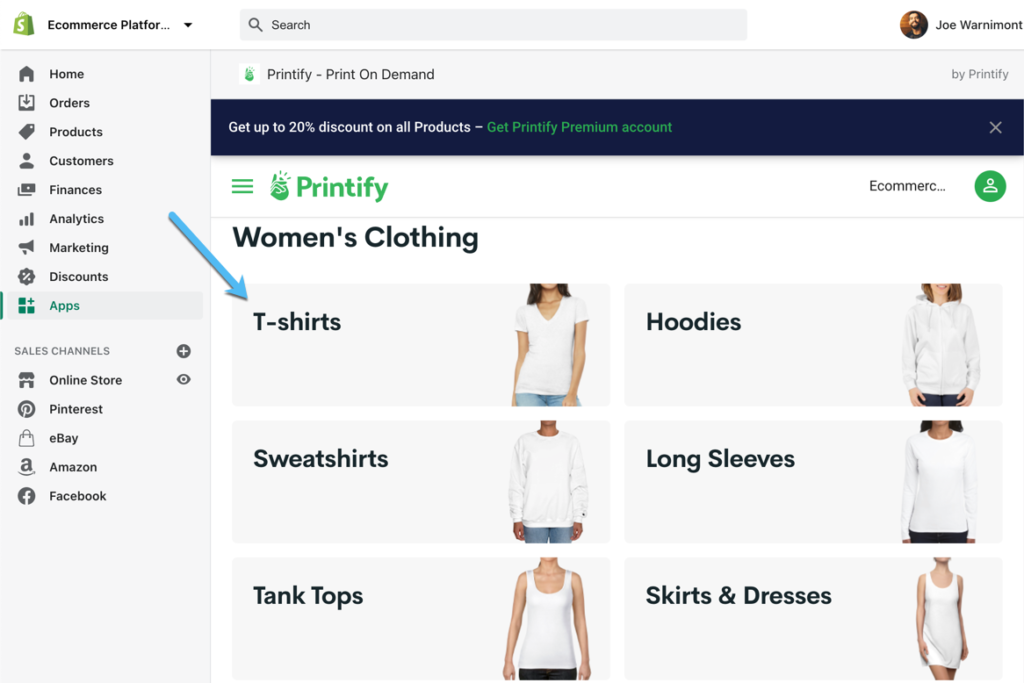
In Shopify, simply go to the Apps menu item, then choose Printify.
Scroll down on the page to look for the product catalog, with options like Men's Clothing, Women's Clothing, Accessories, and more. Select any of these product categories to begin making a design.

As an alternative, it's possible to start the design process in Printify itself, using a completely different browser window.
Go to the store page, and look below the My Products section to click on the Create Product button.
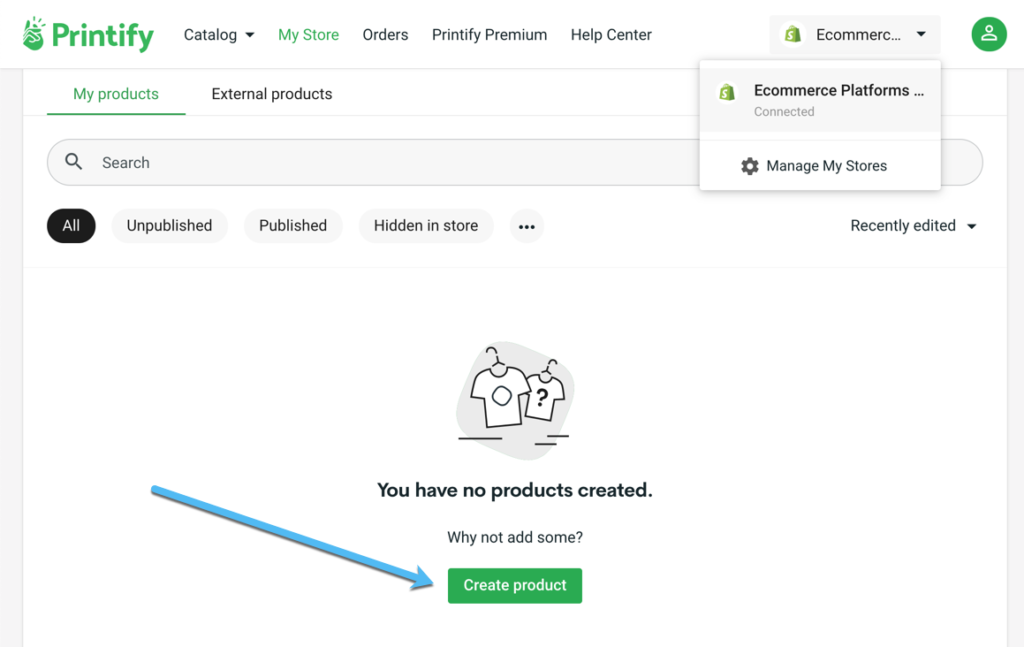
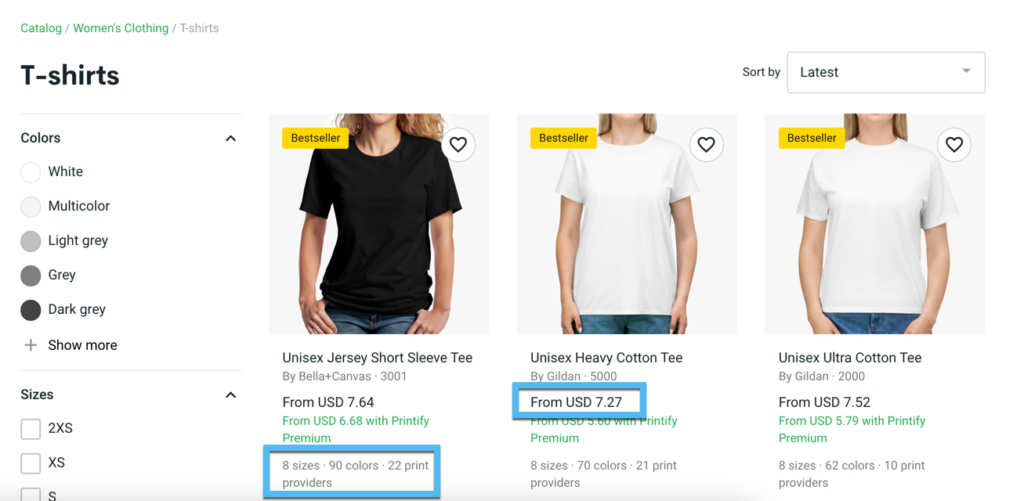
After that, you're brought to the entire Printify product library where you can choose a category. For this example we'll go with Women's Clothing and select the T-shirts category.
Here's where you need to make decisions.
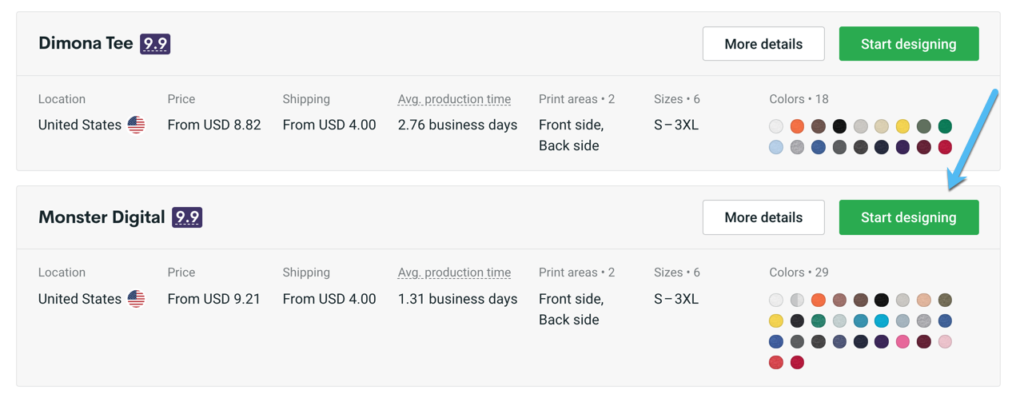
Printify offers dozens of printers and suppliers for each of its products, all of which have unique pricing, shipping costs, colors, and materials.
For example, when looking at women's t-shirts, we can see that the Bella + Canvas shirts come in 8 sizes, 90 colors, and from 22 print providers. That's a lot of options, and it appears to beat out many of the other t-shirt brands. However, the Gildan 5000 has some of the lowest pricing compared to the other top t-shirt brands.
You should use all of these factors to figure out what's the most important to you. In this tutorial, we'll go with the Bella + Canvas since it has far more colors, the pricing is pretty close to the Gildan, and jersey t-shirts are rather popular right now.
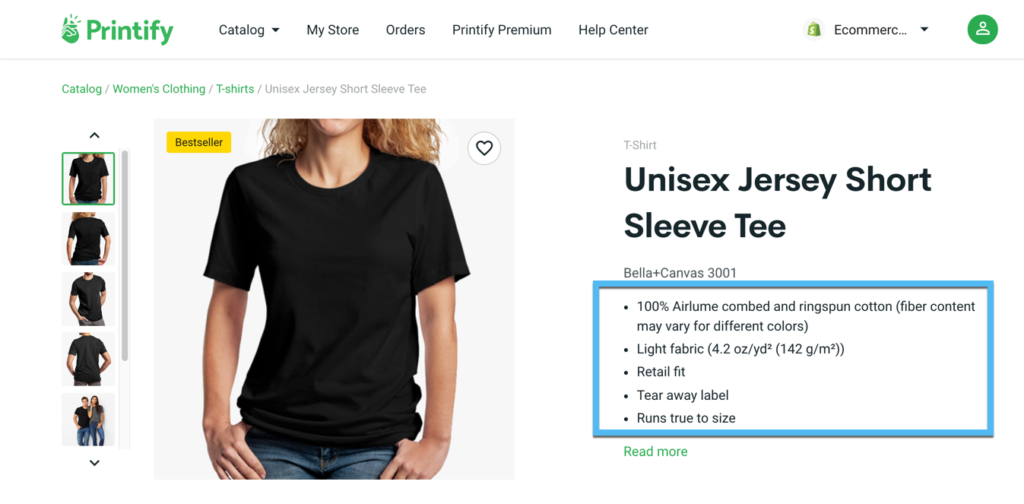
As you're walking through every step, make sure to analyze product details to understand if it's truly the right item for your customers. For instance, the product page for the Bella + Canvas 3001 explains that it has a tear-away label, runs true to size, and offers light fabric. That all sounds good.
Scroll down on the page to the All Print Providers section. Choose the Sort By dropdown menu to reorganize the list based on what's most important to your business.
You can sort the print providers by:
- Printify ranking.
- Production time (in business days).
- Lowest price.
- Highest price.
- Lowest shipping.
- Highest shipping.
The Printify Ranking usually does a wonderful job of organizing the print providers by combining all of the important metrics, while also ensuring that providers in your area are prominently displayed. After all, you probably want a US provider if you're mainly shipping to US customers, or an Australian provider if you're in Australia.

This area also allows you to examine essentials like the Location of the provider (picking from providers in the US vs Canada or the UK).
As mentioned before, you want to get as close to customers as possible.
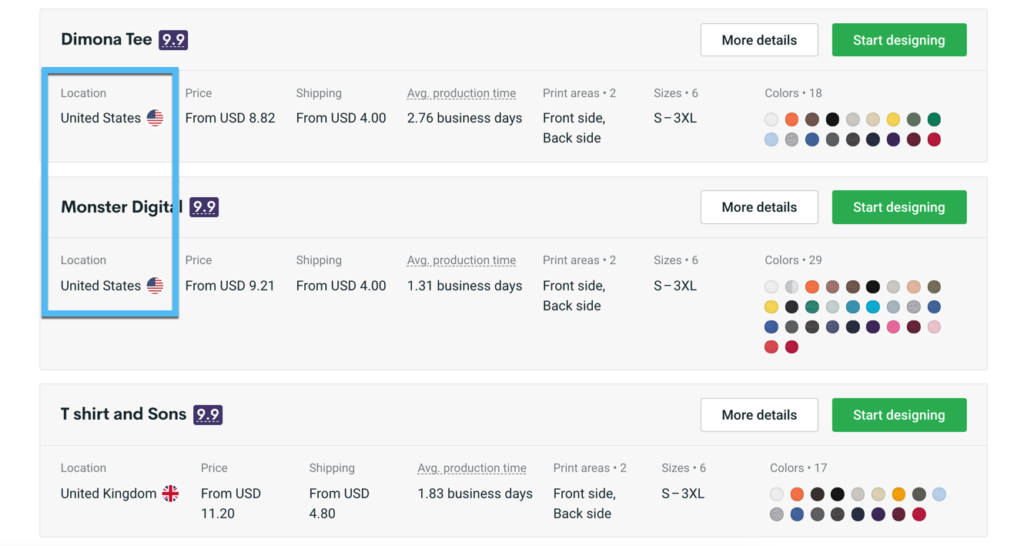
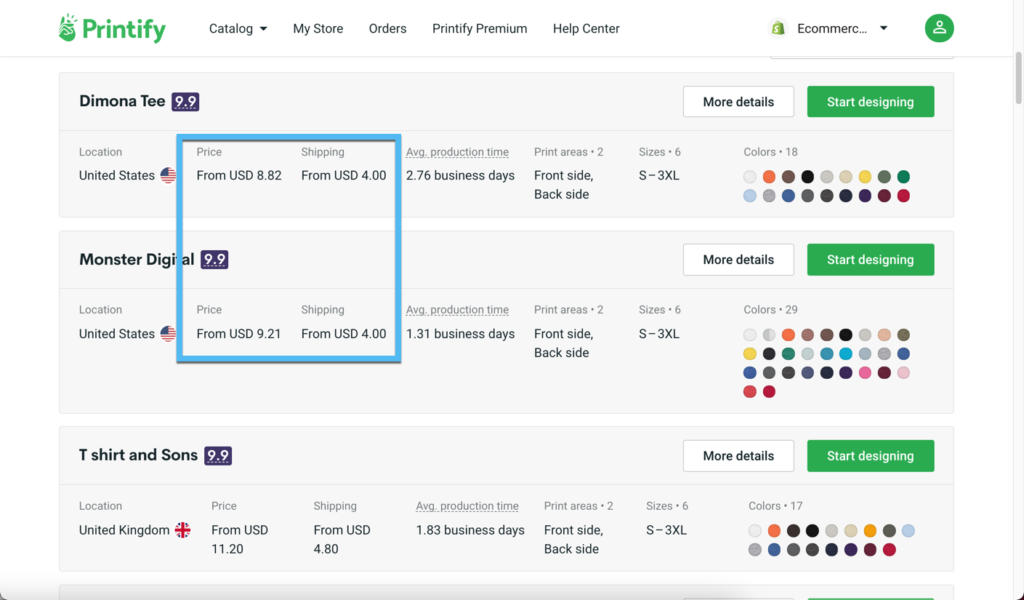
Check out the Price and Shipping columns to understand which providers offer the best prices; it's easy to forget about shipping in your costs.
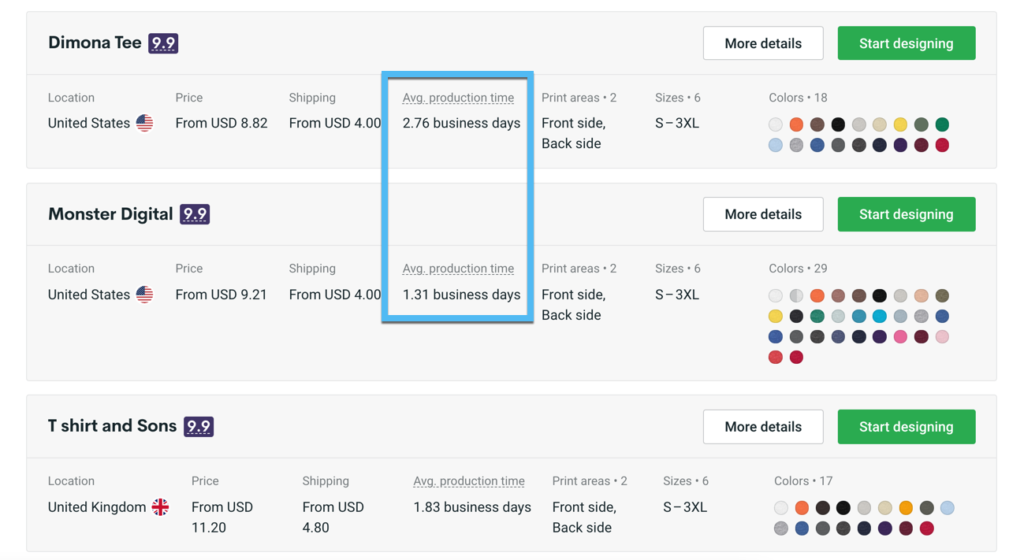
The Average Production Time column also comes into play, since your customers don't want to wait too long to get their products.
Finally, look at the Print Areas, Sizes, and Colors to finish up your decision.
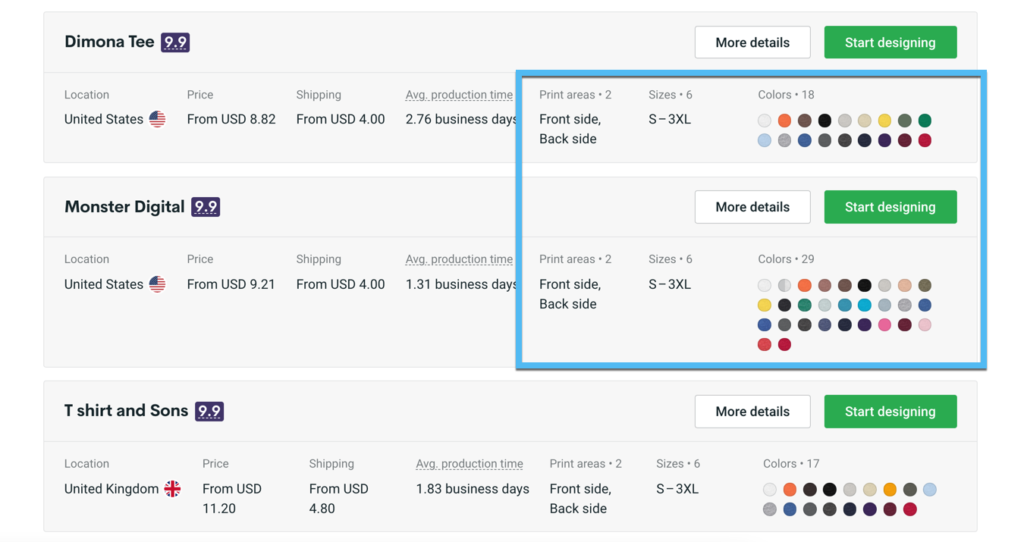
From our selection of providers in this tutorial, the Monster Digital printer seems to make the most sense due to its quick production time and wide range of colors compared to the other top US printer. It's a little more expensive, but sometimes you have to sacrifice if you're more interested in something else like a stronger selection of colors or faster production.
Once you figure out the best provider, click on its Start Designing button.
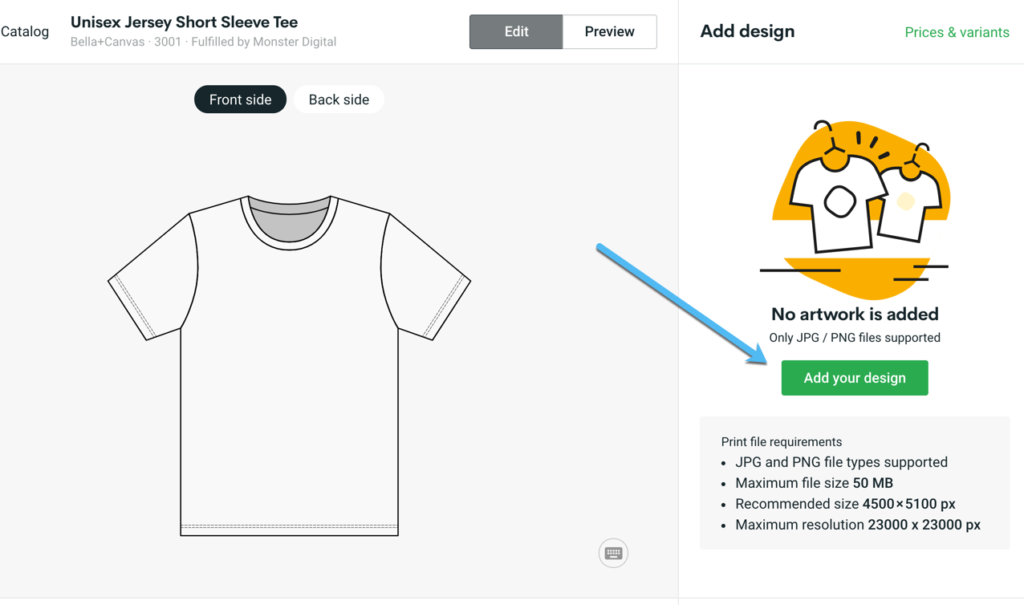
Now it's time to upload a design you have from your computer and place it on the product.
Click the Add Your Design button to make this happen.
Note: Printify currently only supports JPG and PNG files. We highly recommend going with PNG files with transparent backgrounds. Otherwise, you'll be printing whatever colored background is shown from the picture.
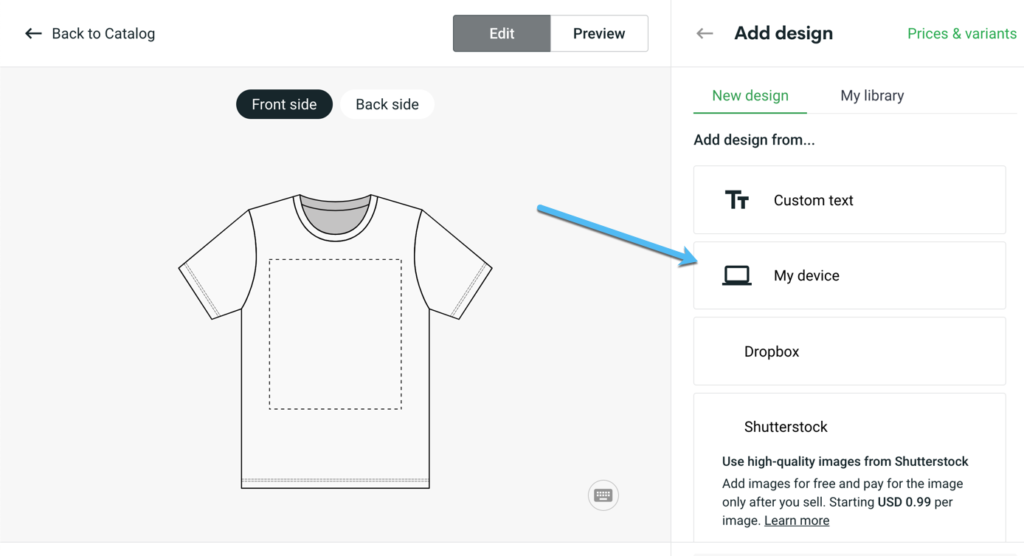
You can add custom text, upload from your device, or grab an image from a place like Dropbox or Shutterstock.
For most cases, you'll click on the My Device button.
Once your image is uploaded, you'll see it placed on the shirt mockup to the left.
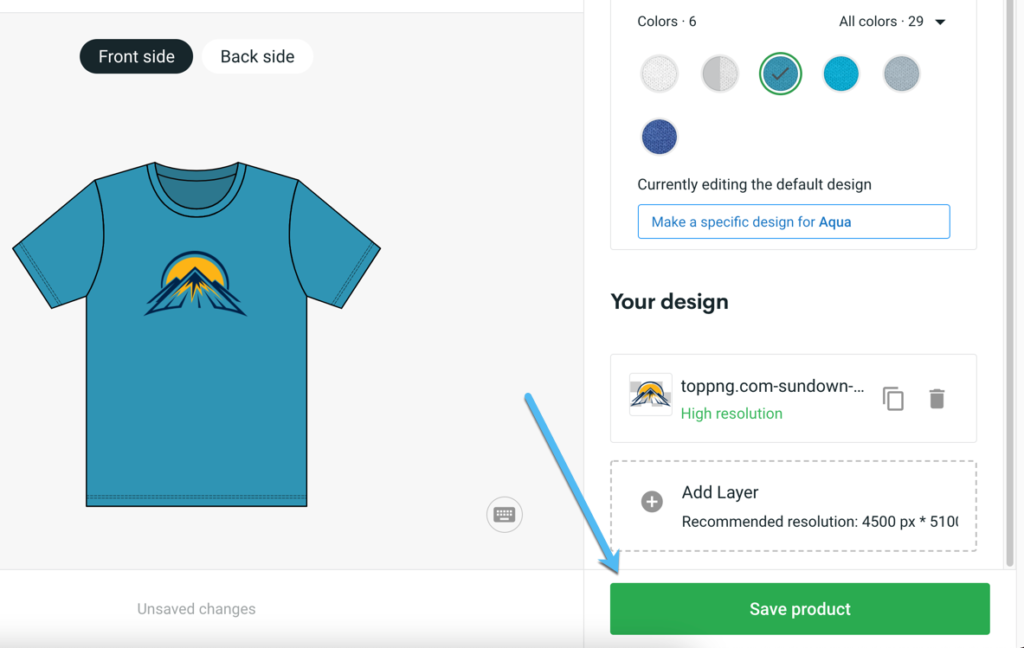
Feel free to resize, move, or rotate the image with the tools provided. You also want to check the Resolution indicator to ensure it's at least considered a Medium Resolution print; otherwise, you may find that the print comes out grainy. Therefore, try to stick to high-resolution images, and consider making them slightly smaller on the product, which should bump up the resolution.
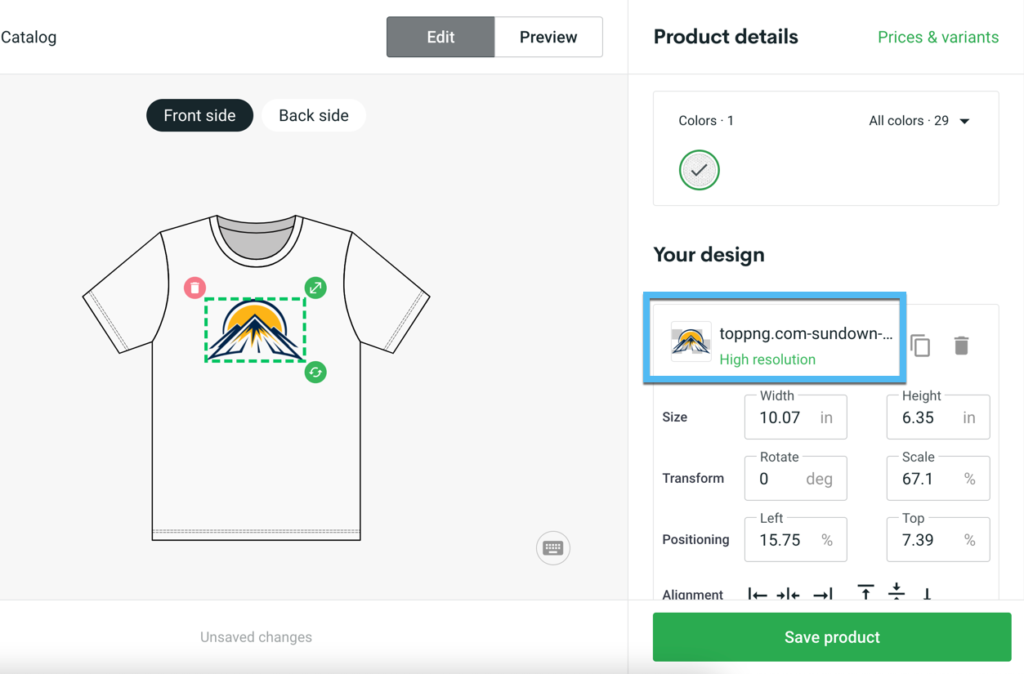
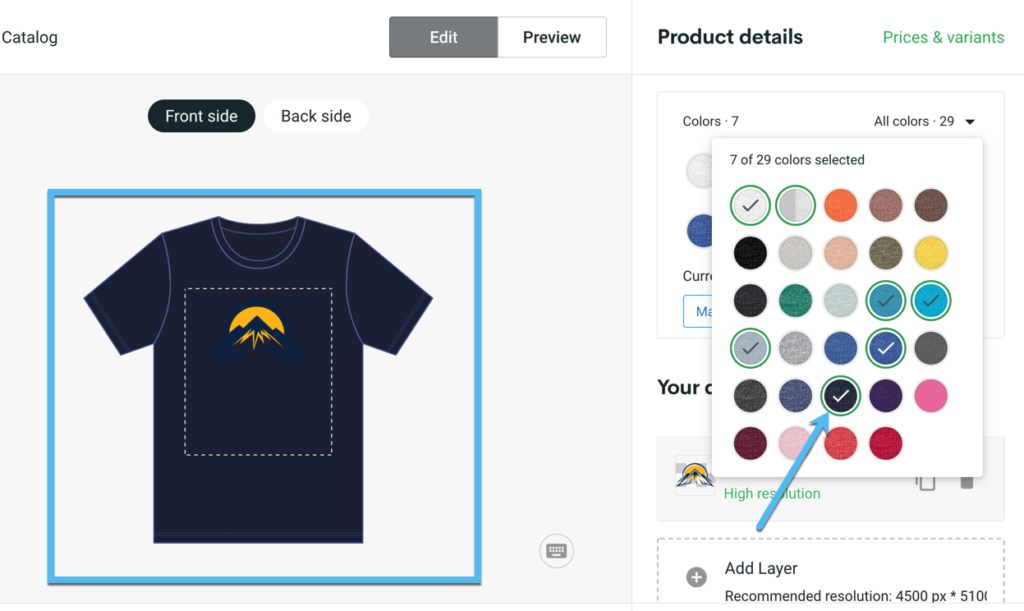
Go to the Colors dropdown menu to pick whichever colors you want to sell.

Make sure you avoid product colors that conflict with shades in the design. If parts of the design get washed out in the preview, it's not wise to see if it'll look better in real life.
Also, you'll want to order samples for all products, regardless of what it looks like in the online designer. All printers are different, and a digital rendering rarely comes out the same as it does in real life.
Some products also have additional printing locations. For shirts, you can often print on the back or the sleeve.
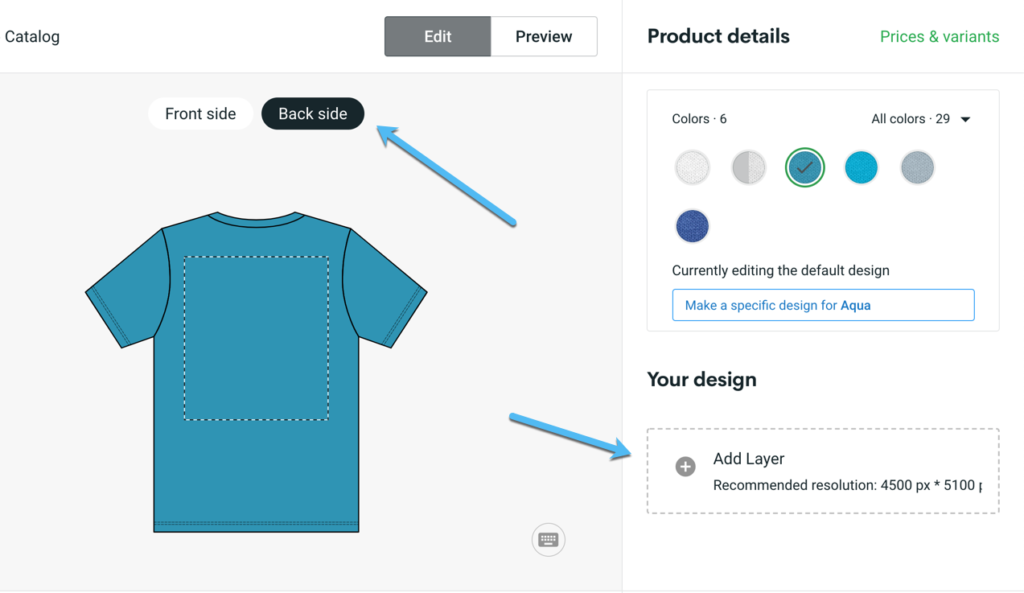
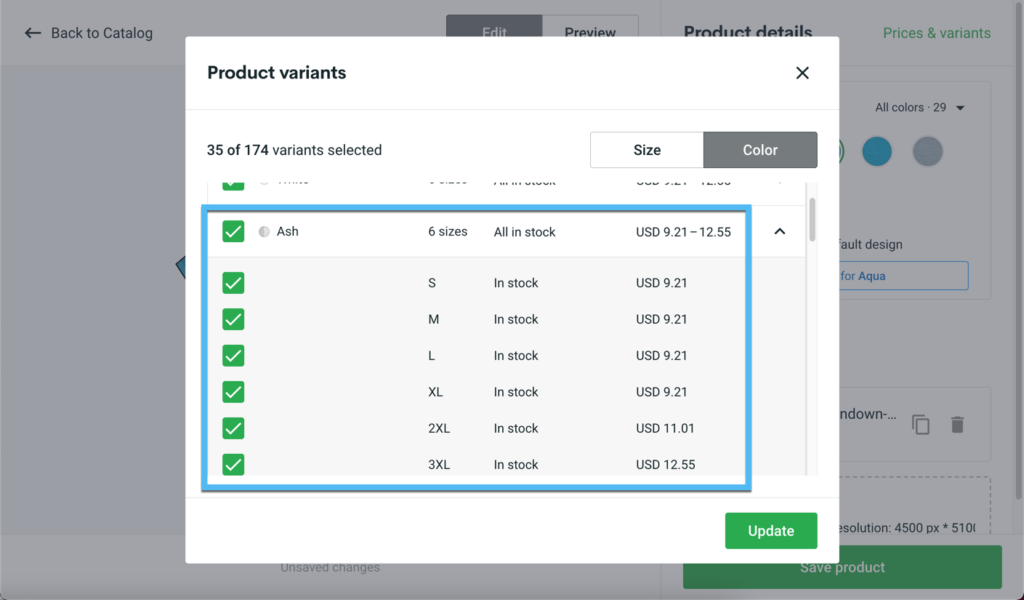
Before adjusting any product page details, click on the Prices and Variants link.
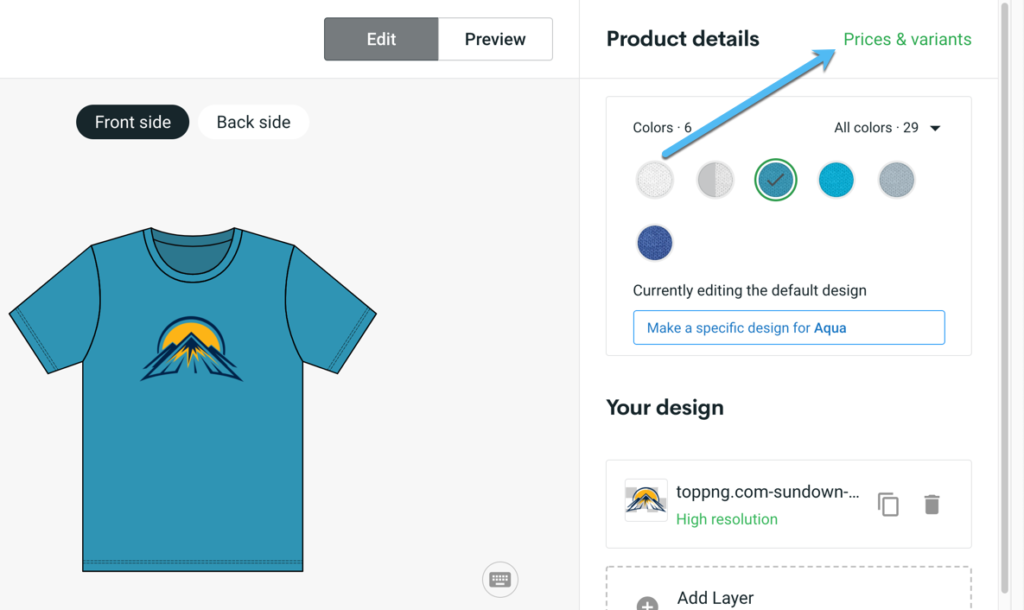
This lets you select the variants you want included on your store, while also checking if there are any pricing issues for certain variants or colors.
Finally, click the Save Product button to move onto product details.
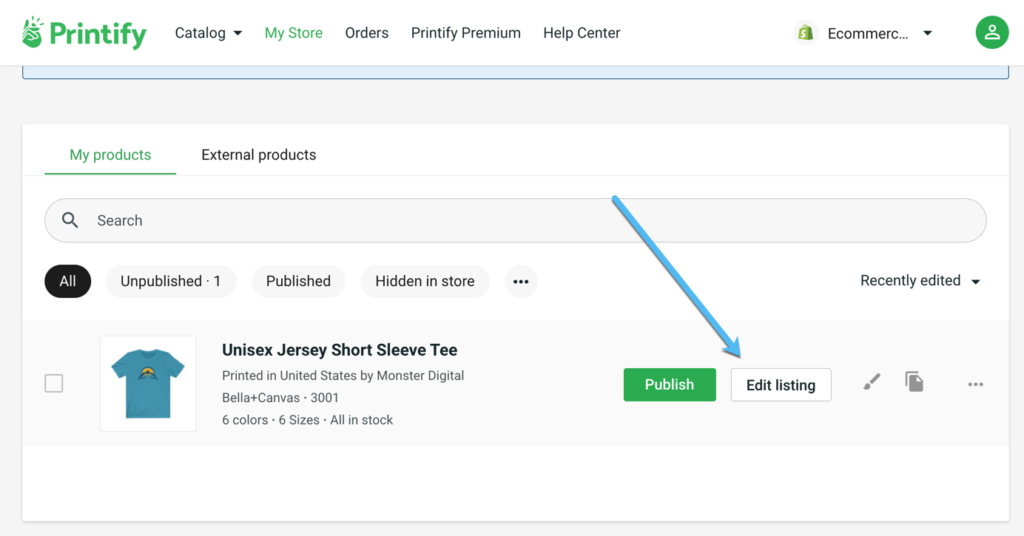
Edit the Product Listing
The product listing includes details like pricing, product description, and sizing guides.
We recommend handling as much of this as possible on Printify, then making tweaks once the item is sent to Shopify.
In the My Products list, select the Edit Listing button.
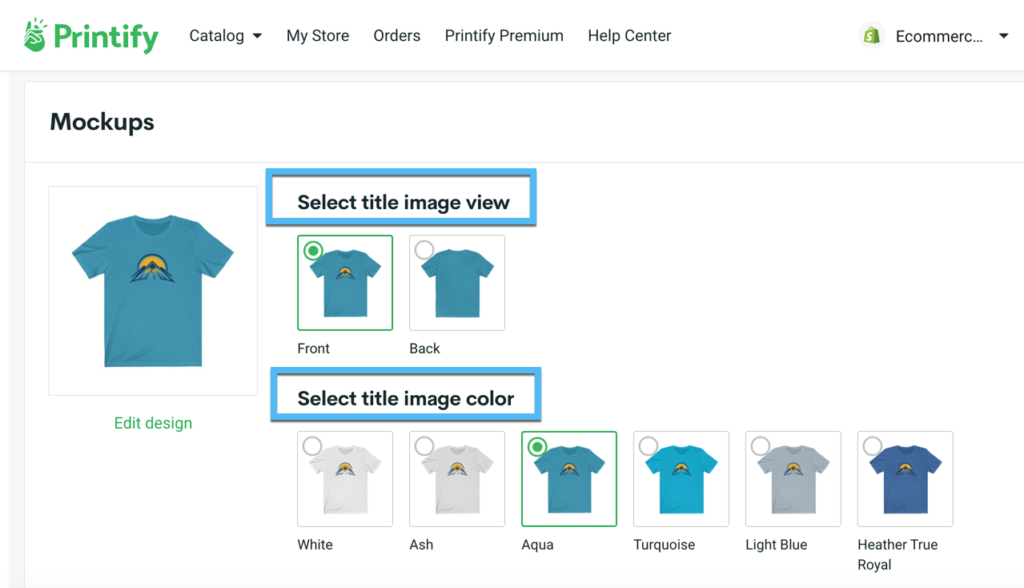
The first section to take care of is called Mockups.
Here, you select the title view image of your product, along with whichever color you want to have on the main mockup. These serve as the item's images on your product page.
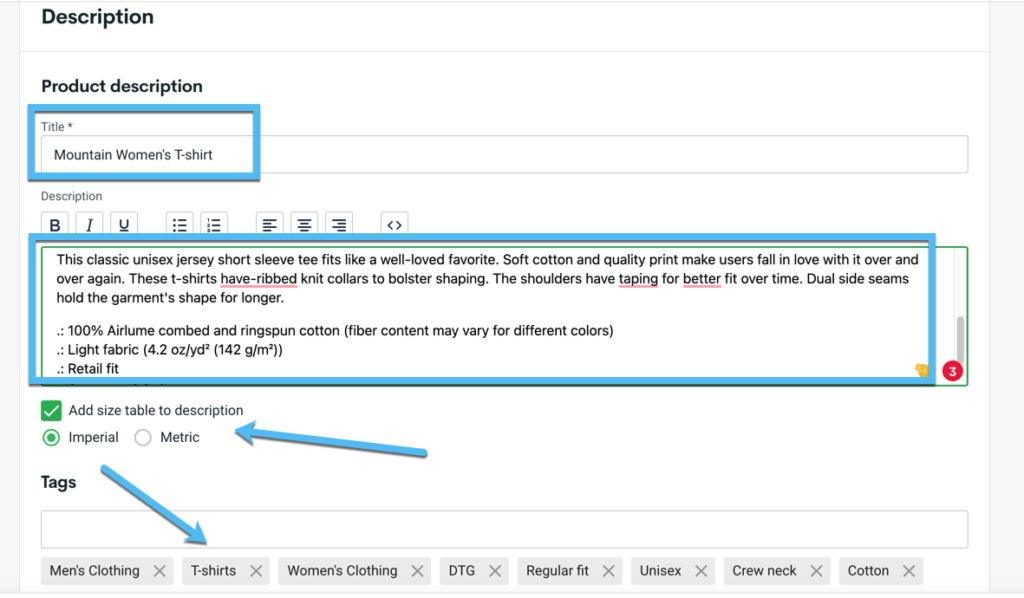
Moving on, scroll to the Product Description section to add a relevant, fun, and SEO-optimized Title and Description. Printify automatically adds its manufacturer content for assistance, but you're much better off customizing them for uniqueness.
You can also add a sizing table (highly recommended for apparel) and tags.
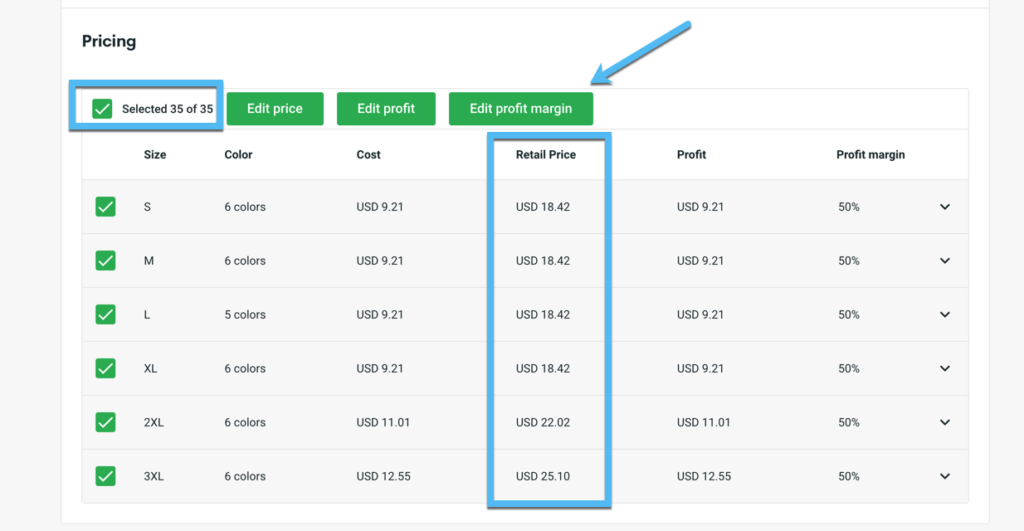
The final product detail to set up is for Pricing.
Go through each of the product variants and check out the Cost, Retail Price, and Profit for each one.
You can select all of the variants then click on the buttons to Edit Price, Edit Profit, or Edit Profit Margin.
Just keep an eye on the Retail Price and Profit to ensure your products aren't too expensive but that you're still making enough money.
Sync Printify with Shopify to Publish the Product
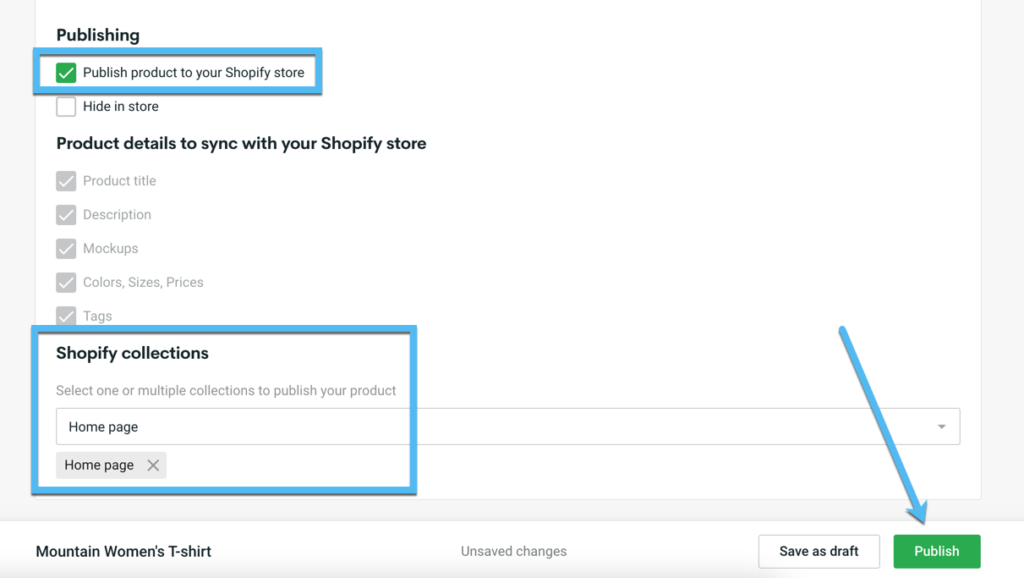
To finish up, you'll want to actually publish your new product design to Shopify.
Go to the very bottom of the Printify Edit Product page to locate the Publishing section.
Check the box that reads “Publish product to your Shopify store.”
In addition, add the item to any Shopify Collections that make sense. It's usually prudent to have a Home Page collection in Shopify and add important products to the front part of your website.
Finally, click on the Publish button to send all of these details to Shopify.
At last, Printify shows the published item in the My Products section, where you can either click on the See In Store button or the Edit Listing option.
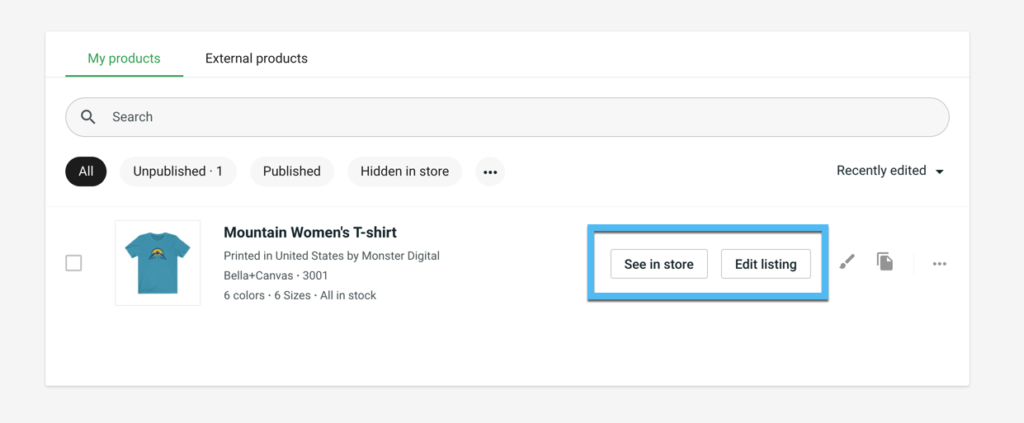
The See In Store button brings you to the frontend of that product page.
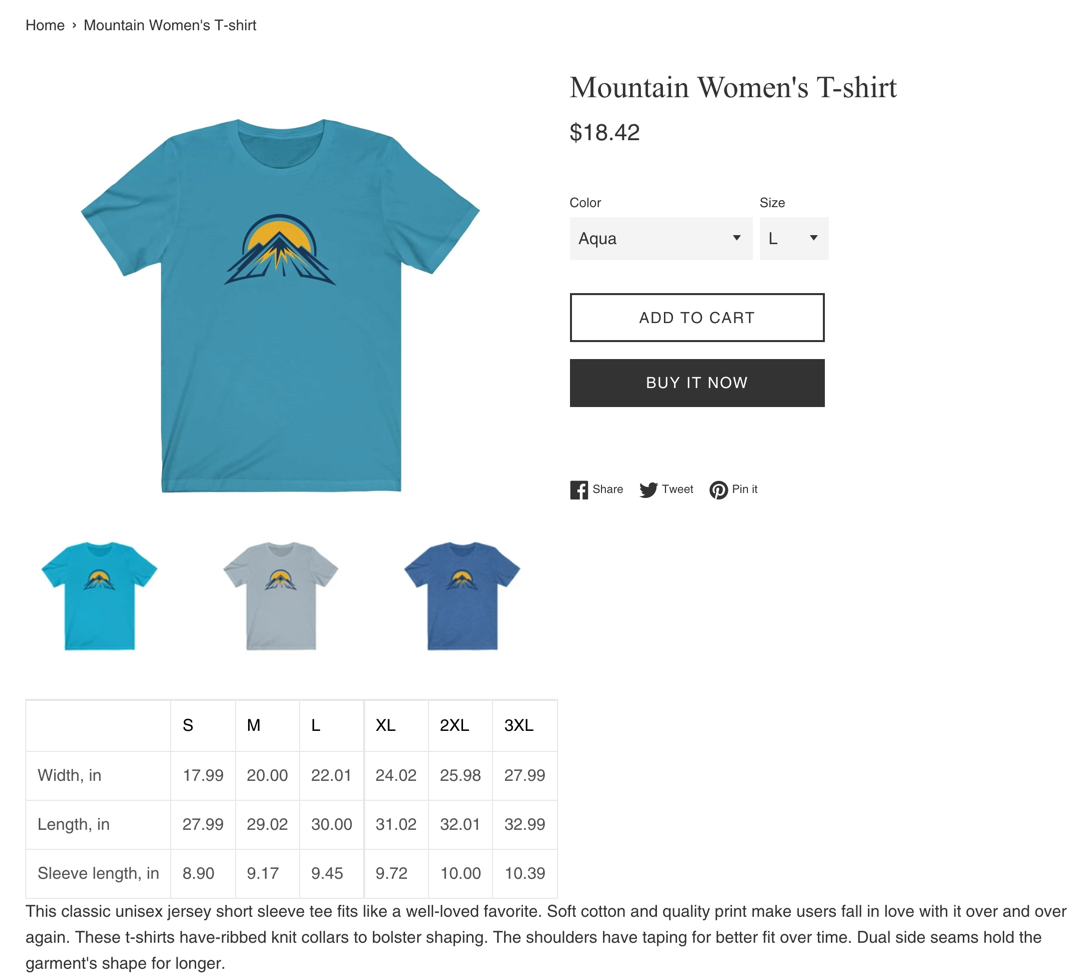
As you can see, we have a complete product page on the website now, with buttons for people to buy, images, and all product details.
You can also edit the item in Shopify by clicking on Products > All Products.
Sift through your list of items to locate the most recently published one.
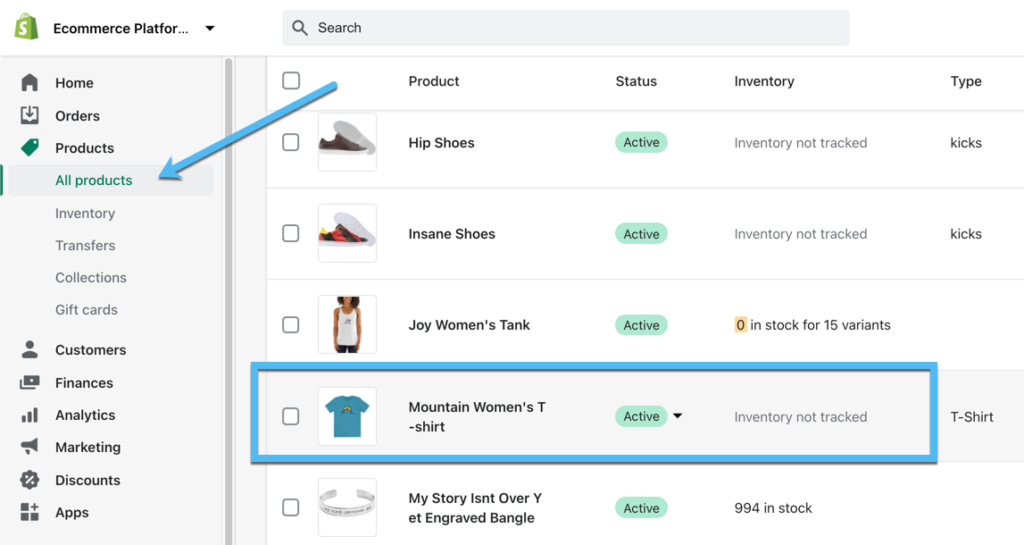
Shopify offers complete control over all of the product details you saw before, along with additional settings for changing things like the product status, sales channels, and more.

Tips for Selling Print-on-demand Products with Printify and Shopify
There you have it! You're now the proud owner of a print-on-demand store after integrating Printify with Shopify and adding some products to sell.
Although we can't cover everything about building and running a POD online store from start to finish, here are some final tips to guide you along the way:
- Always order product samples. You never know about the print or product quality until you hold it in your own hands. Printify offers steep discounts for samples. And you're only setting yourself up for potential returns and customer complaints if you're trusting a digital mockup instead of running your own quality control.
- Don't forget to brand every aspect of your store. A logo is nice, but you should also look into customizing colors, fonts, and all images in Shopify.
- Look into the wide variety of ways to obtain designs if you're not a professional designer. You can purchase premade designs from sites like PlaceIt or Envato Elements. It's also not a bad idea to hire a real designer.
- Be sure to configure the right receiving and fulfillment settings. Printify offers several settings for accepting returns, automating your order routing, and choosing specific suppliers.
- Think about selling print-on-demand items on marketplaces as well. Printify lets you hook up your products to places like eBay and Etsy, widening your reach to a whole new set of customers.
- Consider multiple ways to market your products. Most marketing options are available through Shopify. Think about search engine ads, social media posts and ads, email marketing, and abandoned cart recovery with coupons.
- Only partner with Printify suppliers that offer fast shipping to your target customers. Also, be transparent about your shipping times, especially if they may take a little longer from certain printers.
- Factor in all business costs when pricing products. Think about billing, shipping, marketing, and more.
- Publish all necessary legal and informational pages. This includes terms and services, privacy policies, shipping information, and return policies.
- Figure out ways to handle customer support. Again, Shopify usually helps out with this if you install certain apps for running live chat, handling emails, and publishing knowledgebase and blog articles. You may also want to consider taping into the API to integrate more advanced solutions.
- Be sure to understand how returns are handled. Printify doesn't accept returns since you're selling custom products. However, you can send back items with manufacturer defects or printing problems. This means you'll have to figure out your own return policy where you collect items in your own office or home, throw out the returns, or tell customers that returns aren't possible.
In Conclusion
Merging Printify with Shopify makes for the perfect POD store configuration. It's not only an inexpensive way to start an ecommerce company, but the products on Printify are affordable, you don't have to order in bulk, and there's no need to worry about shipping, storage, or packaging.
If you have any questions about how to make a POD ecommerce shop using Printify with Shopify, let us know in the comments section below!


Regards.
I have managed to have the honor of reading one of your few posts and the truth is they have a lot of valuable information, very well explained and very well organized.
Your posts have helped me a lot to clarify my doubts and that is why I left you the comment.
Keep doing what you know how to do…
Thanks for the kind words Paul!