組み込みの Mailchimp 統合により、ユーザー情報をオーディエンス リストに直接収集することが非常に簡単になります。
この機能を使用する主な利点は、収集した情報を手動でエクスポートおよびインポートする必要がないことです。データは、 plugin.
つまり、ハンターが Mailchimp オーディエンス リストに追加されると、そのシステムのすべてのメリットを享受できるということです。 たとえば、ハンターにフォローアップ メッセージを送信したり、別のリストに移動したりできます。
ただし、Gift Hunt フォームに入力したときに使用したメール アドレスを使用して既にリストに登録されている人は、Mailchimp リストに再度追加されないので注意してください。
Gift Hunt を Mailchimp アカウントに接続する方法を学びましょう。
APIキーを取得する
API キーは、開発者がよく口にするもののように聞こえますが、心配する必要はありません。この記事とビデオの助けを借りれば、開発者がいなくても簡単に作成できます。 APIキーを作成します
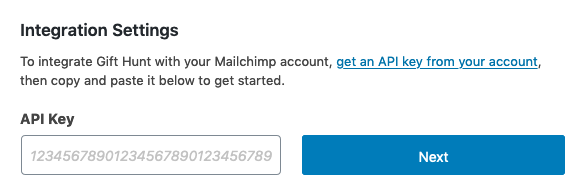
API キーを取得したら、Gift Hunt の Mailchimp Integration ページに移動します。 plugin (WordPress 管理画面の左側のナビゲーション セクション)。
「統合設定」セクションの「API キー」フィールドに API キーを追加し、「次へ」をクリックします。
[次へ] をクリックすると、Gift Hunt は Mailchimp に接続して、アカウントで利用可能なオーディエンス リストを取得します。
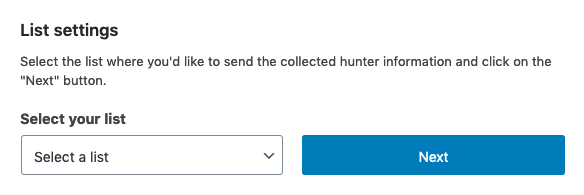
リストは「リスト設定」ブロックに表示されます。収集したハンター情報を送信するリストを選択し、リスト フィールドの横にあるボタンをクリックします。Gift Hunt は、選択したリストから利用可能なフィールドを読み取ります。
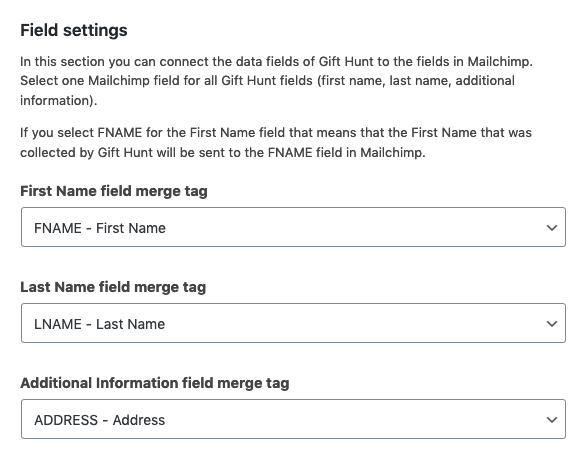
「フィールド設定」セクションでは、Gift Hunt のデータ フィールドを Mailchimp のフィールドに接続できます。Gift Hunt のすべてのフィールド (名、姓、追加情報) に対して 1 つの Mailchimp フィールドを選択します。
First Name フィールドに FNAME を選択すると、Gift Hunt によって収集された First Name が Mailchimp の FNAME フィールドに送信されます。
API キー、リスト、およびフィールドが設定されたら、設定を保存できます。 「ステータス」セクションで「アクティブ」オプションを選択して、Mailchimp 統合をオンにすることもできます。

⚠️重要
以前に収集されたユーザー情報はリストに送信されず、Mailchimp 統合を有効にした後に収集された情報のみがリストに送信されます。それ以前にユーザー情報を収集していて、リストの同期を維持したい場合は、ハンターをエクスポートし、収集したデータを Mailchimp にインポートします。
Mailchimp 統合がアクティブになると、収集されたすべての情報が Gift Hunt によって保存され、選択した Mailchimp リストにも送信されます。
設定をテストする
ライブに移行する前に、設定をテストして、すべてが正常に機能することを確認することもできます。 統合設定ページの下部に、「統合設定をテストする」ブロックがあります。 フォームにいくつかのテスト データを追加し、[Test integration] ボタンをクリックします。
使用するメール アドレスが、選択した Mailchimp オーディエンス リストにまだ追加されていないことを確認してください。追加されていない場合は、エラーが発生します。

すべてが正常に機能した場合は、成功メッセージが表示され、準備完了です。

私たちを見てみましょう ベストプラクティスガイド ギフト ハント キャンペーンの成功のために。
ゲット plugin
Gift Hunt は、Web サイトへのトラフィックを増やし、訪問者がサイトに費やす時間を増やし、潜在顧客のデータベースを拡大するのに役立ちます。
認定条件 に…
- ギフトハントをインストールする WordPress サイトで
- 創造する 初めてのギフトハント セッション
- プレビュー あなたのギフトハントセッション
- 収集したユーザー データをエクスポートする
- カスタム アイコンをアップロードする あなたのギフトハントセッションのために
- アニメーションを変更する ギフトハントのアイコン
- 位置を変更する ギフトハントのアイコン
- 別のデザインを使用する ポップアップウィンドウ用
- つながり、 あなたへのギフトハント Mailchimp アカウント
- ディスプレイ あなたのギフト ハント アイコン ショートコードで
- ポップアップでカスタム コンテンツを使用する ウィンドウを使用して入力ファイルを追加します。
- 成功メールを無効にする 誰かがデータ収集プロセスを完了した後
- ギフトアイコンを表示する ログインまたは匿名の訪問者

